Intermediate Shaft Outer Bearing R&R

ejallison1

Veteran Member
Joined
Apr 28, 2010
Location
Kansas, Illinois
TDI
98 Jetta TDI AHU, 97 Passat TDI AAZ, 04 Golf TDI PD, 01 NB TDI ALH
I am going to attempt a how to on the way I replaced the outer intermediate shaft bearing on my 97 Passat. Usual disclaimers that this is how I did it and your results may vary-proceed at own risk.


This car has 230xxx miles and not infrequently I notice that the low oil pressure light (blue flashing) is on for a few seconds after initial start-up. Am not a mechanic but have read on this forum that these bearings can be the more likely cause of low oil pressure. Oil pumps and rod bearings did not seem to be the most common culprit-these bearing did. I plan to keep this car a long time so did this as a preventative maintenance item. I do not have a mechanical oil pressure gauge on this car so I can not tell you before and after PSI-just in there already so why not do it.


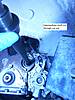
The ideal time to do this is when replacing both the clutch and timing belt-so review those how to's on tdiclub.com and/or myturbodiesel.com. I did the engine and trans mount at the same time, which is necessary to remove the trans for a new clutch-at least the way I did it. I read all the how to's on the clutch replacement and I found it more simple to remove the subframe (k-frame) in order to get the trans out for clutch replacement. I highly recommend that you both heat and PB blast the subframe bolts prior to removing. I had one bolt snap off and it was a bear getting it out. Oil pan has to come off with this method.


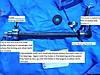
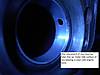
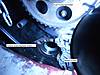
During this procedure I left the front engine mount attached-no reason just hadn't done it yet. With the trans out and the engine supported with a harbor freight lift you can lower the engine enough to pull the intermediate shaft completely out exposing the outer bearing.


ejallison1

Veteran Member
Joined
Apr 28, 2010
Location
Kansas, Illinois
TDI
98 Jetta TDI AHU, 97 Passat TDI AAZ, 04 Golf TDI PD, 01 NB TDI ALH


Used other washer/all thread set-up to tap the new bearing in. Went in fairly easy especially after getting it started. Go slow-and make sure you have the holes lined up!!


Impressions: Really don't know if this was necessary. The shaft felt much tighter after new bearing was inserted compared to the original so probably some wear after 230xxx miles. Will try to report back after finish everything up and report whether this has cured low oil pressure blue flashing light upon initial start up. When dry fitting the new bearing over the shaft on the bench was concerned I may not have the correct bearing since it seemed pretty loose. The bearing does compress as you insert it and felt tighter the original bearing.
 
Last edited:

Steve Addy

Top Post Dawg
Joined
Aug 7, 2002
Location
Iowa
TDI
97 Mk3
Nice job, good documentation. This is a bit of maintenance that we don't often talk about because access to it is a pain.

I have a couple of these bearings in my spares bin just for situations like this.

Steve
 

chrisvb

Veteran Member
Joined
Dec 7, 2011
Location
ontario
TDI
1.9 jetta
Thanks for the info , am about to do similar operation . Have you considerated installing a permanent oil presure gauge?? Real easy and i at least know what is happening?
 

Houpty GT

Veteran Member
Joined
Aug 31, 2008
Location
South Carolina
TDI
Corrado TDI, 2000 Golf, 1996 B4 Variant
I wanted to bump this thread since it is the best I have seen for the intermediate shaft. I am down to 7 psi at idle so I am going to try this tomorrow. I also want to share the JaysinSpaceman mod.
Ok, I am going to show you how I modified the ahu/1z front intermediate shaft bearing so that it shouldn't be as failure prone. Although I did get a bit carried away while doing the repairs and forgot to take pictures as it was going back together.

These next two diagrams show the Timing Belt routing for the 1.8 gasser and the ahu/1z (which bassically share the same block) and the fact that the timing belt runs on opposite sides of the intermediate shaft pulley. This rearrangement of the timing belt is the majority of the reason that this front bearing is prone to failure, it not only changes the direction that the shaft is loaded but also the direction that it turns. The thrust load of the timing belt can also be exaggerated by adding a larger injector pump head (like 11 or 12 mm) because the force required to turn the pump increases and the tension on the timing belt also increases and therefore the thrust applied to the I-shaft bearing also increases. The oil hole in this bearing was positioned in the correct place for the gasser engine(about 10 o'clock) but completely incorrectly for the TD/TDI engines.


These next two pictures are taken from above the motor looking down at the wear on the thrust side of the TDI bearing. You can see a difference in color/shine at the wear/no wear interface.


This picture is looking up from the bottom of the motor at the oil galley hole that supplies oil to the bearing. It is quite literally 180 degrees opposite of the thrust load on the tdi I-shaft, this means that not only is the T-belt thrust pushing the shaft toward the dry side of the bearing but the oil pressure coming out of the galley is also adding to that thrust force.


Here is the practice groove cut into the back side of the bad bearing that I removed and then the two new bearings with the grove cut into the front bearing. The bearing shell is only about .060" thick and since the babbitt material on the inside of the bearing is .005" or so thick the groove should only be cut .035-.040" deep and the width of the oil hole in the bearing.


This looks out of focus but it is so you can see the groove depth at the side of the bearing.


New bearings.


This is where I quit taking pictures because I was so excited to get it all back together. But it goes together just like the original except that the front bearing oil hole gets clocked down between the 4:00-5:00 mark so that the oil enters at the beginning of the thrust area and is swept under the thrust area as any plane bearing is typically installed.

Now the repair I have done here is for an engine that is not completely disassembled. If you have an engine block that you are rebuilding and is just a bare block I would perform this repair differently, I would machine this grove into the bearing bore in the block itself (1/8" deep and the same width as the oil galley hole) then using a standard bearing (without any modification) the oil hole in the bearing would be located down at the 4:00-5:00 mark.

If you have any questions feel free to ask I will answer them as best I can.

Thanx for looking,
Jaysin
Here is the link to his post. https://forums.tdiclub.com/index.ph...her-toyota-swap-but-m-tdi.358097/post-4562442
 

jdulle

Veteran Member
Joined
Feb 4, 2017
Location
Ithaca, NY
TDI
96 B4, 97 B4
I think I should do this at some point too. On my 97 the oil light flashes for several seconds before the pressure builds. I don't know if I will bother, I might just drive it and see what happens.
 

Steve Addy

Top Post Dawg
Joined
Aug 7, 2002
Location
Iowa
TDI
97 Mk3
I think I should do this at some point too. On my 97 the oil light flashes for several seconds before the pressure builds. I don't know if I will bother, I might just drive it and see what happens.
Mine maybe flashes 1.5 times at startup, not really sure how long that is in seconds.

I wouldn't hesitate to perform the service if it was necessary, I think putting money into what you know is a lot better than putting money into something you don't know.

Steve
 

jdulle

Veteran Member
Joined
Feb 4, 2017
Location
Ithaca, NY
TDI
96 B4, 97 B4
Yeah, I don't know if its necessary, it's just that the other 2 B4 tdi that I have owned the light goes out faster. You can also hear the valves clatter for the same amount of time and then the lubrication hits them.
 

Houpty GT

Veteran Member
Joined
Aug 31, 2008
Location
South Carolina
TDI
Corrado TDI, 2000 Golf, 1996 B4 Variant
My engine has low oil pressure. I was told that the inner bearing on my engine was worn because the oil pressure was much lower at the cylinder head than it was at the oil filter. I decided to take a chance and change the outer bearing since it was so commonly the problem. This would also give me a chance to inspect the inner bearing replacement if needed. The new outer bearing gave me zero improvement on oil pressure. It is possible to change the inner bearing with the engine in the car but the tools will need to be better quality than what I had and the oil pan will also need to come out. I am going to inspect the vacuum pump next, then plan on the rear bearing and inspecting the oil pump while the oil pan is off.

The outer bearing job was not too difficult. Getting tools to work is going to take most of the time. I made a puller with threaded rod and a washer with same outer diameter but a larger center bore. I then ground 2 edges of the washer so that it was oval shaped. The larger inner diameter of the washer allows me to turn it at an angle on the threaded rod. The angle and the 2 ground sides let me slip it while it is still on the threaded rod and it is able to grab the bearing when it straightens out. The washer needs to be the EXACT diameter of the bearing since the bearing is so thin. There is barely anything to hold onto and it will slip off otherwise.
The other method that works is to put a rod through the bearing at an angle and then stuff a rag around it. You can use a small punch and hammer and go side to side to tap the bearing in where the rag and rod will catch it. A pry bar can then easily pull it out perpendicular to the hole while leaving the rod in for safety.
 

Houpty GT

Veteran Member
Joined
Aug 31, 2008
Location
South Carolina
TDI
Corrado TDI, 2000 Golf, 1996 B4 Variant
I managed to install the rear intermediate shaft bearing with the engine in the car. I purchased the Lisle 18000 camshaft bearing tool. 18000 Universal Camshaft Bearing Tool | Lisle Corporation It works well with the #1 collet and the small driving washer. I recommend spending double on a good American tool rather than half on a junky Chinese tool. Why throw money away and you can always sell a good tool? If you want to go cheap, you can buy the expanding driver (Lisle 18330) and the Number 1 expanding assembly (Lisle 18020) for $23 each, add your own driving washer, and tap the cap on an iron pipe to use as a driving bar.
The bearing comes out and goes in easy. Space is tight so you have to remove and add the bearing with a magnet on a stick to get it onto the camshaft bearing tool. Do not overtighten the expanding assembly or the edges of the collet will stick out past the outer diameter of the bearing and hit the block. The major problem is seeing the hole alignment. I marked the bottom of the bearing after determining the best alignment from a visual on the side of the engine. There is no good way to see the hole completely. I can see the hole with a mirror from the vacuum pump port, but lighting is still poor. A borescope might be very useful. I plan to make a coat hanger feeler or use compressed air in the oil pump channel to confirm it is open. The JayinSpaceman mod would resolve the issue completely.
The oil channel points to the transmission.
 

garciapiano

Veteran Member
Joined
Feb 12, 2018
Location
Southern California
TDI
1997 Jetta TDI (1Z)
There's a nice video showing this procedure on Youtube.

There is a CAD file on thingiverse for a tool that you could use to knock the bearing out. You just need to have it cut out of steel plate by some company like sendcutsend.com or ponoko. The problem is they have something like a $30 minimum, although that and some threaded rod is significantly cheaper than the previous post's $300+ tool :oops:

Personally, this job looks 8 million times easier with the engine out, and you can actually do it right, maybe even evaluate other engine bearings at the same time.
 
Last edited:

Houpty GT

Veteran Member
Joined
Aug 31, 2008
Location
South Carolina
TDI
Corrado TDI, 2000 Golf, 1996 B4 Variant
You are way off price! The tool costs less than $150. Lisle 18000 Universal Camshaft Bearing Tool 1.125" to 2.69", in Case | JB Tools
Plus, I told people which Lisle parts they need to build a quality tool for $46 from Summitracing plus some iron pipe and a tap. You can't budget $30 for tools and advocate pulling the entire engine on the short road to a rebuild in the same post. This whole thread is meant to provide a reasonable alternative to a job that will create runaway costs if it is done by the mechanic's book.

The thingiverse puller plate is the same as I made of washers and described in post #9. It works well for pulling but must be the exact diameter since the bearing wall thickness is so thin. You may find it extremely difficult to try and use that to install a bearing during in-frame work.


I had excellent results with this process as I did indeed have the bearing lined up on the first shot. The Clevite SH1209s bearing provided a snug fit once it was pressed into the block. Finally, to check the alignment, I wrapped a piece of safety wire around a wooden dowl. I let 1 inch of wire stick out and I used that as a feeler from the beltside of the engine with flashlight to confirm enough of the hole was open. You could also modify this process to perfectly mark the bottom of the bearing for alignment.
I will also note that bearing depth can be set by matching it with the staining on the block from the old bearing.
 

garciapiano

Veteran Member
Joined
Feb 12, 2018
Location
Southern California
TDI
1997 Jetta TDI (1Z)
True. Some of us just love punishing ourselves and doing things by the mechanic's book. 🤦‍♂️

In other news, I ordered 7 of the above thingiverse tool and now have 6 extras sitting around. If anyone wants one, pay me $5 and I'll send it your way.
 
Top