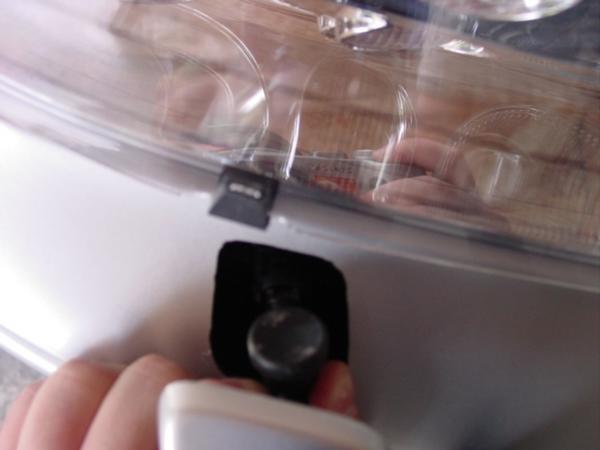
OEM HID's and Headlight Sprayers installed! *PICS

Kennedy

Veteran Member
Joined
Jul 22, 2002
Location
Fredericksburg, VA
OEM HID\'s and Headlight Sprayers installed! *PICS

Finally got my Bora HID's from Mike Zimmerman... Just installed them, and got the balls to dremel my bumper so I can wire up my headlight sprayers.


lumberjackbob

Veteran Member
Joined
May 6, 2003
Location
Sherwood, OR
TDI
2000 Getta
OEM HID\'s and Headlight Sprayers installed! *PICS

....(wiping drool from lip)....

You just had to go and post pictures didnt you? /images/graemlins/grin.gif
Very nice!
 

BAMA TDI

Veteran Member
Joined
Jul 27, 2000
Location
South Who\'lda Thought It
OEM HID\'s and Headlight Sprayers installed! *PICS

I hate you. /images/graemlins/eek.gif Nah, just kidding man. They look great Kennedy!!! /images/graemlins/cool.gif /images/graemlins/cool.gif /images/graemlins/cool.gif

Regards,
John
 

mtltdi

Veteran Member
Joined
Apr 1, 2003
Location
Canada
TDI
2003 Golf GLS, Indigo Blue
OEM HID\'s and Headlight Sprayers installed! *PICS

I'm SO jealous. Nice sprayers! /images/graemlins/tongue.gif
 

harmattan84

Active member
Joined
May 5, 2003
Location
Bay Area, CA
OEM HID\'s and Headlight Sprayers installed! *PICS

did you use the NA bumper or did you have to order the european bumper for the sprayers?!?!?


NICE CAR BTW /images/graemlins/ooo.gif /images/graemlins/ooo.gif
 

vwtdiwagon

Veteran Member
Joined
Apr 23, 2002
Location
Northern Cali
TDI
02.5 Jetta Wagon GLS TDI
OEM HID\'s and Headlight Sprayers installed! *PICS

Looks great!! Where did you get your OEM headlight protectors? Do you have a part # for them. Thanks.
 

Radeon9

Well-known member
Joined
Aug 21, 2003
Location
United States
OEM HID\'s and Headlight Sprayers installed! *PICS

Nice..very nice...How much was this whole package? and are you using a auto or manual leveling system?
 

Kennedy

Veteran Member
Joined
Jul 22, 2002
Location
Fredericksburg, VA
OEM HID\'s and Headlight Sprayers installed! *PICS

So many questions...

Harmattan, I got a used european rebar "front bumper" and the sprayer setup from Birdman (Jerry), who got it from Nathan (nbernard, europarts solution). He's a good source of parts if you can get a hold of him. I just dremmeled my US spec bumper cover using a "drill bit". Started in the middle and took my time. Came out damn near perfect.

vwtdiwagon, got the OEM headlight protectors from hillside imports for about $45. They're a VW accessory sold in Australia... don't have PN, sorry. Just order from Hillside, Dan's a great guy and will help you with anything you're working on.

Radeon, I've beed piecing this together for a while. Mike Zimmerman gave me a special price on the HIDs... I know him persoanlly (from the same town) so he sold them to me at his cost of ($980). He sells them for about $1200 - $1300 depending on the euro value. He makes about $100 per set he sells after shipping. Bets price I've found anywhere.
The used sprayer system was about $175 from Nathan. I haven't wired in the pump yet, but it'll be a snap.

As fo levelling, I'm doing the manual levelling if we can figure out if the pinout are the same for 2003 lights. Right now there's no levelling, but you don;t really need it. Most US spec cars that have HID (NIssan) don't have levelling. I plan to eventually install the auto system, but all thesensor and parts are almost ANOTHER $1000 I've heard.
 

KOMET155

Veteran Member
Joined
Oct 18, 2001
Location
Exit 9 - you from joisey?
TDI
VW komet
OEM HID\'s and Headlight Sprayers installed! *PICS

since you havent wired your pump yet, you might want to do it at the same time as manual leveling if you decide to go that route. that's what i did. that way i had the 2 wires from the pump converge with the one wire from the passenger side headlight in a conduit (with OEM "Y" connection) to go along the side of the engine bay and up into the cowl area. I then ran the drivers side range control wire in the conduit with my outside temp sensor wires in that conduit, also up into the cowl. I then connected the range control wires together and sent one through the firewall along with the hot wire from the pump. I grounded the pump under the cowl on one of the ground studs with a ring connector.

Hope that helps /images/graemlins/wink.gif
 

tongsli

Top Post Dawg
Joined
Jan 31, 2000
Location
Baltimore, MD
TDI
2000 Jetta TDI, 2004, Jetta Wagon TDI PD
OEM HID\'s and Headlight Sprayers installed! *PICS

Chris,

Make sure you use the correct repair wires, solder all your wires and cover them with shrink wrap/tubing

L
 

KOMET155

Veteran Member
Joined
Oct 18, 2001
Location
Exit 9 - you from joisey?
TDI
VW komet
OEM HID\'s and Headlight Sprayers installed! *PICS

Chris- I agree, you must not use radio shack terminal connectors, staples and scotch tape to complete this mod.

LOL.
 

Occams_Razor

Veteran Member
Joined
Jun 27, 2003
Location
Dayton, Ohio
TDI
Jetta Wagon, 2003, Reflex Silver
OEM HID\'s and Headlight Sprayers installed! *PICS

Hillside Imports has the leveling motors, OEM dual switch and the wiring diagram. The 2003 wiring is the same for the manual leveling switch. I have read that the auto leveling, for some strange reason, doesn't want to work on the 2003's. I have no idea why but I read it on the 'Tex so it must be true! /images/graemlins/laugh.gif

I just installed the MMP black-out e-codes, (with the Hillside manual leveling kit), last weekend and the headlight washers this weekend. (Mine work btw!) /images/graemlins/grin.gif

BTW Chris; The wiring info you gave me for the 192 relay isn't completly correct.

[ QUOTE ]
You'll need one 000 979 212 wire, cut it in half. That 's the wire connector you'll need. Take the other end of the wire and plug it into <font color="red">pin 5</font> of the T18a connector and run it outside the firewall to the washer pump.

[/ QUOTE ]


The wire you need for the washer motor goes to terminal 6 in the relay block not terminal 5. The MOGOLF wiring diagram correctly shows it going to terminal 6.

I was thinking about doing an install FYI on my washer installation. I took pictures as I did the install(s). Any interest? /images/graemlins/rolleyes.gif
 

Kennedy

Veteran Member
Joined
Jul 22, 2002
Location
Fredericksburg, VA
OEM HID\'s and Headlight Sprayers installed! *PICS

Occams...
Nice catch, you are correct, that was probably a typo. Power comes in from fuse box to pin 15 of T18a (relay plate, and then out pin 6 of T18a to the headlight pump.
 

Occams_Razor

Veteran Member
Joined
Jun 27, 2003
Location
Dayton, Ohio
TDI
Jetta Wagon, 2003, Reflex Silver
OEM HID\'s and Headlight Sprayers installed! *PICS

Yup!

Of course I figured this out when I was upside down under my dash! /images/graemlins/shocked.gif

BTW I have a trick to get the relay plate apart without destroying it! All you need is an AOL CD box and 5 minutes... /images/graemlins/laugh.gif
 

bigmacf1

Veteran Member
Joined
Mar 25, 2002
Location
Surrey, BC, Canada
TDI
2002 Jetta 1.8T Tiptronic sedan galactic blue
OEM HID\'s and Headlight Sprayers installed! *PICS

[ QUOTE ]
Kennedy said:
As fo levelling, I'm doing the manual levelling if we can figure out if the pinout are the same for 2003 lights. Right now there's no levelling, but you don;t really need it. Most US spec cars that have HID (NIssan) don't have levelling. I plan to eventually install the auto system, but all thesensor and parts are almost ANOTHER $1000 I've heard.


[/ QUOTE ]
This might help you....found on vwvortex.
Manual levelling wiring diagram:
Running "how-to" post on installing leveling motors on pre-2003 OEM
Auto levelling sensors:
making the auto levelers work on HID's

I am currently waiting for my front levelling sensor and connection rods. I've already installed my rear levelling sensor (have not finish the wiring yet). I am thinking about having manual and auto levelling together.
I believe the total of the sensors and mounting brackets came close to Cdn$300 from local dealership.
 

KOMET155

Veteran Member
Joined
Oct 18, 2001
Location
Exit 9 - you from joisey?
TDI
VW komet
OEM HID\'s and Headlight Sprayers installed! *PICS

Oh really? I tried the "6 small screwdriver" trick but wound up breaking 5 of the 6 locking points. good thing that frame doesnt really go anywhere with the relays attached. /images/graemlins/blush.gif
How did you do it?
[ QUOTE ]
Occams_Razor said:

BTW I have a trick to get the relay plate apart without destroying it! All you need is an AOL CD box and 5 minutes... /images/graemlins/laugh.gif

[/ QUOTE ]
 

Kennedy

Veteran Member
Joined
Jul 22, 2002
Location
Fredericksburg, VA
OEM HID\'s and Headlight Sprayers installed! *PICS

Occam, please do share...
I annhialated mine, extracted all the pins, then replaced the whole thing. I still haven't completly re seated the block fo fears I may have to that again!
 

Occams_Razor

Veteran Member
Joined
Jun 27, 2003
Location
Dayton, Ohio
TDI
Jetta Wagon, 2003, Reflex Silver
OEM HID\'s and Headlight Sprayers installed! *PICS

[ QUOTE ]
Kennedy said:
Occam, please do share...
I annhialated mine, extracted all the pins, then replaced the whole thing. I still haven't completly re seated the block fo fears I may have to that again!

[/ QUOTE ]

I got a relay block from IMPEX so I could see what I had to deal with BEFORE I got upside down under the dash.

The relay block is held together with "hooks", (for lack of a better term), on each of the four corners of the pink interior.


When you have the relay block apart you can see that the four "hooks" of the pink part are in the shape of a ramp and when you put the block together they "click" into place against cooresponding hooks on the inside of the black main relay block.


So how do you get the "hooks" to disengage so you can take the darn thing apart. Small, (jewlery), screwdrivers are a pain in the arse and are very hard to handle. /images/graemlins/confused.gif

The trick is to create a "ramp" to pull the sides of the block apart so as to allow the "hooks" to disengage. /images/graemlins/ooo.gif

I did it by taking an AOL CD box, (the plastic ones), and cutting 4 rectangles of the correct size to fit the relay box cut outs, (just measured 1/2"). To make it even easier cut the "ramps" out of the hinge side of the box. That way they will already have a bevel. /images/graemlins/cool.gif

Place the 4 "ramp/spreaders" in the slots between the black relay exterior and the pink interior the closest to the edge as you can. The bevel should be on the outside edge.


Once the ramp spreaders are in place a bit of judicious jiggling should cause the hooks to release and you can then carefully pry, (the black part is soft), the two apart. /images/graemlins/shocked.gif

When I did it in the car the ramp spreaders released the hooks and the relay block "popped" the slightest bit, enough to insert a flat blade between the two parts to separate them completly.

The relay block I got from IMPEX was a bit hard to separate but the one in the car practically fell apart in my hands with this trick. /images/graemlins/rolleyes.gif

YMMV /images/graemlins/grin.gif

Occams Razor
 
Top