Occams_Razor
Veteran Member
Hi All,
Since the only installation instructions are from Roger Moore for the Golf I deceided to post instructions specific to the Jetta.
Step 1:
Open the hood. /images/graemlins/grin.gif
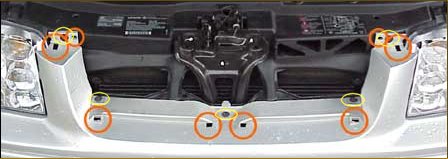
Remove the grill. The grill is held on its corners by hooks that snap into the bumper cover. The hooks go where the orange circles indicate in the following picture.

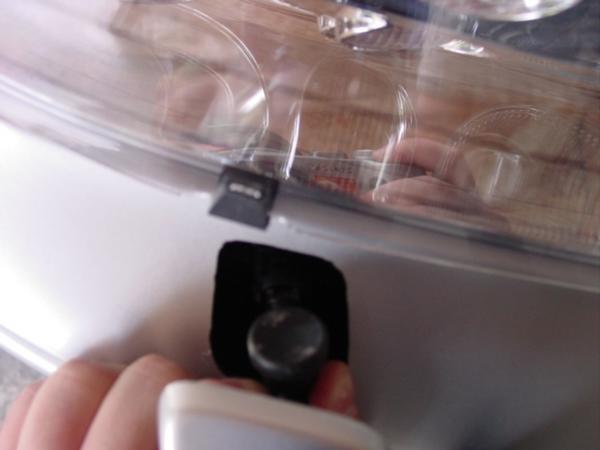
Lifting the edge of the grill will allow you to unsnap it and pull the top towards you. Don't pull too far as you still have to disconnect the hood release handle; like so:

Once the hood release handle is removed you can pull off the grill .

Now proceed to remove the bumper. The Jetta bumper is held by 4 T25 torx screws inside the frt edge of each fender well. (Don't forget to remove the side markers! Push in on the frt edge until it goes into the bumper and pull the rear edge off. No need to pry!)

5 T30 torx bolts are located underneath the grill.
2 T30 torx bolts inside the bumper air intakes. Sorry no picture. To take the plastic intake covers off just pinch on the two slots on each end. You'll figure it out! /images/graemlins/laugh.gif
Once all the bumper bolts are off you can pull the bumper to the frt and off. Make sure to place it on something soft, especially the pointed corners at the rear, to avoid scratching the paint. Don't ask how I know this... /images/graemlins/rolleyes.gif
You should now have this staring at you:

Here is the headlight washer kit; Hella Golf IV headlamp washer retrofit kit #8WS 008 558-001,(Yes you need the Golf IV kit. Hella does not make a kit specifically for the Jetta/Bora.), that Chad is procuring from Germany.
Everything in the picture is included except for relay 192, (if you are going to ever use the rain sensor gizmo in your windshield), or relay 603, (4B0 955 531 E relay with headlight washers but no rain sensor gizmo), the Bora washer nozzles and the Bora washer nozzle covers. The kit includes the washer nozzles and covers from a Golf which do not work with the Jetta bumper.

Just to clarify. To complete the kit for a Jetta you will need in ADDITION TO THE KIT the following parts from Germany, (unless John at IMPEX relents and deciedes to bring some in. Last time I asked they said the part numbers was obsolete! /images/graemlins/mad.gif):
1J5 955 109A Bora Headlight Washer Cover, Left
1J5 955 110A Bora Headlight Washer Cover, Right
1J5 955 103 Bora Headlight Washer Jet Carrier w/ Jet, Left
1J5 955 104 Bora Headlight Washer Jet Carrier w/ Jet, Right
If you want to wire the kit the same as the factory installation, (Downside of the hella retrofit kit is that your headlights get sprayed everytime you clean your windshield. The OEM install only sprays your headlights when the lights are ON and every 4th time you squirt the windshield. The Hella way, everytime, you'll go through fluid like crazy.).
You will also need to replace the stock windshield wiper relay, (usually Relay 377), with:
1J0 955 531 "Relay 192", (if you have any plans to use the rain sensor gizmo with your windshield. If you don't have the rain sensor you will lose the intermittant function of your wipers with the "192" relay.), or;
4B0 955 531 E "Relay 603", (this relay is the one for headlight washers with no rain sensor.)
Now we come to the biggest headache. I have confirmed that you do need a euro rebar, (even if you have a wagon), unless you can get a used one from a US MY2001 Jetta wagon. (I have a 2003 wagon and it has the same rebar as the sedan.. Made in Mexico no less!) The Euro Rebar is needed to mount the washer assemblies.

Correct Part Number for the Euro Rebar = 1J0 805 551 <font color="red">E</font>
NOTE: It seems that the VW warehouse has the C rebar, (US), as the replacement for the E euro rebar in their computer and it doesn't matter what number you order you will be getting the C if you are in the US.
John at IMPEX will be trying to get some of the correct ones from Germany but it might take awhile. If you are interested let IMPEX know that you want the E rebar with the headlight washer mounts because if you order it from the web form it will default to what VW says and you will receive the wrong one! (Don't ask me how I know this..) /images/graemlins/mad.gif
You DO NOT need the Euro bumper cover for the Jetta/Bora. The front bumper covers are almost identical. The only difference is that the euro bumper cover has a set of dimples on the inside face to help guide where you need to cut the hole for the nozzles. The US bumper does not have the dimples. (Unless you have a wagon like mine, (made in Germany), that contrary to popular believe DID have the dimples!).
ETKA actually tells you that if you need the euro cover for a car with headlight washers it will need to be shop modified, hence the dimples.
Remove your headlamp assemblies. 4 T25 torx screws.
Siphon the fluid out of the 3 ltr. reservoir using the long supplied hole in the kit into a clean container.
Remove the stock 3 ltr. reservior. Remove the tank by loosening up 2 10mm nuts and one 10mm screw. It is held with a plastic nut found behind the bottle bolted to the fender and right in front of the bottle on the plate above the intercooler.
Disconnect the pump wire and fluid level sensor wire. If you have a wagon you will also find some cool little disconnects for the water hoses that go back to the tail gate.
Prepare the new tank.
Install the filter in the neck and cap;
Install the headlight washer pump with the new grommet from the kit in the frt hole of the bottle;
Install the old pump using the old grommet in the back hole of the bottle;
If your tank has the level sensor hole install the old level sensor using the old grommet.
If your tank, (like mine), doesn't have the hole for the level sensor don't despair! A hole can be drilled in the tank without too much trouble using a 1" Forstner Bit.

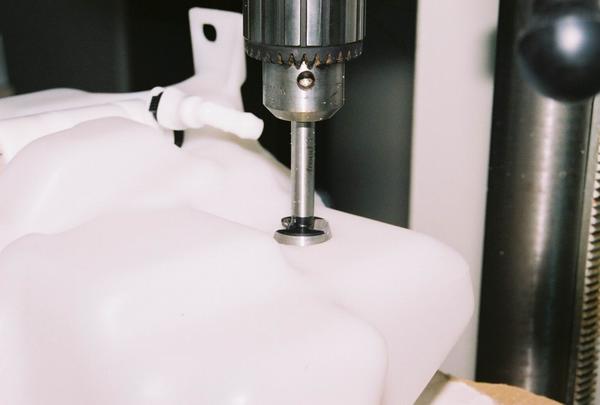

NOTE: When you drill the hole, (best done on a drill press after measuring 27 times to make sure you have it in the exact same relative position as the original bottle), you may find that the sensor fits in very tightly or doesn't want to go in at all. DO NOT SAND THE HOLE TO MAKE IT BIGGER! The reason it is not going in correctly is because the hole has a ridge formed on the inside from the drilling. Take a knife and scrape the ridge off and the sensor should fit in nice and snug and not leak. (Or you can do what I did. Sand it with a drum in the drill press. Make it oversize and have to use epoxy to help the grommet seal after all the water leaked out after installing the darn thing!) /images/graemlins/rolleyes.gif
Once the bottle is ready you have to do what SVTWEB best described as "Stuffing 150 pds of sh*t into a 50 pd bag" or words to that effect. (Actually Eric is wrong. It is more like having to stuff 200 pds of sh*t into a 25 pd bag but I digress.) /images/graemlins/rolleyes.gif
To make this part easier, (and so you can learn from my mistakes), I suggest you:
1) Remove the fuel filter, (you don't have to disconnect it. Unbolt it and lift it out of the way.),
2) Remove the upper and lower intercooler hoses and the intercooler.
3) Remove the wire loom guide/support from the right side, (looking from above), of the ledge where the washer bottle will now live. The new bottle is bigger in that area and the loom guide/support interferes.
Once you have those parts off it is still a pain but at least you will be able to make yourself believe that their actually is enough room to install the !@#$%^&* bottle.
Once the bottle is installed connect everthing back in the reverse of the removal. /images/graemlins/grin.gif
It should look like this when you are done:


Once the bottle is installed you can proceed to the removal of your US rebar and replacement with the "correct" Euro rebar.
I think there are 2 bolts on the ends and various torx bolts/screws on the bottom and in the middle. (Didn't take a picture so I can't remember exactly.)
It has been brought to my attention that the support for the lock carrier is different to correctly support the euro rebar. The correct part number for the support for the lock carrier is 1J0 805 567.
(I didn't bother getting the new lock carrier support so didn't originally give the part number.)
For some strange reason IMPEX shows 1J0 805 567 as being equivalant to 1J0 805 567 B, (which is the US lock carrier support), with 2 different prices. I think it is the same situation as the euro rebar. VWOA is crossindexing the euro number to its american counterpart. Buyer beware!
Once the Euro rebar is installed install the washer pumps.
They are left and right, (and are marked as such on the body of the pump), so don't mix them up!

BTW The bottom of the pumps rotate so don't freak out if the outlets aren't pointing where they should. /images/graemlins/eek.gif You can turn them to the correct orientation. /images/graemlins/grin.gif
With the nozzles installed it is all a matter of running the hose to each nozzle. It should look like this when done.
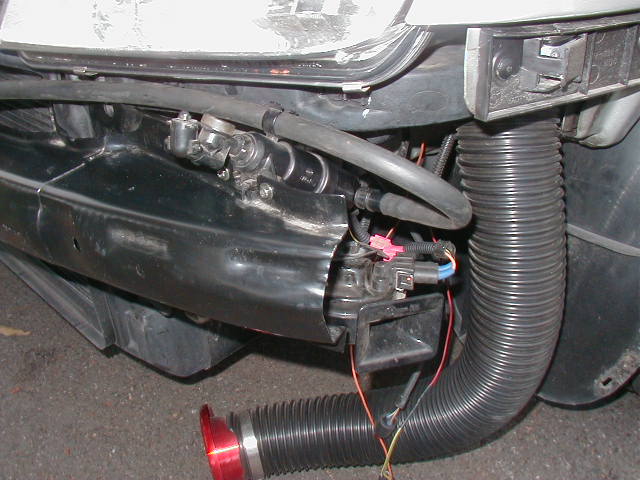
and

The rest of the installation is the cutting of the bumper but I don't have any pictures.
My bumper, (2003 wagon), had the dimples on the bottom edge so I connected the dots with a Sharpie and then I used a 1 3/8" Forsnter bit to drill out the initial hole and then used the Roger Moore drill method to open the oval up. I connected the drill holes with a cut off wheel in a Dremel and then I used a 1" sanding drum, by hand, to get the final shape.
Make sure you sand a little and measure the fit of the washer covers as you go until they just fit. They should fit without too much side to side clearance so they will always fall back to the same place after spraying your headlights.
Once the cutting is done the installation of the bumper and grill is the reverse of the removal! /images/graemlins/grin.gif
NOTE: The Euro rebar DOES NOT USE THE FOAM from the US rebar. It doesn't fit and the Euro cars don't use foam at all. Nyet, Nine, Nada, Nothing as SVTWEB would say.
If you are going to use the Hella wiring please go to Roger Moores explanation for details. My kit did not contain the instructions and I didn't use the Hella wiring anyway..
I wired my washers with Chris Kennedys instructions except for one minor detail that I have corrected here:
[ QUOTE ]
Now how to wire it in:
Wires you'll need;
(1) 000 979 133 (A)
(1) 000 979 212
(1) 000 979 225 (A)
Some 2.5mm wire (14 gauge?)
You can download the wiring diagrams for the headlight washer system here:
http://pics.tdiclub.com/members/Kennedy/headlamp_washer.pdf
As you can see, you only need to run 3 wires.
You'll need to run a 000 979 133 from pin 11 of T/17 (headlight switch to pin 9 of T18a connector (it's that relay plate the control module plugs into).
Run on wire from a switched/fused power soure (fuse 33 in the fuse box to be correct) to pin 15 of the T18a connector. You'll need one 000 979 212 wire, cut it in half. That 's the wire connector you'll need. Take the other end of the wire and plug it into pin <font color="red"> 6 </font> of the T18a connector and run it outside the firewall to the washer pump. Get a 000 979 225 wire and cut it half. Splice a one half into the wire coming from the firewall and plug it the #2 pin on the pump connector. Take the other half of the 000 979 225, plug it into pin one of the pump connector and run it to ground.
The hardest part of this whole process is taking apart the T18a relay plate. I destroyed mine removing the "pink block" for the back. Once destroyed, you can order another, seperate the pink block with great care, extract the existing wires from the destroyed connector and put them in the new connector. It's a real PIA, but I'm anal about my wiring and sticking to OEM convention.
PN for the T18a relay plate: 4A0937529
Also, little hint... While you have the relay plate apart plug a wire into pin 10 and 14 before you put the pink block back together. This way you won't have to break the thing again should you ever decide to do the rain sensor/antidazzle mirror. That's where the rain sensor gets connects.
[/ QUOTE ]
The relay plate is the hardest part but using an AOL CD box you can get around the frustration of destroying it and having to buy a new one.
The explanation on what you need to do is here:
Relay Plate Seperation
Once all is said and done the installation looks and works very well and isn't extremly hard to do.
I am sorry I don't have a picture of the washers at work but I can tell you they look dang cool when they do! /images/graemlins/cool.gif
BTW Most of the pictures are mine but I did "borrow" some of Litos since my digital camera "ate" the ones I took.
Have fun! /images/graemlins/grin.gif
Since the only installation instructions are from Roger Moore for the Golf I deceided to post instructions specific to the Jetta.
Step 1:
Open the hood. /images/graemlins/grin.gif
Remove the grill. The grill is held on its corners by hooks that snap into the bumper cover. The hooks go where the orange circles indicate in the following picture.
Lifting the edge of the grill will allow you to unsnap it and pull the top towards you. Don't pull too far as you still have to disconnect the hood release handle; like so:
Once the hood release handle is removed you can pull off the grill .
Now proceed to remove the bumper. The Jetta bumper is held by 4 T25 torx screws inside the frt edge of each fender well. (Don't forget to remove the side markers! Push in on the frt edge until it goes into the bumper and pull the rear edge off. No need to pry!)
5 T30 torx bolts are located underneath the grill.
2 T30 torx bolts inside the bumper air intakes. Sorry no picture. To take the plastic intake covers off just pinch on the two slots on each end. You'll figure it out! /images/graemlins/laugh.gif
Once all the bumper bolts are off you can pull the bumper to the frt and off. Make sure to place it on something soft, especially the pointed corners at the rear, to avoid scratching the paint. Don't ask how I know this... /images/graemlins/rolleyes.gif
You should now have this staring at you:
Here is the headlight washer kit; Hella Golf IV headlamp washer retrofit kit #8WS 008 558-001,(Yes you need the Golf IV kit. Hella does not make a kit specifically for the Jetta/Bora.), that Chad is procuring from Germany.
Everything in the picture is included except for relay 192, (if you are going to ever use the rain sensor gizmo in your windshield), or relay 603, (4B0 955 531 E relay with headlight washers but no rain sensor gizmo), the Bora washer nozzles and the Bora washer nozzle covers. The kit includes the washer nozzles and covers from a Golf which do not work with the Jetta bumper.
Just to clarify. To complete the kit for a Jetta you will need in ADDITION TO THE KIT the following parts from Germany, (unless John at IMPEX relents and deciedes to bring some in. Last time I asked they said the part numbers was obsolete! /images/graemlins/mad.gif):
1J5 955 109A Bora Headlight Washer Cover, Left
1J5 955 110A Bora Headlight Washer Cover, Right
1J5 955 103 Bora Headlight Washer Jet Carrier w/ Jet, Left
1J5 955 104 Bora Headlight Washer Jet Carrier w/ Jet, Right
If you want to wire the kit the same as the factory installation, (Downside of the hella retrofit kit is that your headlights get sprayed everytime you clean your windshield. The OEM install only sprays your headlights when the lights are ON and every 4th time you squirt the windshield. The Hella way, everytime, you'll go through fluid like crazy.).
You will also need to replace the stock windshield wiper relay, (usually Relay 377), with:
1J0 955 531 "Relay 192", (if you have any plans to use the rain sensor gizmo with your windshield. If you don't have the rain sensor you will lose the intermittant function of your wipers with the "192" relay.), or;
4B0 955 531 E "Relay 603", (this relay is the one for headlight washers with no rain sensor.)
Now we come to the biggest headache. I have confirmed that you do need a euro rebar, (even if you have a wagon), unless you can get a used one from a US MY2001 Jetta wagon. (I have a 2003 wagon and it has the same rebar as the sedan.. Made in Mexico no less!) The Euro Rebar is needed to mount the washer assemblies.
Correct Part Number for the Euro Rebar = 1J0 805 551 <font color="red">E</font>
NOTE: It seems that the VW warehouse has the C rebar, (US), as the replacement for the E euro rebar in their computer and it doesn't matter what number you order you will be getting the C if you are in the US.
John at IMPEX will be trying to get some of the correct ones from Germany but it might take awhile. If you are interested let IMPEX know that you want the E rebar with the headlight washer mounts because if you order it from the web form it will default to what VW says and you will receive the wrong one! (Don't ask me how I know this..) /images/graemlins/mad.gif
You DO NOT need the Euro bumper cover for the Jetta/Bora. The front bumper covers are almost identical. The only difference is that the euro bumper cover has a set of dimples on the inside face to help guide where you need to cut the hole for the nozzles. The US bumper does not have the dimples. (Unless you have a wagon like mine, (made in Germany), that contrary to popular believe DID have the dimples!).
ETKA actually tells you that if you need the euro cover for a car with headlight washers it will need to be shop modified, hence the dimples.
Remove your headlamp assemblies. 4 T25 torx screws.
Siphon the fluid out of the 3 ltr. reservoir using the long supplied hole in the kit into a clean container.
Remove the stock 3 ltr. reservior. Remove the tank by loosening up 2 10mm nuts and one 10mm screw. It is held with a plastic nut found behind the bottle bolted to the fender and right in front of the bottle on the plate above the intercooler.
Disconnect the pump wire and fluid level sensor wire. If you have a wagon you will also find some cool little disconnects for the water hoses that go back to the tail gate.
Prepare the new tank.
Install the filter in the neck and cap;
Install the headlight washer pump with the new grommet from the kit in the frt hole of the bottle;
Install the old pump using the old grommet in the back hole of the bottle;
If your tank has the level sensor hole install the old level sensor using the old grommet.
If your tank, (like mine), doesn't have the hole for the level sensor don't despair! A hole can be drilled in the tank without too much trouble using a 1" Forstner Bit.
NOTE: When you drill the hole, (best done on a drill press after measuring 27 times to make sure you have it in the exact same relative position as the original bottle), you may find that the sensor fits in very tightly or doesn't want to go in at all. DO NOT SAND THE HOLE TO MAKE IT BIGGER! The reason it is not going in correctly is because the hole has a ridge formed on the inside from the drilling. Take a knife and scrape the ridge off and the sensor should fit in nice and snug and not leak. (Or you can do what I did. Sand it with a drum in the drill press. Make it oversize and have to use epoxy to help the grommet seal after all the water leaked out after installing the darn thing!) /images/graemlins/rolleyes.gif
Once the bottle is ready you have to do what SVTWEB best described as "Stuffing 150 pds of sh*t into a 50 pd bag" or words to that effect. (Actually Eric is wrong. It is more like having to stuff 200 pds of sh*t into a 25 pd bag but I digress.) /images/graemlins/rolleyes.gif
To make this part easier, (and so you can learn from my mistakes), I suggest you:
1) Remove the fuel filter, (you don't have to disconnect it. Unbolt it and lift it out of the way.),
2) Remove the upper and lower intercooler hoses and the intercooler.
3) Remove the wire loom guide/support from the right side, (looking from above), of the ledge where the washer bottle will now live. The new bottle is bigger in that area and the loom guide/support interferes.
Once you have those parts off it is still a pain but at least you will be able to make yourself believe that their actually is enough room to install the !@#$%^&* bottle.
Once the bottle is installed connect everthing back in the reverse of the removal. /images/graemlins/grin.gif
It should look like this when you are done:
Once the bottle is installed you can proceed to the removal of your US rebar and replacement with the "correct" Euro rebar.
I think there are 2 bolts on the ends and various torx bolts/screws on the bottom and in the middle. (Didn't take a picture so I can't remember exactly.)
It has been brought to my attention that the support for the lock carrier is different to correctly support the euro rebar. The correct part number for the support for the lock carrier is 1J0 805 567.
(I didn't bother getting the new lock carrier support so didn't originally give the part number.)
For some strange reason IMPEX shows 1J0 805 567 as being equivalant to 1J0 805 567 B, (which is the US lock carrier support), with 2 different prices. I think it is the same situation as the euro rebar. VWOA is crossindexing the euro number to its american counterpart. Buyer beware!
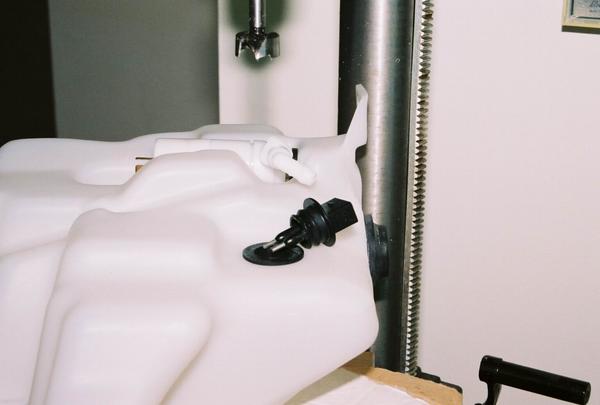
Once the Euro rebar is installed install the washer pumps.
They are left and right, (and are marked as such on the body of the pump), so don't mix them up!
BTW The bottom of the pumps rotate so don't freak out if the outlets aren't pointing where they should. /images/graemlins/eek.gif You can turn them to the correct orientation. /images/graemlins/grin.gif
With the nozzles installed it is all a matter of running the hose to each nozzle. It should look like this when done.
and
The rest of the installation is the cutting of the bumper but I don't have any pictures.
My bumper, (2003 wagon), had the dimples on the bottom edge so I connected the dots with a Sharpie and then I used a 1 3/8" Forsnter bit to drill out the initial hole and then used the Roger Moore drill method to open the oval up. I connected the drill holes with a cut off wheel in a Dremel and then I used a 1" sanding drum, by hand, to get the final shape.
Make sure you sand a little and measure the fit of the washer covers as you go until they just fit. They should fit without too much side to side clearance so they will always fall back to the same place after spraying your headlights.
Once the cutting is done the installation of the bumper and grill is the reverse of the removal! /images/graemlins/grin.gif
NOTE: The Euro rebar DOES NOT USE THE FOAM from the US rebar. It doesn't fit and the Euro cars don't use foam at all. Nyet, Nine, Nada, Nothing as SVTWEB would say.
If you are going to use the Hella wiring please go to Roger Moores explanation for details. My kit did not contain the instructions and I didn't use the Hella wiring anyway..
I wired my washers with Chris Kennedys instructions except for one minor detail that I have corrected here:
[ QUOTE ]
Now how to wire it in:
Wires you'll need;
(1) 000 979 133 (A)
(1) 000 979 212
(1) 000 979 225 (A)
Some 2.5mm wire (14 gauge?)
You can download the wiring diagrams for the headlight washer system here:
http://pics.tdiclub.com/members/Kennedy/headlamp_washer.pdf
As you can see, you only need to run 3 wires.
You'll need to run a 000 979 133 from pin 11 of T/17 (headlight switch to pin 9 of T18a connector (it's that relay plate the control module plugs into).
Run on wire from a switched/fused power soure (fuse 33 in the fuse box to be correct) to pin 15 of the T18a connector. You'll need one 000 979 212 wire, cut it in half. That 's the wire connector you'll need. Take the other end of the wire and plug it into pin <font color="red"> 6 </font> of the T18a connector and run it outside the firewall to the washer pump. Get a 000 979 225 wire and cut it half. Splice a one half into the wire coming from the firewall and plug it the #2 pin on the pump connector. Take the other half of the 000 979 225, plug it into pin one of the pump connector and run it to ground.
The hardest part of this whole process is taking apart the T18a relay plate. I destroyed mine removing the "pink block" for the back. Once destroyed, you can order another, seperate the pink block with great care, extract the existing wires from the destroyed connector and put them in the new connector. It's a real PIA, but I'm anal about my wiring and sticking to OEM convention.
PN for the T18a relay plate: 4A0937529
Also, little hint... While you have the relay plate apart plug a wire into pin 10 and 14 before you put the pink block back together. This way you won't have to break the thing again should you ever decide to do the rain sensor/antidazzle mirror. That's where the rain sensor gets connects.
[/ QUOTE ]
The relay plate is the hardest part but using an AOL CD box you can get around the frustration of destroying it and having to buy a new one.
The explanation on what you need to do is here:
Relay Plate Seperation
Once all is said and done the installation looks and works very well and isn't extremly hard to do.
I am sorry I don't have a picture of the washers at work but I can tell you they look dang cool when they do! /images/graemlins/cool.gif
BTW Most of the pictures are mine but I did "borrow" some of Litos since my digital camera "ate" the ones I took.
Have fun! /images/graemlins/grin.gif