ALH TDI engine transplant into '84 Vanagon

AndyBees

Top Post Dawg
Joined
May 27, 2003
Location
Southeast Kentucky
TDI
Silver 2003 Jetta TDI, Silver 2000 Jetta TDI (sold), '84 Vanagon with '02 ALH engine
InterCooler fan

Item 8. Replaced the InterCooler blower fan with a bottom mounted puller fan.....Done!


Below, is a "before" pic showing the top mounted blower fan. The pic is from inside the engine bay looking toward the left rear corner of the Vanagon. The assembly is behind plexi-glass... You can see to the left that the tail light assembly has been removed.. (Check out the modified EGR assembly. I used the valve stem hole as a place to tap for boost gauge piping.) [this and simliar pics are in previous posts]


Below, is a pic of the same area after removing the blower fan.


Below, is a shot looking thru the left tail light hole. The four studs were fabricated from aluminum bolts and welded to the InterCooler. They were made extra long to mount the "blower" fan. The spacers are 1/2 copper plumbing pipe ...... just left it as is! The demensions of the IC are roughly the same as an OE IC on an ALH Jetta/Golf/NB. That info was posted much earlier in this Thread.


Below, is a pic of the bottom side "before" installing the puller fan.


Below, is a pic with the puller fan installed. This fan seems to "move" more air and is much quieter. Yeah, I used some silicone chalk to close any perimeter holes.


Below, is a pic of the puller fan without the shield installed.


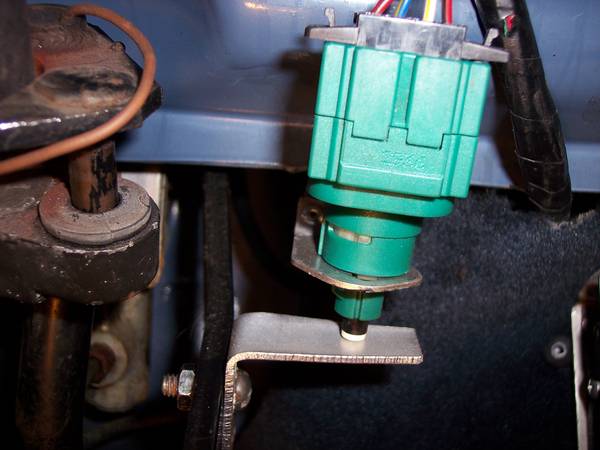
There was a very small oil leak from the sensor. So, while I had the IC out, I gave it a good pressure wash, inside and out. I used new O-rings and oil pan glue to make sure that it doesn't leak.:D

EDIT: As you can see, the left rear corner of the Vanagon, down low, got whacked some time ago. The view is really not bad looking from a standing position.
 
Last edited:

AndyBees

Top Post Dawg
Joined
May 27, 2003
Location
Southeast Kentucky
TDI
Silver 2003 Jetta TDI, Silver 2000 Jetta TDI (sold), '84 Vanagon with '02 ALH engine
Item #5 & #6.

The Vanagon Dash has been removed ......... cleaned ventilation box, replaced the flapper seals, etc., as well as cleaned the general area where the box bolts up.

Below are various pics of the work. I hope to complete the job tomorrow.

Pics without any comments.....


Opps, one comment ...... below, you can see where the fan motor sit there in the center. The top of the Ventilation Box has been removed. In this pic, the Box is twisted off center and tilted forward. The heater core is barely visible in front of the box ....better veiw in next pic..:D


Okay, I got a message from my vendor that the new [used] axles have been shipped.

Wow! I've given second thoughts about pulling the tranny to have the flywheel milled. Seems it did real well when I test drove for the oil pan.
 

markward

Veteran Member
Joined
Jul 5, 2007
Location
Loxahatchee, Florida
TDI
82 Vanagon and 2011 JSW
Andy, the pan looks really nice. How did he fabricate the flange? We just got back from our annual road trip. No problems to report. I did determine that my stock odometer is loosing about a 1/10 of a mile over 4 miles indicated or there abouts. My dog and wife kept knocking the plug out for the GPS each time I tried to do a 100 mile run for comparison. Good news is I may actually be getting over 30 mpg average on long road trips. It always seemed to work out to 29. something. It was killing me not to hit 30.

I am curious what your IAT reads on the scan gauge vs ambient. I am still not running a fan on the intercooler and under most load conditions no more than 30F over ambient. markw
 

AndyBees

Top Post Dawg
Joined
May 27, 2003
Location
Southeast Kentucky
TDI
Silver 2003 Jetta TDI, Silver 2000 Jetta TDI (sold), '84 Vanagon with '02 ALH engine
The oil pan flange is 3/8 inch mild steel. He welded together four pieces of metal. The welder has a plasma cutter. He used a grinder to provide the final tweaks to it's shape. It was perfectly flat laying on his big steel shop table. Also, even though he had a TDI block and diesel bell housing bolted up to use as a guide, I had to grind off a few places a little to make it fit. Also, I had to loosen the AC compressor to allow more room about installing the pan.... works great though.

Yeah, I've always used a modified formula in my Excel spreadsheet to account for Odometer fluctuations. Seems new tires are not all the same and affect the odometer.

Well, today, I finally got the clutch master cylinder. So, hopefully before the week is out I can re-install the dash. I plan to lube the clutch and brake pedals while I am at this point. They do tend to be slow occasionally about rebounding. Also, my clutch switch needs to be tweaked so it will cut the Cruise out immediately! .....right now, if I push-in the clutch pedal to kick-out the cruise control the engine revs up pretty high...... just an adjustment thingy.

My IAT reads as much as 30F above ambient during long hill climbs. I think the puller fan set-up will be an improvement......1. more air flow, 2. quieter operation compared to the other fan, and 3. since it is a puller, there will not be any reflective hot air as with the blower set-up! Based on ScanGauge, seems the temp sensor kicks-on at about 118F and off at about 90F. So, on a 90+ day, the fan will run continously! I have an amber LED on the dash that let's me know the fan is on! I also have a manual toggle switch for the fan.

Also, I have my new axles (good cleaned and painted used), CV Joints and CV Boots ready to install.

Grease for the CV Joints ............. any suggestions? These are brand new Lobo joints and boots!

Right now, I'm up over my head with the house rehab project, among other things.

Yep, looks like no Alaska trip this summer.

I'm hoping to head down to Midlands Bio-fuels GTG on June 8th at Winnsboro, SC. And, we plan to head up to Maine for the TDI Fest Labor Day Weekend!

Lastly, I've almost decided on which sound deadening material to use........ just haven't placed the order yet!
 
Last edited:

markd89

Veteran Member
Joined
Oct 21, 2009
Location
Los Angeles
TDI
1978 VW Bus 1Z TDI
My IAT reads as much as 30F above ambient during long hill climbs. I think the puller fan set-up will be an improvement......1. more air flow, 2. quieter operation compared to the other fan, and 3. since it is a puller, there will not be any reflective hot air as with the blower set-up! Based on ScanGauge, seems the temp sensor kicks-on at about 118F and off at about 90F. So, on a 90+ day, the fan will run continously! I have an amber LED on the dash that let's me know the fan is on! I also have a manual toggle switch for the fan.
Very interesting. I haven't driven my bus for a few weeks as have been out of town, but recall IATs were WAY more than 30*F above ambient. I am running the 1Z stock Turbo, 1019 injectors and a Malone tune between stage 1 and stage 2. Of course, only the first item effects IAT, the rest EGT. I have a pusher fan running full-time. I'll study your setup some more and try to figure out why its so much better. I had thought about an air-water setup but don't want the complexity. I just decided to drive a little slower up hills and not worry :) Mark
 

markward

Veteran Member
Joined
Jul 5, 2007
Location
Loxahatchee, Florida
TDI
82 Vanagon and 2011 JSW
Mark, I have seen as high as 200 F on my IAT during an extreme load on a hot day going up a mountain, but that is very rare, but for most regular conditions, I see 30 F like Andy, but with no fan. I also do not monitor EGT or boost. I'll get around to that one day.

My thinking is that when the IAT is going up, that is input for the ECU. The ECU must think, "what is going on here?" and do some sort of compensation. Otherwise what would be the point of continually monitoring IAT? My guess is the engine compartment temp must be at least 30F about ambient running down the highway, so I don't feel similar IAT is the end of the world.

Where do you measure your temp? My IAT is in a tube independent of the intake manifold. It is actually in the plumbing between the intake and the cooler. I had considered mounting the IAT sensor directly on the intake manifold, but was concerned that heat soak from the engine temp would affect the temp the IAT sensor was seeing. markw
 

AndyBees

Top Post Dawg
Joined
May 27, 2003
Location
Southeast Kentucky
TDI
Silver 2003 Jetta TDI, Silver 2000 Jetta TDI (sold), '84 Vanagon with '02 ALH engine
Well, the 30F degree above ambient is in the ball park. It may have been as much as 40 degrees ......... I just cannot remember what the difference was last summer when I drove it to Ypsilanta, Michigan when ambient was 90F and above.... could have been running close to 130F (40F above). But, I do not remember it being of a concern to me.

If you notice, my "cooling" air pretty much all comes down the side shoot rather than from the engine compartment. I have a piece of plexiglas with insulation around the perimeter to keep out the hot engine bay air.

My sensor is located on the exit side of the IC near the out pipe.

I've read that water-to-air can be a heat soak nightmare under certain conditions.

Running cruise on the Interstate, on some hills the boost gauge shows about 16-17psi actual. It's an India made VDO mechanical gauge. Using the MAP reading from ScangeGauge and then subtracting about 14psi, the VDO gauge seems to be about right!

My EGT sensor is not in a good location. I'm using the EGR exhaust port on the manifold which doesn't put the sensor directly in the flame. However, I've never seen over 575F. I may go ahead and modified the EGR port so the sensor will be in the flame. My coolant Temp aspect of the dual gauge (EGT & Coolant Temp) doesn't work properly. The instructions were generic and McNally hasn't been helpful at all. They have not been able to tell me which of the PIN recepticals to plug the sensor wire into. So, that aspect of my gauge is useless at this point.
 

markd89

Veteran Member
Joined
Oct 21, 2009
Location
Los Angeles
TDI
1978 VW Bus 1Z TDI
My guess is the engine compartment temp must be at least 30F about ambient running down the highway, so I don't feel similar IAT is the end of the world.

Where do you measure your temp? My IAT is in a tube independent of the intake manifold. It is actually in the plumbing between the intake and the cooler. I had considered mounting the IAT sensor directly on the intake manifold, but was concerned that heat soak from the engine temp would affect the temp the IAT sensor was seeing. markw
The Intake air is influenced by the air temp in the engine bay but IMO the caused would be ranked by:

1. Boost. Twice the air in the same volume is twice the heat. My physics here may not be right on, but that's not too far off.

2. Heat from the exhaust which has heated the turbo and in-turn the intake air.

3. Probably 3 - air around the air filter is warmer than cold air.

My IAT is measured in the tube which leads to the intake manifold which is a stock-ish position. It sounds like your setup is similar.

I know lower IAT's are better for power but ultimate power is not my goal. I've kind of accepted my high IATs and keep an mainly eye on EGTs when doing a hill run. More to say on EGT's but will put them in the reply to Andy's message.

Mark
 

markd89

Veteran Member
Joined
Oct 21, 2009
Location
Los Angeles
TDI
1978 VW Bus 1Z TDI
If you notice, my "cooling" air pretty much all comes down the side shoot rather than from the engine compartment. I have a piece of plexiglas with insulation around the perimeter to keep out the hot engine bay air.

My sensor is located on the exit side of the IC near the out pipe.

I've read that water-to-air can be a heat soak nightmare under certain conditions.

Running cruise on the Interstate, on some hills the boost gauge shows about 16-17psi actual. It's an India made VDO mechanical gauge. Using the MAP reading from ScangeGauge and then subtracting about 14psi, the VDO gauge seems to be about right!

My EGT sensor is not in a good location. I'm using the EGR exhaust port on the manifold which doesn't put the sensor directly in the flame. However, I've never seen over 575F. I may go ahead and modified the EGR port so the sensor will be in the flame. My coolant Temp aspect of the dual gauge (EGT & Coolant Temp) doesn't work properly. The instructions were generic and McNally hasn't been helpful at all. They have not been able to tell me which of the PIN recepticals to plug the sensor wire into. So, that aspect of my gauge is useless at this point.
The plexiglass part sounds like a useful improvement. I could definitely use something to stay more isolated from the engine bay.

I agree on the air-water concerns. It is possible to do it nicely but you have to have a good radiator and pump and tubing flowing enough volume. There were some people on the Vanagon TDI list who reported really nice results, but it is a bunch more complexity.

I think having a good EGT measurement is pretty important unless you're running stock fueling and taking it easy on hills. It was easy to do with the exhaust manifold off.

My concern is not about melting the turbo, although I'd like to avoid that but moreso in not melting the pistons. I've had people tell me that 1500F sustained is safe but I just don't believe it enough to try it. 1500F in a car doing a mile run or something is different than a heavy van going up hill for 10 miles or more.

For me, I slow down on hills and keep it maybe 1200F. On flat ground, I can go 75ish at 900F or less. I don't drive over 75 mph much - it's too hairy ;-)

Mark
 

markd89

Veteran Member
Joined
Oct 21, 2009
Location
Los Angeles
TDI
1978 VW Bus 1Z TDI
Ask Fix until Broke what you get when you run sustained high EGT's. (hint, the result in his case was a cracked piston from excessive thermal loading)
That's exactly what I am afraid of. I read through the first 10 pages of the thread but there does not seem to be a consensus on safe/not safe EGTs for avoiding Fix until Broke's adventure. Malone told me 1500F or something was safe and I let it get there for 1/2 second very occasionally.

Does anyone have any firm data on what is safe for internals for say 1 hr continuous?
 

greengeeker

Vendor
Joined
Feb 8, 2006
Location
Cambridge, MN
TDI
2002 Jetta GLS
Unfortunately, I don't. I've been looking for an answer to that question for my Ranger build and haven't found one yet. I think the main take away from FUB's thread (there are a few take aways) is the importance of oil temp and how can indicate piston temperatures.
 

markd89

Veteran Member
Joined
Oct 21, 2009
Location
Los Angeles
TDI
1978 VW Bus 1Z TDI
Unfortunately, I don't. I've been looking for an answer to that question for my Ranger build and haven't found one yet. I think the main take away from FUB's thread (there are a few take aways) is the importance of oil temp and how can indicate piston temperatures.
I hope this is not forking Andy's thread too far from his build. If so, we should move to another thread.

I'm using the larger Passat B5 oil cooler. I also installed an oil temp sender at the top of the oil cooler. What I have seen there so far has been pretty boring - max of 220F. Once it gets warm it seems pretty stable. If oil temp (and oil temp measured at that point) really means safety, then I guess all is OK. I still keep the EGTs under 1300F whenever I can.
 

AndyBees

Top Post Dawg
Joined
May 27, 2003
Location
Southeast Kentucky
TDI
Silver 2003 Jetta TDI, Silver 2000 Jetta TDI (sold), '84 Vanagon with '02 ALH engine
Hey, guys, no problem. Discussions here help inform all those who are considering a similar conversion.

I must have fell asleep with the laptop on my chest last night. Cause, I thought I typed a response to Mark W's comment.....LOL.

Yeah, I knew you (Mark W) was talking to the other Mark. I was only chimming in a bit there!

As for the plexi-glas, I've considered sealing off the air intake/filter area on the opposite side of the engine bay. That would require all intake air to come down the vent shoot, thus no hotter engine bay air would go thru the system.

Well, guys we are now laying concrete block for the foundation on the house rehab project. Hopefully next week I can back to my conversion project.
 

AndyBees

Top Post Dawg
Joined
May 27, 2003
Location
Southeast Kentucky
TDI
Silver 2003 Jetta TDI, Silver 2000 Jetta TDI (sold), '84 Vanagon with '02 ALH engine
Well, since I am into a bunch of corrections, upgrades, modifications, alterations, etc., I'm thinking about dropping the Turbo and doing a tap to obtain EGT post-Turbine exhaust! That way I will know what the Turbo is spitting out.

I have re-installed the dash.

Right now, there is so much going on with personal endeavors, I've all but put the project on back burner for a few weeks.

I do have some pics to post of the clutch and brake pedal assembly. Not exactly TDI stuff, but using the cruise control requires those pedals to fall back to the normal position so the switches for the ALH system will work properly.... I'll post the details later.
 

markd89

Veteran Member
Joined
Oct 21, 2009
Location
Los Angeles
TDI
1978 VW Bus 1Z TDI
Well, since I am into a bunch of corrections, upgrades, modifications, alterations, etc., I'm thinking about dropping the Turbo and doing a tap to obtain EGT post-Turbine exhaust! That way I will know what the Turbo is spitting out.
I think that'd be a good improvement over what you have, but FWIW pre-turbo seems to be what most measure against as then you're seeing the gases before they have been cooled by the turbo..

Mark
 

libbybapa

Veteran Member
Joined
Nov 15, 2011
Location
Where?
TDI
'83 AHU mTDI high top Vanagon, '84 AHU mTDI pop top Vanagon, '85 Franken-mTDI Adventurewagen Vanagon, '91 Vanagon ALH mTDI tin top auto, '02 Jetta eTDI Wagon, '02 Jetta eTDI Sedan
There is a significant and very variable drop in temp with the pressure drop across the turbine which means that post turbine temps are quite variably inaccurate.
 

jjordan11

Veteran Member
Joined
Jan 5, 2008
Location
Lehi, UT
TDI
1988 Audi 80 quattro PD130, 1982 Westfalia TDI
I have to say pre-turbo is the most accurate and it's pretty easy to tap a port into the exhaust manifold.
 

nicklockard

Torque Dorque
Joined
Aug 15, 2004
Location
Arizona
TDI
SOLD 2010 Touareg Tdi w/factory Tow PCKG
Andy, you're right about that EGT sensor. If it never shows above 575F it's flat-out lying. Some people have just used longer probes and made sure the tip was inserted all the way (but not touching the manifold walls) with better results. Or you can easily tap the mani and put a short probe in. And of course, it goes without saying that placement absolutely MUST be pre-turbo, or it's totally useless.
 

libbybapa

Veteran Member
Joined
Nov 15, 2011
Location
Where?
TDI
'83 AHU mTDI high top Vanagon, '84 AHU mTDI pop top Vanagon, '85 Franken-mTDI Adventurewagen Vanagon, '91 Vanagon ALH mTDI tin top auto, '02 Jetta eTDI Wagon, '02 Jetta eTDI Sedan

libbybapa

Veteran Member
Joined
Nov 15, 2011
Location
Where?
TDI
'83 AHU mTDI high top Vanagon, '84 AHU mTDI pop top Vanagon, '85 Franken-mTDI Adventurewagen Vanagon, '91 Vanagon ALH mTDI tin top auto, '02 Jetta eTDI Wagon, '02 Jetta eTDI Sedan
It is largely a function of the pressure difference pre-turbine and post-turbine. Just as a gas becomes hotter when it is compressed, it becomes colder when decompressed.
 

AndyBees

Top Post Dawg
Joined
May 27, 2003
Location
Southeast Kentucky
TDI
Silver 2003 Jetta TDI, Silver 2000 Jetta TDI (sold), '84 Vanagon with '02 ALH engine
Ah, ha! I believe "libbybapa" hit the nail on the head in reference to the pressure difference and how it affects EGT before and after the Turbo. Also, thanks very much for the photo location. On top of the exhaust manifold is too close to the Intake Manifold.

Well, I've been giving this some thought as a result of the feedback here. Since dropping the Turbo and/or Intake off the ALH in a Vanagon is extremely easy compared to a Jetta/Golf/NB, this is not going to be a major surgery procedure. So, I may go ahead and tap two holes, one pre-turbo and the other post-turbo. It would be interesting to see the difference in temp readings.

I had to special order the temp sensor probe and cable ...16 feet to reach the gauge pod in the center of the dash of the Vanagon. 15.25 feet would have been too short.

My gauge is a McNally Electronics two in one gauge. The other aspect is engine coolant temp. That aspect doesn't seem to work properly. The instruction sheet is very unclear as to which pin the sensor wire is supposed to be plugged into. I purchased the kit at the 2011 TDI Fest auction. It had never been installed. I have communicated with McNally with very little help. They e-mailed me the instruction sheet which is just like the one with the kit. The instruction sheet is for EGT and Boost not Coolant Temp. Seems I could never make the dude understand my delemia. I have been using Pin-8 which seems okay until the engine gets up to full temp and then it bounces back and forth. Also, turning on the park or head lights causes the gauge to peg-out.

Oddly, the EGT and Coolant temp gauges are both within 1 degree of each other when the engine is cold .............. turn-on ignition and there it is, both about the same temp reading.:eek:

So, I have to sort out that issue..............

Speaking of gauges, unless you can find real German made VDO, do not purchase them............. waste of cash! My oil pressure gauge lasted about three months. A new sender did not solve the problem. I'm going with a mechanical................. long nylon 1/8" tube!:D
 

libbybapa

Veteran Member
Joined
Nov 15, 2011
Location
Where?
TDI
'83 AHU mTDI high top Vanagon, '84 AHU mTDI pop top Vanagon, '85 Franken-mTDI Adventurewagen Vanagon, '91 Vanagon ALH mTDI tin top auto, '02 Jetta eTDI Wagon, '02 Jetta eTDI Sedan
If the engine has returned to ambient, prior to starting, the EGT and Coolant temp should be very close to the same.

I've had several electronic oil pressure senders fail. My next one will be remote on the line to my aux oil cooler in order to eliminate vibrations. I had a mechanical oil pressure gauge on one of my vans for a while and when cold, the response lag time was almost humorous.
 

AndyBees

Top Post Dawg
Joined
May 27, 2003
Location
Southeast Kentucky
TDI
Silver 2003 Jetta TDI, Silver 2000 Jetta TDI (sold), '84 Vanagon with '02 ALH engine
Okay, here are a few pics of the Clutch and Brake Pedals as well as the assembly that they fit into. Also, the new clutch master cylinder is in these pics.

To bring you up to date, the clutch master cylinder was leaking fluid. So, while I had the dash out to replace the heater fan blower, etc., I went ahead with replacing the clutch master cylinder as well as polished the pivot pin and greased everything. (read comments above the pics for details)

There were issues with the pivot pin. Occassionally, the brake pedal would not bounce back to the normal position. Two problems this created, 1. The engine would default to only idle (903 rpms) if the brake pedal did not engage the brake switch (ALH switch). 2. The cruise control would not work if the brake switch was disengaged due to the stuffness associated with the poorly operting pedal.

Note: The brake switch for the ALH has two different contacts inside. One is normally closed and the other is normally open. The normally closed one was affected by the brake pedal not rebounding back to the closed position.

Below, is a pic of the general area where the clutch and brake pedals are located. The black thingy on the left is the brake booster. The brake and clutch mounting bracket is to the right (aluminum thingy). The large braided hose laying there provides fluid from the brake reservoir to the clutch master cylinder down below..... the end of the clutch and brake "pivot pin" can be seen just below the braided hose, center!


Below, is the clutch and brake pedals. The "pivot pin" is on the right. The mounting bracket with the clutch master cylinder is on the left and actually turned upside down in relation to how it is mounted (sorry about that).


Below, is a pic of the two pedals. The hole where the "pivot pin" goes actually has bronze bushings inside...


Below, this pic shows the hole in the bracket for the "pivot pin." Remember, the mounting bracket is upside down in relation to the pedals (sorry about that).


Below, in this pic you can see the "pivot pin" inserted thru the holes in the pedals.


Below, is a close-up of the "pivot pin." As you can see, there are 'gouged' spots on the pin. That is the area on the right side where the brake pedal operates.......thus, contributed to the draggy rebound of the pedal.


One more pic of the "pivot pin."


I never saw any indication that the assembly had been removed from it's original installation. So, I suspect the battered pivot pin was installed on the assembly line.

I filed the rough part off and then buffed it on a bench grinder......... after lubing, the assembly worked very smooth!:D


EDIT: Below is a pic of the ALH brake switch set-up with the Vanagon brake pedal ....
 
Last edited:

jimbote

Certified Volkswagen Nut
Joined
Jul 10, 2006
Location
spiral arm, milky way (aka central NC)
TDI
Tacoma 4x4 converted to TDI
I'd be concerned running that much nylon tube from the engine to the cabin ... lots of distance for something to chaff or cut ... I guess if you protect it enough but you should be able to find a quality electronic sender and gauge for not too expensive, or you could use a pressure gauge isolator, it minimizes the mess if in case of line failure... nice work in the switches ... I went with factory toyota switches when I setup my cruise control ... ecm has been very happy with them and they were a snap to mount :)
 
Last edited:

AndyBees

Top Post Dawg
Joined
May 27, 2003
Location
Southeast Kentucky
TDI
Silver 2003 Jetta TDI, Silver 2000 Jetta TDI (sold), '84 Vanagon with '02 ALH engine
Has anyone tried a digital oil pressure gauge set-up?

Gauge quality and price start from under $20.00 and go well beyond $300.00........ I can tell you, the cheap stuff (digital or analog) don't last. But, is the more expensive stuff any better?

Seems someone mentioned that vibrations from the engine really play havoc with the oil pressure senders. Maybe a fexible pressure pipe set-up for a remote location off the engine would be worth considering.

I have the 1/8 nylon boost pressure tube running inside a larger tube along with wiring.

Jimbote, if change over to a mechanical oil pressure gauge, I'll install another small conduit to place the tube inside for protection.

Examples:


Below, the two circuits coming out of the side of the conduit go to the fuel tank sensor connector. The hole was sealed with RTV...


I actually have two of the white tubes in use........stuffed with wires. These two conduits are going up just behind the radiator to the inside of the Van below the dash.


Below, in this pic, you can see where the conduits come out under the dash ..................now, nice and tucked way behind the cover.
 
Top