
Franko6
Vendor , w/Business number
From the first time I looked at the PD motor, I've had several problems with the design. Besides the reduction of the cam lobe width, there is a serious engineering flaw. The oiling of the cam bearings is in the wrong place.
From the inception of the IDI overhead cams, the oiling has been introduced at the bottom of the cam saddle. This would be the dwell side of the cam, meaning that the side which is not loaded and therefore, the clearance would be in the saddle of the cam bearing surface. All forces for a conventional overhead cam are on the cam caps, as the force of the springs push the camshaft upward. Inserting an oil flow at the bottom shell in a conventional overhead camshaft is appropriate.
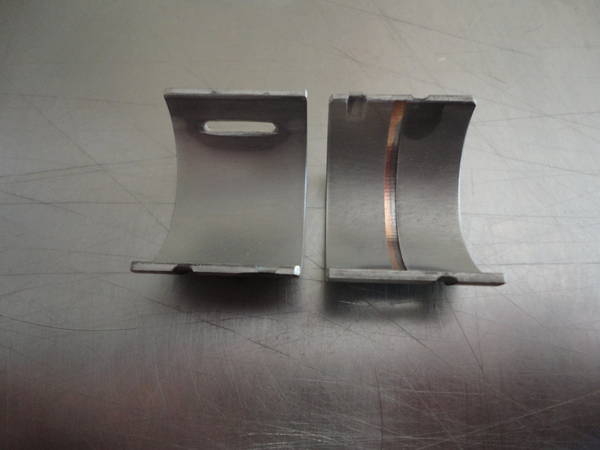
The Pumpe Duse engines with unit injectors, which fire at around 27,000 psi, are operated by a rocker shaft and roller for the injectors. The forces exerted are in the opposite direction from what is normal in a TDI overhead cam engine. The pressure on the camshaft bearings is downward and to the rear as exhibited in this picture. Note the galley oiling hole in the right bearing shell.

The wear patterning shows the center of the downward force to be about at the 7 o'clock position. The top shell on the left is virtually untouched. Please note that the pitting on the top shell is from being thrown around in a box for a while, not from any damage of operation.
The other problem that the PD motors exhibit was a bit confusing. There is a starburst bounce pattern and a wear pattern at the dwell side of the cam as in the following picture...

I believe the two problems of the excessive cam bearing wear and the starburst patterning are caused by the same condition.
The wear on the lower cam shell has caused an oil starvation to the cam bearings. If you look at the first picture, the wear pattern on the cam shows the camshaft pushing hard into the cam bearing directly up to the oiling slot in the cam bearing. The force of the cam is causing the oil flow to be restricted or even cut off. That is extremely detrimental to the cam bearings and will cause premature failure. It also reduces oil flow to the top of the head.
This leads to the starbust patterning. With the oil flow reduction, perhaps even to zero on some of the cam bearings, the camshaft and cam followers overheat. When the cam followers overheat, the oil inside the lifter begins to boil. That causes the lifter to expand, reducing the dwell clearance to zero. The dwell clearance of the cam followers should be .004" for about 240 degrees of the cam cycle. This required cam follower clearance is a critical period of time that allows the lifter and camshaft to cool. The constant contact and subsequent heating is a serious flaw.
Since the lifter has become pressurized, the heating problem becomes exacerbated; now the lifter is in constant contact with the cam and the heating becomes worse. That is the reason you see a striping on what should be a 'no contact' area of the cam. The starburst pattern is caused by the lifter instead of being hydraulically filled, is bouncing on a cushion of superheated air inside the lifter as it climbs the lobe to the top of it's travel.
The Solution:
The cure is to introduce the oiling at the correct location in the cam bearing. The terminology for the introduction of the oil in the correct location is referred to as 'clocking'. The correct entrance point would be at the 1 o'clock position from the middle of the bearing loading(6 o'clock). I.E., if the bearing is loaded at the 7 o'clock position, the oil should enter at the 2 o'clock position, or 195 degrees from the center of contact. Ideally, the dwell side bearing (Top bearing) should be grooved to carry oil from the slot in the top shell to the 2 o'clock position.
It is necessary to remove the rocker shafts, camshaft caps and camshaft to facilitate the following procedure. Although this procedure was carried out on the bench with the head off the car, the caps can all be drilled by removing them from the vehicle. There is one hole in the #1 journal that you have to take pains to keep chips out of the motor.
Edit**Please note that the drilling of the head requires skill with drilling small holes and does have risk of debris, which must be carefully removed. Due to the problems of drilling the cam caps, a "no drill' bearing modification is recommended as alternative. The alternative bearing shell mod follows the bearing drill mod.
The Procedure:
Using a scribe, mark the slot in the top bearing shell of each camshaft cap.

Center punch the end of the scribed mark closest to the oiling hole for the rockers.

Drilling with a 7/64" drill, start the hole by drilling straight into the bearing cam cap for about 1/16". WARNING! THIS IS A SMALL DIAMETER DRILL PRONE TO BREAKAGE! USE A COBALT DRILL!Work slowly and carefully. If you do not feel comfortable doing the procedure, find a competent machinist/ mechanic to perform the work for you.

Once you have the hole established, aim toward the rocker shaft oil galley.


Deburr the finished hole and clean out any chips and debris.
the #1 cap requires special attention as there is no oil galley hole for the rocker shafts and that hole has to be established.

The hole is on the center line from the cam cap bolt and split the difference between the cap bolt hole and the outside edge of the cam saddle. Drill at an angle over to the existing oil galley hole for the bottom cam bearing shell. Cross-drill if necessary. De-burr. Drill and cross drill cap to match hole for the saddle.
If you are doing this procedure without removing the head, the #1 cam hole is the only one that can cause you some debris issue. First, cover all exposed areas inside the head with a cover to keep drilling debris out. I also use a Shop Vac when drilling. Nearly every single chip goes right up the vacuum hose.
After drilling, there will be some particles in the galley. Plug any bolt holes that go into the galley and install the cam bearings for #'s 3, 4 and 5. Use a straw on a spray can of WD-40 and spray into the #2 oil galley. Blow air pressure into the #2 galley and drive any debris from the #1 cam galley hole.
Drilling of these holes will double th flow rate of oil to the camshaft, introduce the oil at the correct location on the camshaft and will cause the excess oil to sling off the camshaft lobes onto the cam followers. Since oil not only lubricates, but also carries away heat, this procedure should dramatically improve oiling and cooling of the cam and followers.
To complete the 'clocking' process, the top bearing shell should be cut from the oil slot to the 2 o'clock position. This is The modified bearing shell with bottom tang removed and top bearing slotted.
This allows oil to flow down the center of the non-loaded top bearing. Additional oil will eject out the sides of the top bearing, which benefits the cam followers with additional cooling oil.
**Edit**
There have been many people who are uncomfortable with drilling the cam caps and particularly, creating the oiling path for the #1 bearing cap. In order to resolve this issue, we have created a 'no drill' bearing cap.

If you note, in the picture above that shows the inside of the cam bearings, you can see the ends of the bearing groove for the outside of the shell. The picture immediately above shows the outside of the bearing shells and the rest of the groove, marked for top and bottom and the direction toward the front of the car that they should be installed.
IMPORTANT: Installation is a process. You can't slap the bearings in and expect them to work properly. We have noted several cam bearing failures, some as quickly as 15 seconds after start up. Two of these failures were with cam bearings that were not modified and were OEM bearings. Most recently, a post of cam bearing failure noted after 50,000km after modifying the cam bearings with a diamond bur in a dremel tool. I believe that the failures are due to improper manufacture and/or installation.
In order to properly install the cam bearings, I would recommend these 4 rules.
1. We cut the cam bearing annular slot with a lathe. Properly done, this method eliminates any bur in the cam bearing.
2. When reversing the cam bearing, care should be taken to completely remove the bearing tang. If the tang is not removed properly, the bearing will have interference and premature wear. It is better to remove a bit too much of the tang than to remove not enough.
**For those of you who might worry that removing the tang would cause an issue of allowing the bearing to spin, that is not so. The bearing crush is what holds the bearings in place. A total of .001" bearing projection keeps the bearings from spinning in the cam caps. This is also how the 'tangless' connecting rod bearings for the same vehicles stay in place.**
3. When installing the bearings, the use of a assembly grease is absolutely necessary. We recommend Joe Gibbs assembly grease.
4. Tighten the cap cap screws progressively 5-10-and finally 15 ft lbs. Between each torque stage, strike the cam caps with a rubber dead- blow hammer sharply to center the bearing shells. When final torque stage is reached, the camshaft should be turned by hand to assure that there is no undue resistance.
We do not recommend the OEM torque-to-yield (tty) bolts, as they are expensive and ineffective. Instead, we have arrived at a set of non-stretch bolts that have been thoroughly tested to meet our requirements. These bolts are reusable.
As stated, the cam cap screws have a final torque value of 15 ft lbs. The rocker shaft bolts are torqued to 30 ft lbs, except for the bolts that go through the #1 and #5 caps. If those end bolts are torqued to 30 ft lbs, the uneven loading causes the two end cam caps to deform and cant inward at the top of the cam cap. We have adjusted the torque spec for the two end bolts to 22 ft lbs to compensate for this engineering design problem.
From the inception of the IDI overhead cams, the oiling has been introduced at the bottom of the cam saddle. This would be the dwell side of the cam, meaning that the side which is not loaded and therefore, the clearance would be in the saddle of the cam bearing surface. All forces for a conventional overhead cam are on the cam caps, as the force of the springs push the camshaft upward. Inserting an oil flow at the bottom shell in a conventional overhead camshaft is appropriate.
The Pumpe Duse engines with unit injectors, which fire at around 27,000 psi, are operated by a rocker shaft and roller for the injectors. The forces exerted are in the opposite direction from what is normal in a TDI overhead cam engine. The pressure on the camshaft bearings is downward and to the rear as exhibited in this picture. Note the galley oiling hole in the right bearing shell.
The wear patterning shows the center of the downward force to be about at the 7 o'clock position. The top shell on the left is virtually untouched. Please note that the pitting on the top shell is from being thrown around in a box for a while, not from any damage of operation.
The other problem that the PD motors exhibit was a bit confusing. There is a starburst bounce pattern and a wear pattern at the dwell side of the cam as in the following picture...
I believe the two problems of the excessive cam bearing wear and the starburst patterning are caused by the same condition.
The wear on the lower cam shell has caused an oil starvation to the cam bearings. If you look at the first picture, the wear pattern on the cam shows the camshaft pushing hard into the cam bearing directly up to the oiling slot in the cam bearing. The force of the cam is causing the oil flow to be restricted or even cut off. That is extremely detrimental to the cam bearings and will cause premature failure. It also reduces oil flow to the top of the head.
This leads to the starbust patterning. With the oil flow reduction, perhaps even to zero on some of the cam bearings, the camshaft and cam followers overheat. When the cam followers overheat, the oil inside the lifter begins to boil. That causes the lifter to expand, reducing the dwell clearance to zero. The dwell clearance of the cam followers should be .004" for about 240 degrees of the cam cycle. This required cam follower clearance is a critical period of time that allows the lifter and camshaft to cool. The constant contact and subsequent heating is a serious flaw.
Since the lifter has become pressurized, the heating problem becomes exacerbated; now the lifter is in constant contact with the cam and the heating becomes worse. That is the reason you see a striping on what should be a 'no contact' area of the cam. The starburst pattern is caused by the lifter instead of being hydraulically filled, is bouncing on a cushion of superheated air inside the lifter as it climbs the lobe to the top of it's travel.
The Solution:
The cure is to introduce the oiling at the correct location in the cam bearing. The terminology for the introduction of the oil in the correct location is referred to as 'clocking'. The correct entrance point would be at the 1 o'clock position from the middle of the bearing loading(6 o'clock). I.E., if the bearing is loaded at the 7 o'clock position, the oil should enter at the 2 o'clock position, or 195 degrees from the center of contact. Ideally, the dwell side bearing (Top bearing) should be grooved to carry oil from the slot in the top shell to the 2 o'clock position.
It is necessary to remove the rocker shafts, camshaft caps and camshaft to facilitate the following procedure. Although this procedure was carried out on the bench with the head off the car, the caps can all be drilled by removing them from the vehicle. There is one hole in the #1 journal that you have to take pains to keep chips out of the motor.
Edit**Please note that the drilling of the head requires skill with drilling small holes and does have risk of debris, which must be carefully removed. Due to the problems of drilling the cam caps, a "no drill' bearing modification is recommended as alternative. The alternative bearing shell mod follows the bearing drill mod.
The Procedure:
Using a scribe, mark the slot in the top bearing shell of each camshaft cap.
Center punch the end of the scribed mark closest to the oiling hole for the rockers.
Drilling with a 7/64" drill, start the hole by drilling straight into the bearing cam cap for about 1/16". WARNING! THIS IS A SMALL DIAMETER DRILL PRONE TO BREAKAGE! USE A COBALT DRILL!Work slowly and carefully. If you do not feel comfortable doing the procedure, find a competent machinist/ mechanic to perform the work for you.
Once you have the hole established, aim toward the rocker shaft oil galley.
Deburr the finished hole and clean out any chips and debris.
the #1 cap requires special attention as there is no oil galley hole for the rocker shafts and that hole has to be established.
The hole is on the center line from the cam cap bolt and split the difference between the cap bolt hole and the outside edge of the cam saddle. Drill at an angle over to the existing oil galley hole for the bottom cam bearing shell. Cross-drill if necessary. De-burr. Drill and cross drill cap to match hole for the saddle.
If you are doing this procedure without removing the head, the #1 cam hole is the only one that can cause you some debris issue. First, cover all exposed areas inside the head with a cover to keep drilling debris out. I also use a Shop Vac when drilling. Nearly every single chip goes right up the vacuum hose.
After drilling, there will be some particles in the galley. Plug any bolt holes that go into the galley and install the cam bearings for #'s 3, 4 and 5. Use a straw on a spray can of WD-40 and spray into the #2 oil galley. Blow air pressure into the #2 galley and drive any debris from the #1 cam galley hole.
Drilling of these holes will double th flow rate of oil to the camshaft, introduce the oil at the correct location on the camshaft and will cause the excess oil to sling off the camshaft lobes onto the cam followers. Since oil not only lubricates, but also carries away heat, this procedure should dramatically improve oiling and cooling of the cam and followers.
To complete the 'clocking' process, the top bearing shell should be cut from the oil slot to the 2 o'clock position. This is The modified bearing shell with bottom tang removed and top bearing slotted.
This allows oil to flow down the center of the non-loaded top bearing. Additional oil will eject out the sides of the top bearing, which benefits the cam followers with additional cooling oil.
**Edit**
There have been many people who are uncomfortable with drilling the cam caps and particularly, creating the oiling path for the #1 bearing cap. In order to resolve this issue, we have created a 'no drill' bearing cap.
If you note, in the picture above that shows the inside of the cam bearings, you can see the ends of the bearing groove for the outside of the shell. The picture immediately above shows the outside of the bearing shells and the rest of the groove, marked for top and bottom and the direction toward the front of the car that they should be installed.
IMPORTANT: Installation is a process. You can't slap the bearings in and expect them to work properly. We have noted several cam bearing failures, some as quickly as 15 seconds after start up. Two of these failures were with cam bearings that were not modified and were OEM bearings. Most recently, a post of cam bearing failure noted after 50,000km after modifying the cam bearings with a diamond bur in a dremel tool. I believe that the failures are due to improper manufacture and/or installation.
In order to properly install the cam bearings, I would recommend these 4 rules.
1. We cut the cam bearing annular slot with a lathe. Properly done, this method eliminates any bur in the cam bearing.
2. When reversing the cam bearing, care should be taken to completely remove the bearing tang. If the tang is not removed properly, the bearing will have interference and premature wear. It is better to remove a bit too much of the tang than to remove not enough.
**For those of you who might worry that removing the tang would cause an issue of allowing the bearing to spin, that is not so. The bearing crush is what holds the bearings in place. A total of .001" bearing projection keeps the bearings from spinning in the cam caps. This is also how the 'tangless' connecting rod bearings for the same vehicles stay in place.**
3. When installing the bearings, the use of a assembly grease is absolutely necessary. We recommend Joe Gibbs assembly grease.
4. Tighten the cap cap screws progressively 5-10-and finally 15 ft lbs. Between each torque stage, strike the cam caps with a rubber dead- blow hammer sharply to center the bearing shells. When final torque stage is reached, the camshaft should be turned by hand to assure that there is no undue resistance.
We do not recommend the OEM torque-to-yield (tty) bolts, as they are expensive and ineffective. Instead, we have arrived at a set of non-stretch bolts that have been thoroughly tested to meet our requirements. These bolts are reusable.
As stated, the cam cap screws have a final torque value of 15 ft lbs. The rocker shaft bolts are torqued to 30 ft lbs, except for the bolts that go through the #1 and #5 caps. If those end bolts are torqued to 30 ft lbs, the uneven loading causes the two end cam caps to deform and cant inward at the top of the cam cap. We have adjusted the torque spec for the two end bolts to 22 ft lbs to compensate for this engineering design problem.
Last edited:
")