
ALH TDI engine transplant into '84 Vanagon
- Thread starter AndyBees
- Start date
AndyBees
Top Post Dawg
- Joined
- May 27, 2003
- Location
- Southeast Kentucky
- TDI
- Silver 2003 Jetta TDI, Silver 2000 Jetta TDI (sold), '84 Vanagon with '02 ALH engine
Vanagon tank, about 99% finished
*EDIT: In the summer of 2014, I replaced this tank with an eBay purchase. The rehabbed tank did leak just enough to keep the bottom "damp." But, considering I go into Canada and back into the USA, I was afraid the Border Agents might look under and see the patch on the tank which might end with a search. So, it was time to replace it.
This photo is of the sump with center baffle section in place. It has at least three coats of Red-Kote on it. Also, the grey stuff is JB Weld. I coated it with Red-Kote before installing the sump! According to the manufacturer, Red-Kote and JB Weld are compatible. Notice the outer perimeter of the sump.....bare metal! That will be coated with JB Weld prior to sitting it on the supports (you will see those in the following photos).

This photo shows the templates I made to use to fabricate the aluminum supports that hold the sump in place.

This photo shows the supports laying on the outside of the tank around the hole.

This photo shows the supports inside the tank around the perimeter of the hole. I coated them with Red-Kote, clamped them in place, drilled holes for 1/8 inch pop rivets 1/4 inch long (Made in USA, BTW). Notice the fuel line intake, well that sucker was not easy to snap back on as I sit the sump in place. You can see the hole it goes into on the sump in the first photo above. I left the return line just laying inside! It is stiff and will stay where it is and not be problematic!

This is a closer look at the supports with a mirror showing the back side at the baffle divide.

This photo shows the sump in place. I used JB weld to go around the perimeter before sitting it on. Of course, I pre-drilled numerous holes for stainless screws to hold it on. Also, to the right, notice the JB Weld on the other sump (where the fuel level operates). Those spots had tiny holes. I used the dremil to knock loose the surface. Also, inside, I brushed on several coats of Red-Kote!

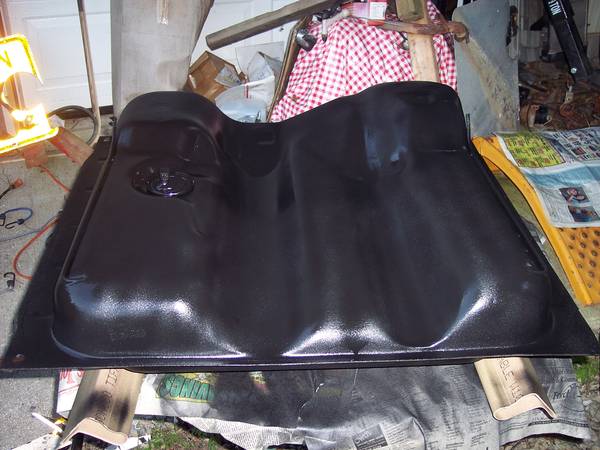
And, presto! The tank sitting on the work table. It really looks much cleaner than it appears.

Little secret: I use regular JB Weld and JB Weld Kwik mixed about 75% / 25% respectively and it will set-up quicker than than the regular but slower than the quick and is easy to work with. Also, it is "tested" compatible with the Red-Kote and diesel fuel!
It is my plan to coat the outside of the Tank with something. I'll post the results once I come to a consensus on what to do.
Well, to get 'er done, as best I can tell, I have about 10 hours of work (and a few beers), about $30.00 for the Red-Kote, about $12.00 of JB Weld (all old stuff I had on hand), and no idea how much electricity I used in the electrolysis process.") Of course, there was use of the vacuum, a few paper towels, use of the drill, the jig-saw, some acetone for clean-up, etc.
Of course, there was use of the vacuum, a few paper towels, use of the drill, the jig-saw, some acetone for clean-up, etc.
I would not sell it for $350.00....... and, I would not do another for $350.00!
*EDIT: In the summer of 2014, I replaced this tank with an eBay purchase. The rehabbed tank did leak just enough to keep the bottom "damp." But, considering I go into Canada and back into the USA, I was afraid the Border Agents might look under and see the patch on the tank which might end with a search. So, it was time to replace it.
This photo is of the sump with center baffle section in place. It has at least three coats of Red-Kote on it. Also, the grey stuff is JB Weld. I coated it with Red-Kote before installing the sump! According to the manufacturer, Red-Kote and JB Weld are compatible. Notice the outer perimeter of the sump.....bare metal! That will be coated with JB Weld prior to sitting it on the supports (you will see those in the following photos).
This photo shows the templates I made to use to fabricate the aluminum supports that hold the sump in place.
This photo shows the supports laying on the outside of the tank around the hole.
This photo shows the supports inside the tank around the perimeter of the hole. I coated them with Red-Kote, clamped them in place, drilled holes for 1/8 inch pop rivets 1/4 inch long (Made in USA, BTW). Notice the fuel line intake, well that sucker was not easy to snap back on as I sit the sump in place. You can see the hole it goes into on the sump in the first photo above. I left the return line just laying inside! It is stiff and will stay where it is and not be problematic!
This is a closer look at the supports with a mirror showing the back side at the baffle divide.
This photo shows the sump in place. I used JB weld to go around the perimeter before sitting it on. Of course, I pre-drilled numerous holes for stainless screws to hold it on. Also, to the right, notice the JB Weld on the other sump (where the fuel level operates). Those spots had tiny holes. I used the dremil to knock loose the surface. Also, inside, I brushed on several coats of Red-Kote!
And, presto! The tank sitting on the work table. It really looks much cleaner than it appears.
Little secret: I use regular JB Weld and JB Weld Kwik mixed about 75% / 25% respectively and it will set-up quicker than than the regular but slower than the quick and is easy to work with. Also, it is "tested" compatible with the Red-Kote and diesel fuel!
It is my plan to coat the outside of the Tank with something. I'll post the results once I come to a consensus on what to do.
Well, to get 'er done, as best I can tell, I have about 10 hours of work (and a few beers), about $30.00 for the Red-Kote, about $12.00 of JB Weld (all old stuff I had on hand), and no idea how much electricity I used in the electrolysis process.
Of course, there was use of the vacuum, a few paper towels, use of the drill, the jig-saw, some acetone for clean-up, etc.I would not sell it for $350.00.
...... and, I would not do another for $350.00!
Last edited:
AndyBees
Top Post Dawg
- Joined
- May 27, 2003
- Location
- Southeast Kentucky
- TDI
- Silver 2003 Jetta TDI, Silver 2000 Jetta TDI (sold), '84 Vanagon with '02 ALH engine
Outside of the tank coating:
Here is a photo of the corner of the tank showing a "test" shot of coating. The coating is Rustoleum bed-liner for trucks. I wanted to see if it is compatible to the existing coating that's on the tank. After about 15 minutes drying time, the surface has a slight "rough" texture (maybe just what I'm looking for). I plan to apply a very thin coat of JB Weld (my favorite epoxy) around the vent holes where the coating has flaked off, as well do touch-ups here and there on the tank.

Another view of the test coat (Rustoluem truck bed liner)

Here is a photo of the tank completely finished. This photo is featured in a later post!
Here is a photo of the corner of the tank showing a "test" shot of coating. The coating is Rustoleum bed-liner for trucks. I wanted to see if it is compatible to the existing coating that's on the tank. After about 15 minutes drying time, the surface has a slight "rough" texture (maybe just what I'm looking for). I plan to apply a very thin coat of JB Weld (my favorite epoxy) around the vent holes where the coating has flaked off, as well do touch-ups here and there on the tank.
Another view of the test coat (Rustoluem truck bed liner)
Here is a photo of the tank completely finished. This photo is featured in a later post!
Last edited:
AndyBees
Top Post Dawg
- Joined
- May 27, 2003
- Location
- Southeast Kentucky
- TDI
- Silver 2003 Jetta TDI, Silver 2000 Jetta TDI (sold), '84 Vanagon with '02 ALH engine
Okay, due to the holiday, family, friends, etc., I've let the fuel tank project rest a bit. However, seems I cannot stay away from RESEARCH......LOL.
So, here is a nice link about replacing the vent line system on the Vanagon fuel tank.
*EDIT: As of 2/27/2015 the link does not work....
http://www.kayakwesty.com/gastank.html
I stumbled onto the site this morning. I do have all the components to replace the grommets, fuel lines, vent lines, etc. So, when I drop the old tank and go in with the "rebuilt" tank, everything will be replaced.
Hope the link above is helpful to those that need to address the tank issues.
Last edited:
AndyBees
Top Post Dawg
- Joined
- May 27, 2003
- Location
- Southeast Kentucky
- TDI
- Silver 2003 Jetta TDI, Silver 2000 Jetta TDI (sold), '84 Vanagon with '02 ALH engine
Vanagon Fuel Tank Capacity
Back in '86, right after I purchased the '83 Vanagon, with a very low fuel level, I drove it up and down the street in an attempt to run it dry. I wanted to see for sure what it would hold and where the gauge was pointing at empty. Well, due to time constraints, etc., I never finished the experiment. However, the guage was pointing below empty when I filled it up...... as I recall, it held just over 15 gallons.
In 1993 (2nd trip to Alaska), heading down (south) the Liard Highway toward the Alaska Highway after leaving Ft. Providence, NWT earlier that day, the fuel level was getting extremely low. I would kick it in neutral and coast down hills. Finally, I began to shut the engine down as I coasted. We arrived very late in Ft Liard and the only station on the main drag was closed. We spent the night in a local campground. Next morning, I put in almost 15.5 gallons on 296 miles (19.09 mpg). That was cutting it close!
According to the Bentley Manual, the Vanagon tank holds 16.0 gallons and the Syncro tank is 18.5 gallons.That's a nice link, I'll have to do that with my tank some time soon. Speaking of tanks what is the capacity of our fuel tanks?
Back in '86, right after I purchased the '83 Vanagon, with a very low fuel level, I drove it up and down the street in an attempt to run it dry. I wanted to see for sure what it would hold and where the gauge was pointing at empty. Well, due to time constraints, etc., I never finished the experiment. However, the guage was pointing below empty when I filled it up...... as I recall, it held just over 15 gallons.
In 1993 (2nd trip to Alaska), heading down (south) the Liard Highway toward the Alaska Highway after leaving Ft. Providence, NWT earlier that day, the fuel level was getting extremely low. I would kick it in neutral and coast down hills. Finally, I began to shut the engine down as I coasted. We arrived very late in Ft Liard and the only station on the main drag was closed. We spent the night in a local campground. Next morning, I put in almost 15.5 gallons on 296 miles (19.09 mpg). That was cutting it close!
markward
Veteran Member
I have always used 15 US gallons as a reference. I don't recall where I got that number from. The gauge in mine is crazy. It goes through about a half in 125 miles. It hangs at a half for another 100 miles and then starts to drop again. It gets to the reserve around 330 miles which is when I always try to stop. Plus my butt and leg are killing me if it has been a continuous run. I do not have a supply pump on my van. I'd be afraid to run it out since I need to setup an IV drip to the injection pump and crack the injector lines to get it primed again. When the tank is low, the needle also plays tricks on me. It really dances around under braking and acceleration. I have been convinced it is running empty and then I look again and the needle has floated back up.
Anyhow, Andy, I did not realize JB Weld would hold up submerged in diesel for extended periods. In fact, I have never really come across any specs on JB Weld. It seems to work or not. No guarantee from them.
Anyhow, Andy, I did not realize JB Weld would hold up submerged in diesel for extended periods. In fact, I have never really come across any specs on JB Weld. It seems to work or not. No guarantee from them.
AndyBees
Top Post Dawg
- Joined
- May 27, 2003
- Location
- Southeast Kentucky
- TDI
- Silver 2003 Jetta TDI, Silver 2000 Jetta TDI (sold), '84 Vanagon with '02 ALH engine
Use of JB Weld with customized MK1 Fuel Filter to work with TDI application. I did this about 8 years ago.......... no leaks at all! Of course, I am using a plug for the inlet per the MK1 application (the threaded hole is quite visible in this first photo). The connections on top are all from a "used" MK4 ALH fuel filter. Using a drimel, hacksaw, grinder, etc., I carefully removed them. The MK1 filter block was modified (grinder) and drilled to accept the components from the MK4 filter........don't laugh. JB Weld holds them together! It works, the filter element inside is the same but only costs about $8.50 including tax!
*EDIT: I did not use this modified fuel filter assembly in my Vanagon. However, it has been in use in a Jetta TDI since before the date of this post and works fine to this date (2/18/21)

This is another view

Two additional views with the MK1 style fuel filter screwed on!


As stated above, I've been running this application almost 8 years with no fuel leaks. Also, I did one for my brother's car almost two years ago.......... no leaks either! The JB Weld is rock solid as from day one!
A representative from Red-Kote told me on the phone that red-kote is compatible with JB Weld. So, I coated the inside of the tank one more time to cover any exposed JB Weld.........
Note: I did not use this filter mount modification with my project.
*EDIT: I did not use this modified fuel filter assembly in my Vanagon. However, it has been in use in a Jetta TDI since before the date of this post and works fine to this date (2/18/21)
This is another view
Two additional views with the MK1 style fuel filter screwed on!
As stated above, I've been running this application almost 8 years with no fuel leaks. Also, I did one for my brother's car almost two years ago.......... no leaks either! The JB Weld is rock solid as from day one!
A representative from Red-Kote told me on the phone that red-kote is compatible with JB Weld. So, I coated the inside of the tank one more time to cover any exposed JB Weld.........
Note: I did not use this filter mount modification with my project.
Last edited:
T_D_I_POWER
Top Post Dawg
- Joined
- Jun 7, 2007
- TDI
- '04 VW PASSAT GLS TDI '06 Audi A4 q Avant 6-Spd Sport Pkg
Way to go you are the MAN.
What's the slotted hex head screw for? Pressure relief valve?
The JB Weld that you used is that the two part and is compatible for metal bonding useage I take it?
What's the slotted hex head screw for? Pressure relief valve?
The JB Weld that you used is that the two part and is compatible for metal bonding useage I take it?
AndyBees
Top Post Dawg
- Joined
- May 27, 2003
- Location
- Southeast Kentucky
- TDI
- Silver 2003 Jetta TDI, Silver 2000 Jetta TDI (sold), '84 Vanagon with '02 ALH engine
The first photo above of the fuel fitler head (my term) is positioned the way you would be looking at it from the front of the car, hood up of course (ALH Jetta 2000 model). So, the fuel line in the center goes to the IP. The other fuel line is the "in" line from the fuel tank. The flow into this "filter head" as modified, in relation to the MK1, is the same. So, as can be observed, the fuel line connections, including the "T" are positioned about 99.99% in the same orientation manner as with the OEM ALH.
The HEX head screw/nut can be removed to prime the filter. Thus, the "prime" that's dumped in will be filtered!
That fuel filter will fit in the OEM filter bracket of the ALH!....... screw-down holds it just like the OEM.
Yes, I feel quite confident that JB Weld (an Epoxy) will withstand diesel fuel exposure. The above pretty much proves its ability to do so. And, yes, the JB Weld is the two part and will bond to metal. In fact, the JB Weld on the fuel filter bracket is the quick stuff..... sets in about 4 minutes and is hard in about a half hour....solid in 2 hours!
Now, as far as the "inside" of the fuel tank, all JB Weld has been coated with the Red Kote.
Last edited:
manual_tranny
Smyth Performance- Intern
+1, fine work andybees! Thanks for sharing!
AndyBees
Top Post Dawg
- Joined
- May 27, 2003
- Location
- Southeast Kentucky
- TDI
- Silver 2003 Jetta TDI, Silver 2000 Jetta TDI (sold), '84 Vanagon with '02 ALH engine
Well, this past week the weather never cooperated so that I could set the fuel tank outside for painting.
I did get pre-occupied with preparing a 1987 5-cylinder Quantum engine for shipping to Utah. The engine come from a car that was "in the family" whose body succumbed to unibody warping from hitting a hole in the road (Indianiapolis in '93). Long story short, that engine, in storage, has been a project in the back of my mind for years. I listed it in the Samba classifieds and someone needed it.......glad to find it a home!
Now, that 5-cylinder would have made an awesome conversion project for the Vanagon. Problem, those engines do not have the same block bolt pattern at the bell housing end as the MK1 to MKIV. An adapter would have been the issue.
Last edited:
AndyBees
Top Post Dawg
- Joined
- May 27, 2003
- Location
- Southeast Kentucky
- TDI
- Silver 2003 Jetta TDI, Silver 2000 Jetta TDI (sold), '84 Vanagon with '02 ALH engine
Quantum - Gas or Diesel
This gasser 5-cylinder is a very strong engine. It come with the CIS fuel injection system. This particular engine is out of a car that I purchased in 1992 and by 1995, thanks to a bad road in Indianiapolis and my young son (he ran it over a curb in the school parking lot), the unibody was trashed. So, the car sit parked until about 2000. Then I junked it. That engine has been in the shed for about 10 years.
Anyway, it is almost ready for shipping to its new owner in W Jordon, Utah!
Jon, the Quantum engine I have is a gasser! I helped my uncle rebuild a Quantum 5-cylinder diesel engine about 12 years ago. As I recall, that engine was not very peppy at all.Was it the gas or diesel? I'm not too familiar with the Quantums.
This gasser 5-cylinder is a very strong engine. It come with the CIS fuel injection system. This particular engine is out of a car that I purchased in 1992 and by 1995, thanks to a bad road in Indianiapolis and my young son (he ran it over a curb in the school parking lot), the unibody was trashed. So, the car sit parked until about 2000. Then I junked it. That engine has been in the shed for about 10 years.
Anyway, it is almost ready for shipping to its new owner in W Jordon, Utah!
AndyBees
Top Post Dawg
- Joined
- May 27, 2003
- Location
- Southeast Kentucky
- TDI
- Silver 2003 Jetta TDI, Silver 2000 Jetta TDI (sold), '84 Vanagon with '02 ALH engine
Update: Met with guy that will be welding up a new oil pan for me in January!
Commenced work on the Cluster mod to accept the TDI cluster. Photos will be posted soon on the cluster work.
I do have a resolution for 2011 ......... finish this conversion project. Commence working the 5-cylinder gasser conversion project and .............. begin preparing for a "hike-thru" on the Appalachian Trial in 2012 (maybe 2013). My journal will be at trailjournals.com under the Appalachian Trail.
EDIT (6/2014): Isn't it amazing how things don't go as planned .....LOL
Last edited:
markward
Veteran Member
Andy, you need to have it running for the TDI fest next September. If time permits I intend to drive up there with ours. The AC install is taking much longer than I anticipated. The time consuming part is insulating the front firewall to minimize any heat coming from the radiator into the cab. I have the evaporator brackets made and most of the insulation done. I expect to have the dash back in by the end of January. There is a VW event on the West Coast we want to try an hit. I work best with deadlines. Maybe you could use TDI Fest as your deadline. Then we can work on getting Jon to meet us there. Talk to you next year. mark
AndyBees
Top Post Dawg
- Joined
- May 27, 2003
- Location
- Southeast Kentucky
- TDI
- Silver 2003 Jetta TDI, Silver 2000 Jetta TDI (sold), '84 Vanagon with '02 ALH engine
TDI fest goal in mind for the conversion!
Yes, the 2011 TDI fest is heavily on my mind, especially it being here in Kentucky. I live about three hours away......that will be an easy for me. I will need to do something about the 22 year running family reunion that's always held on Labor Day weekend! Since my father (86 by then) is the last of 8 brothers, it would be difficult to miss the reunion/family! Most everything with the reunion is on Sunday afternoon. So, that in mind, I feel pretty good about being able to attend!
And, yes, I'd love rolling in with my TDI conversion ticking like a Singer sewing machine!
AndyBees
Top Post Dawg
- Joined
- May 27, 2003
- Location
- Southeast Kentucky
- TDI
- Silver 2003 Jetta TDI, Silver 2000 Jetta TDI (sold), '84 Vanagon with '02 ALH engine
After reading in Paul's Thread about his latest progress with respect to the Intercooler, reminded me of my project.
Question to all readers: Does anyone have recommendations on Turbo piping? I've looked at a good number of "kits" on Flea-bay and a few other web sites. Seems there are a lot of 2.5 to 3.5 inch stuff out there! What's wrong with 2.0 or 2.25 inch Turbo piping? Wouldn't it be easier to plumb with the 2.0 or 2.25 vs the larger diameter pipe? Also, would the smaller piping be "too" restrictive? How about all those TDIs running around with the Intake plugged down to about the size of a Quarter and still seem to run okay?............just thinking!
Give me your two cents on this one!
jjordan11
Veteran Member
I have 2.25" on my van and it seems to do fine. In fact, I was running the same diameter tubing on my hih performance Audi TDI and it did fine. I'll be putting at least 2.5" on my Audi when I get working on it again.
I'll do my best to make it to TDIfest 2011, that would be awesome.
I'll do my best to make it to TDIfest 2011, that would be awesome.
Trailnewt
Well-known member
An ambitious project! Looks like you're having a fine time with it.
I'm using 2" intercooler piping on my 1Z/AHU. That's about the size of the factory tubing. It does just fine. Much easier to shoehorn in to tight locations than big tubing.
I used some stainless steel 2" tubing, a couple stainless bends and some silicone connectors with T-clamps. The tight radius (2" to 2 1/2") tubing bends can be difficult to find but they are out there. Siliconeintakes.com seems to have pretty good prices and customer service for the silicone bits and clamps.
I don't know if the configuration of your ALH intall allows the use of the Saab Blackstone intercooler behind the driver's side tail lamp but that setup works pretty nicely. You can see pictures of my install in the photo section of the tdi-conversion yahoo list:
http://groups.yahoo.com/group/TDI-conversion/photos/album/1232236940/pic/list
Brent
markward
Veteran Member
Andy, I'd have to measure my plumbing, but I recall the restriction is actually at the turbo outlet. For some reason 1.5 inches sticks in my head. In this picture you can barely make out the transition pipe I welded in to go to the larger plumbing to match my intercooler. Sorry the mind is not what it once was. mark

AndyBees
Top Post Dawg
- Joined
- May 27, 2003
- Location
- Southeast Kentucky
- TDI
- Silver 2003 Jetta TDI, Silver 2000 Jetta TDI (sold), '84 Vanagon with '02 ALH engine
Seems most of the Turbo piping kits on Flea-bay are aluminum! That had better be okay, cause that's what I plan to use.
Well, I did get a few things done today.
When working with the fuel tank, I left the return line free just dangling inside the tank. That was a bad decision. So, today, through the fuel level sensor hole, I fished out the end of the line and placed a metal elbow on it. Then I was able to insert the end of it into a hole in the sump where it was originally located with a "return filter." Now, there should be no danger of "gulping air" when the tank is running low.
Also, I worked on modifying the Fuel Level sensor mechanism to accept the Sending Unit mechanism from the ALH tank. Due to a 7.25 inch sweep in the ALH unit vs a 6.75 sweep with the Vanagon unit, I will have to do some serious modifications and hopefully get right in the ball park on operational results!
I have photos and will post later!
jimbote
Certified Volkswagen Nut
great to hear you're going to do a thru hike!!...I'm envious...I did forty+ miles a few years ago through the shenandoah section with a friend who did the whole AT....as far as the sending unit you can just shorten/bend the float arm till you get the right travel ....also you will be fine with 2" or 2.25....you may actually lose a bit of performance going larger on the IC pipingSeems most of the Turbo piping kits on Flea-bay are aluminum! That had better be okay, cause that's what I plan to use.
Well, I did get a few things done today.
When working with the fuel tank, I left the return line free just dangling inside the tank. That was a bad decision. So, today, through the fuel level sensor hole, I fished out the end of the line and placed a metal elbow on it. Then I was able to insert the end of it into a hole in the sump where it was originally located with a "return filter." Now, there should be no danger of "gulping air" when the tank is running low.
Also, I worked on modifying the Fuel Level sensor mechanism to accept the Sending Unit mechanism from the ALH tank. Due to a 7.25 inch sweep in the ALH unit vs a 6.75 sweep with the Vanagon unit, I will have to do some serious modifications and hopefully get right in the ball park on operational results!
I have photos and will post later!
AndyBees
Top Post Dawg
- Joined
- May 27, 2003
- Location
- Southeast Kentucky
- TDI
- Silver 2003 Jetta TDI, Silver 2000 Jetta TDI (sold), '84 Vanagon with '02 ALH engine
Another update: I'm still working the fuel level conversion from the ALH tank to the Vanagon tank. See post #143 for more detail.
Also, today I received the ALH windshield wiper motor and arm assembly. That's going to be a challenge to convert. My desire is to install the ALH system...two reasons, 1. I like it. 2. The wipers on the Vanagon need attention. So, why not divert that labor toward updating the system(s).
Okay: Photos will follow in the near future! My Desktop PC crashed the other day. That PC has my photo program(s) on it. My techy brother will be taking care of this issue for me.
rackaracka
Veteran Member
- Joined
- Nov 15, 2001
- Location
- Monroe, NJ
Andy, hats off to you brother! Very impressive project! I can't wait to follow your progress! I just found this thread today.
Jabba
Member
Hi Andy,
I was asking myself about the way you proceed to adapt your oil sump?
My original oil sump was a plastic one. I've cut it and re-welded it. But i was not confident in my weld so i decided to remove the plastic oil sump to replace it by a metal one.
My project is closed to be finish. Have a look:
http://www.youtube.com/watch?v=VJhclhEyNsI
I had some defaults on my cluster (no warning lights, no dashboard light) i've solved it but my preheaiting indicator is still on, before i turn the key.
For the fuel level i've found this on yahoo tdi group (but not test it. For the moment my fuel level is full but my tank isn't).

AndyBees
Top Post Dawg
- Joined
- May 27, 2003
- Location
- Southeast Kentucky
- TDI
- Silver 2003 Jetta TDI, Silver 2000 Jetta TDI (sold), '84 Vanagon with '02 ALH engine
Jabba, neat Youtube of your project.
Well, my project has been moving a little! In my next post, I'll bring things up to date!
Well, my project has been moving a little! In my next post, I'll bring things up to date!
AndyBees
Top Post Dawg
- Joined
- May 27, 2003
- Location
- Southeast Kentucky
- TDI
- Silver 2003 Jetta TDI, Silver 2000 Jetta TDI (sold), '84 Vanagon with '02 ALH engine
Okay, here is an update that pretty much finishes the Fuel Tank repair/upgrade and modification (ALH fuel level sensor install/modificaiton) I will add the photos of the fuel level sensor mod in the following Post.
All comments are at the top of each photo:
As you may recall, I left the Return fuel line free inside the tank. After many second thoughts, I come to the conclusion it needed to be inserted into the center sump where the uptake (suction) fuel line is located. Located it there assures that return fuel is going back to be picked up again, thus during low fuel level it just might be helpful to prevent gulping air.
So, here is a view of the return line after I "fished" it out of the tank! You can see the Red-Kote on it. The line was plugged during the Red-Kote treatment process.

This is a similar view from a different angle

This photo shows an metal elbow attached....

This photo is looking thru the fuel level sensor hole depicting the return line in the hole in the center sump of the fuel tank bottom.

All comments are at the top of each photo:
As you may recall, I left the Return fuel line free inside the tank. After many second thoughts, I come to the conclusion it needed to be inserted into the center sump where the uptake (suction) fuel line is located. Located it there assures that return fuel is going back to be picked up again, thus during low fuel level it just might be helpful to prevent gulping air.
So, here is a view of the return line after I "fished" it out of the tank! You can see the Red-Kote on it. The line was plugged during the Red-Kote treatment process.
This is a similar view from a different angle
This photo shows an metal elbow attached....
This photo is looking thru the fuel level sensor hole depicting the return line in the hole in the center sump of the fuel tank bottom.
Last edited:
AndyBees
Top Post Dawg
- Joined
- May 27, 2003
- Location
- Southeast Kentucky
- TDI
- Silver 2003 Jetta TDI, Silver 2000 Jetta TDI (sold), '84 Vanagon with '02 ALH engine
*EDIT: In the summer of 2014, I replaced this tank with an eBay purchase. It did leak just enough to keep the bottom "damp." But, considering I go into Canada and back into the USA, I was afraid the border agents might look under and see the patch on the tank and end with a search. So, it was time to replace it. However, I did use this modified Vanagon fuel level sensor in the new tank....
These photos are of the Vanagon fuel level sensor "unit" and the ALH fuel level sensor "unit" with the modifications. Hopefully it will be functional and easily INSTALLED in the fuel tank.
Note: All comments are at the top of the photos: (Also, see *EDIT at #7 below relating to use of the connector/plug)
1. This is a photo of the ALH fuel level sending unit. The photo is after I removed the float and bent the float wire...... sorry that I did not take a photo prior to removing the float. Anyway, you can see the difference in the following photos and how it all works:

2. This is a photo of the Vanagon fuel level sensor unit:

3. This is another view of the ALH fuel level sensor unit. Notice the electrical connector on top. The two pipes sticking up are for the fuel lines (to the IP and Return):

4. Here is another photo of the ALH fuel level sending unit. Notice the connector has been cut out!

5. This photo is of the connector after I cut it out: See EDIT below at #7

6. This is a top veiw of the Vanagon fuel level sensor unit after cutting out the electrical connector and polishing it with the wire brush wheel:

7. This is a photo of the ALH connector sitting in the Vanagon unit as prepared:
*EDIT: I have since cut the plastic away on this connector and soldered long pig-tail wires directly to the connection. The reason I did this is because the connector/plug was up fairly tight against the bottom of the Van flooring (sorry, no photos but is a fairly straight forward procedure). (Also, note that the JB Weld is still perfect to date [2018])

8. This is a photo of the ALH connector JB Welded in the Vanagon unit. Before the JB Weld was applied, all surfaces were cleaned and given a rough "brushing" to provide better bonding: (JB Weld is compatible with Diesel Fuel, Red-Kote also applied):

9. This is another view of the ALH connector in the Vanagon unit (bottom side):

10. This is a similar angle of the unit after Red-Kote was applied. The small Drimel brush was very handy in knocking out all the rust and corrosion:

Additional photos and write-up in next post!
These photos are of the Vanagon fuel level sensor "unit" and the ALH fuel level sensor "unit" with the modifications. Hopefully it will be functional and easily INSTALLED in the fuel tank.
Note: All comments are at the top of the photos: (Also, see *EDIT at #7 below relating to use of the connector/plug)
1. This is a photo of the ALH fuel level sending unit. The photo is after I removed the float and bent the float wire...... sorry that I did not take a photo prior to removing the float. Anyway, you can see the difference in the following photos and how it all works:
2. This is a photo of the Vanagon fuel level sensor unit:
3. This is another view of the ALH fuel level sensor unit. Notice the electrical connector on top. The two pipes sticking up are for the fuel lines (to the IP and Return):
4. Here is another photo of the ALH fuel level sending unit. Notice the connector has been cut out!
5. This photo is of the connector after I cut it out: See EDIT below at #7
6. This is a top veiw of the Vanagon fuel level sensor unit after cutting out the electrical connector and polishing it with the wire brush wheel:
7. This is a photo of the ALH connector sitting in the Vanagon unit as prepared:
*EDIT: I have since cut the plastic away on this connector and soldered long pig-tail wires directly to the connection. The reason I did this is because the connector/plug was up fairly tight against the bottom of the Van flooring (sorry, no photos but is a fairly straight forward procedure). (Also, note that the JB Weld is still perfect to date [2018])
8. This is a photo of the ALH connector JB Welded in the Vanagon unit. Before the JB Weld was applied, all surfaces were cleaned and given a rough "brushing" to provide better bonding: (JB Weld is compatible with Diesel Fuel, Red-Kote also applied):
9. This is another view of the ALH connector in the Vanagon unit (bottom side):
10. This is a similar angle of the unit after Red-Kote was applied. The small Drimel brush was very handy in knocking out all the rust and corrosion:
Additional photos and write-up in next post!
Last edited: