Wingnut
Top Post Dawg
I know I have seen this posted before, but after a short search, I couldn't find it, so I thought I would post up my quick repair of an engine mount with stripped threads.
As you know, aluminum is softer than steel. With the engine mount bolts requiring a significant amount of torque, the threads can get damaged in these mounts after repeated removal & re-installation of the vertical mount bolts. My car is now on its 3rd timing belt and I didn't want to spend $150 on a new mount when I can make my old mount stronger by putting a steel insert in place of the aluminum threads.
On a scale of 1-10, this is about a 2 in difficulty. Other than than the kit itself, the only other tool you need is a tap handle and some cutting oil.
This is the kit I used. It is a Time-Sert kit number 1215 (m12 x 1.50). I went with this kit over a helicoil because it is a solid insert and much better IMHO.

The kit comes with 5 inserts, but they are only 16mm long and I wanted a more solid repair, so I bought extra inserts. They are 24mm long and will hold more of the bolt.
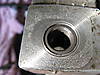
Here is the stripped threads in the mount. Its hard to see as the picture is blurry. But I did not feel that there was enough material left to feel confident it would hold up to another torque and another 160k km of holding the engine up.

Using the supplied drill bit, drill out the old threads. A drill is not required. I used the tap handle:

Then, use the ream tool to make a lip at the top of the hole for the shoulder of the insert. this prevents it from threading below the top of the hole and keeps it flush when inserted.

Then, tap the hole for the insert (cutting oil is recommended):

here are the finished holes to accept the inserts. You can see the lip more clearly in this picture that you made with the ream tool:

Once it is tapped, clean out the hole to remove the shavings. Then use some brake cleaner or similar to clean the threads in the hole. By removing the oil residue from the holes, the threadlock wil hold the insert better.
Apply some Loctite thread lock on the insert:

Use the insert tool to thread the insert into the hole. You must use oil on the insert tool for this step.

As it gets closer to the bottom, it will grab and thread the insert all the way to the bottom and make the repair flush. Its so easy, an 8 year old can do it:

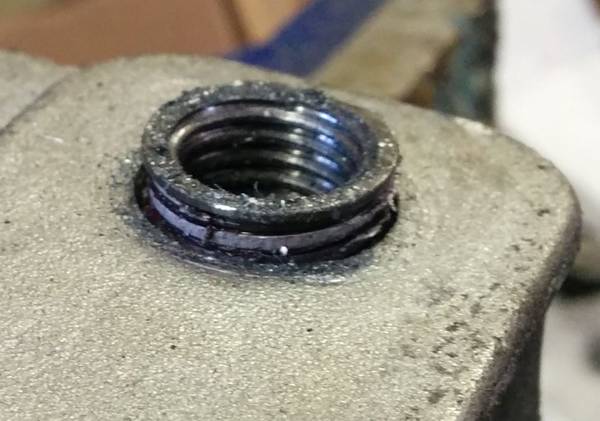
And here is the finished product. The steel inserts are far stronger than the original aluminum threads and you can feel confident about applying the required torque on the new engine mount bolts.

Thanks for looking.
As you know, aluminum is softer than steel. With the engine mount bolts requiring a significant amount of torque, the threads can get damaged in these mounts after repeated removal & re-installation of the vertical mount bolts. My car is now on its 3rd timing belt and I didn't want to spend $150 on a new mount when I can make my old mount stronger by putting a steel insert in place of the aluminum threads.
On a scale of 1-10, this is about a 2 in difficulty. Other than than the kit itself, the only other tool you need is a tap handle and some cutting oil.
This is the kit I used. It is a Time-Sert kit number 1215 (m12 x 1.50). I went with this kit over a helicoil because it is a solid insert and much better IMHO.
The kit comes with 5 inserts, but they are only 16mm long and I wanted a more solid repair, so I bought extra inserts. They are 24mm long and will hold more of the bolt.
Here is the stripped threads in the mount. Its hard to see as the picture is blurry. But I did not feel that there was enough material left to feel confident it would hold up to another torque and another 160k km of holding the engine up.
Using the supplied drill bit, drill out the old threads. A drill is not required. I used the tap handle:
Then, use the ream tool to make a lip at the top of the hole for the shoulder of the insert. this prevents it from threading below the top of the hole and keeps it flush when inserted.
Then, tap the hole for the insert (cutting oil is recommended):
here are the finished holes to accept the inserts. You can see the lip more clearly in this picture that you made with the ream tool:
Once it is tapped, clean out the hole to remove the shavings. Then use some brake cleaner or similar to clean the threads in the hole. By removing the oil residue from the holes, the threadlock wil hold the insert better.
Apply some Loctite thread lock on the insert:
Use the insert tool to thread the insert into the hole. You must use oil on the insert tool for this step.
As it gets closer to the bottom, it will grab and thread the insert all the way to the bottom and make the repair flush. Its so easy, an 8 year old can do it:
And here is the finished product. The steel inserts are far stronger than the original aluminum threads and you can feel confident about applying the required torque on the new engine mount bolts.
Thanks for looking.