Notes for CKRA Timing belt replacement
Notes from CKRA Timing belt replacement at 133,888 miles:
• Reference: CBEA/CJAA Timing belt procedure (Thank you very much!)
o Written by: greengeeker
o Photos by: DanG144, Kriesel, coalminer16
Tools:
• Buy the installation tool kit. This is very convenient if not essential.
• You’re saving money by doing the work yourself. Good excuse to buy tools, right!
Pictures:
• Take pictures of Fuel filter and Coolant reservoir hose routing before and during removal.
• Aids in a quick reinstallation.
Coolant Reservoir:
• I removed this and located the supply line toward the front of the engine.
Fuel System:
• I’m pretty sure the CKRA does not have an auxiliary fuel pump. (I didn’t remove one.)
• Do not disconnect any fuel lines.
o This will alleviate the need to prime system.
Serpentine Belt:
• This belt looked to be in pretty bad shape.
• Buy a spare and keep it in the truck with a 16mm wrench if you’re the paranoid type.
Metalnerd Crank Lock tool:
• Clearance inside radius to clear crank snout diameter.
• Dremel id to remove material to eliminate chamfer. (The chamfered bolt holes locate the tool on the crank.)
Water Pump removal:
• Get a bucket ready.
• Is there a coolant plug / drain on the engine block casting?
• Do replace this. Mine had black junk oozing from weep hole (bearing packing grease?)
Timing Belt tensioner:
• Cannot be removed without removing engine mount bracket. Unless stud is removed, per above. I didn't do this.
• Inspect new timing belt tensioner. Note the pin hole, it’s more like a slot.
o I used a small Allen key instead of the supplied tool. The supplied tool is too large diameter, and too long to be installed with engine mount bracket installed.
o I was glad the Allen key did not shear. Figure out a better tool before you start the project.
Engine mount bracket removal:
• Do this when starting re assembly – When you need to replace tensioner. (Keep the jack out of the way when you're performing the disassembly.)
• Removed / replaced 3ea engine bolts and 2ea mount to bracket bolts.
o Minor finagling of engine was necessary to get the bolts removed, bracket installed, then bracket to mount properly aligned, and 2ea bolts installed.
• Do this step. Give yourself piece of mind that your tensioner is new, and the water pump installation is likely easier without the mount in place.
• Reinstall mount and get the jack out of the way.
Cam and HPFP gear adjusting bolts:
• Do loosen these to aid in timing belt installation
• I left the crank position Tool, and both pins installed through the whole process.
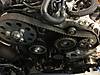
Final timing belt installation:
• I installed the belt around the HPFP, large Idler, small top idler, around cam, tensioner, water pump, pulled tight around crank gear, and then installed the small lower idler.
• The HPFP and crank appeared to be on the correct teeth. The Cam appeared to be one tooth off, the bolts were not centered in the slots. I marked each gear and belt at one tooth with red sharpie.
• At this point I realized I needed to loosen the gear hold down bolts.
• I removed the small lower idler, took the belt off and reinstalled; moving the cam one tooth, and matching the crank and HPFP sharpie marks.
• Tightened all the bolts, confirmed the bolt were centered in the slots, adjusted the tensioner.
• Rotated the engine through several rotations, confirmed the TDC alignment with pins, and then buttoned everything up.
Replace coolant through reservoir. Startup engine. No lights on instrument cluster. Inspect coolant level, top up as required, go for short drive to open thermostat. Let cool off, top up coolant as necessary.
It took me most of the day on Saturday. I raised the car on wheel chocks on 3 wheels, and jack stand on right passenger side, removed wheel, and wheel well. This allowed better access.
This was my first timing belt replacement.