ALH TDI engine transplant into '84 Vanagon

AndyBees

Top Post Dawg
Joined
May 27, 2003
Location
Southeast Kentucky
TDI
Silver 2003 Jetta TDI, Silver 2000 Jetta TDI (sold), '84 Vanagon with '02 ALH engine
Update from South Beach Florida:

Gees! I cannot wait until next week so I can get back to the project......so much yet to do!
 

AndyBees

Top Post Dawg
Joined
May 27, 2003
Location
Southeast Kentucky
TDI
Silver 2003 Jetta TDI, Silver 2000 Jetta TDI (sold), '84 Vanagon with '02 ALH engine
Andy, you were in my neck of the woods and did not stop by to see our vanagon? Sorry we missed you. mark
Mark if it had only been me and the wife, I would have made an effort to get up with you, even before we headed south. However, we were riding with another couple attending a conference at South Beach in Loews Hotel! .......nice! We only had one free day on the way down....went to Key West!

Yesterday, we headed north at about 6:30 am for a stop-over near Dan's neck of the woods just south of Columbia, SC. The dude I was riding with will be heading for Coeur d'alene, Idaho tomorrow morning. So, we were on a tight schedule.
 

markward

Veteran Member
Joined
Jul 5, 2007
Location
Loxahatchee, Florida
TDI
82 Vanagon and 2011 JSW
Andy, no worries, just giving you a hard time. Thinking about adding bigger front brakes now. It stops fine, but gets a little crazy trying to emergency stop from 70mph loaded to the gills. mark
 

AndyBees

Top Post Dawg
Joined
May 27, 2003
Location
Southeast Kentucky
TDI
Silver 2003 Jetta TDI, Silver 2000 Jetta TDI (sold), '84 Vanagon with '02 ALH engine
Update:

Well, this week the welder finished the Intercooler welding mods. Although I have not done anything significant in several weeks, I have been tidying up the garage, going over the wiring, and making some final decisions on a few things.

The following photos are of the Intercooler. The orientation is correct in relation to the engine. Just look at the big black rubber pipe. It is the OE that connects to the EGR. Of course in my application, it will be pointed straight down as it is orientated in these photos. From the back of the Vanagon, the Intake is located on the left side with the EGR inlet pointing toward the rear of the vehicle. The location of the Intercooler will be to the left, slightly lower than the EGR and directly in front and below the left Tail light assembly. (see previous posts [#331] for other info about the Intercooler)

Comments are at the top of each photo...........

Looking at this pic, just imagine that the EGR and Intake are to the right.........everything else is oriented as it will be mounted.

EDIT: Although I did use this Inter Cooler, the set-up you see below was modified considerably from how it looks here. (Edited here, 1/5/2020)


The smaller black pipe (1.5 inch ID) will be coming directly off the Turbo. It will be cut to fit, approximately 7 inches. The pipe coming out of the Intercooler is 2 inch OD as per stock.


This is a similar photo as above but from the opposite direction. To give perspective, the smaller black pipe, uncut, is 12 inches long.


Although visible in some of the other photos, notice the rectangle piece welded on just above the blue outlet pipe. That plate will be bored for the MAP sensor. Also, to the right of it on the other side, a round patch covers the original pipe hole that was OE to the IC.


Just a slightly different angle showing more of the top of the IC


In this photo, you can see the brace that was added for strength. Also, just to the right, you can see where the brace from the OE setup fo the IC was cut off.


Here you can see right into the Black rubber pipe where the EGR will reside.


Here, you are looking at the flip-side of the IC. That's the bottom!


This is a shot of the Outlet without the blue elbow in place


This is a photo of the Inlet side. As you can see, I used a very short piece of pipe then a smaller short piece to put inside of the re-oriented OE pipe that come on the IC.


I do plan to mount a 5.25 inch Spal fan on top of the IC. I have not decided whether it should operate thermo controlled, an on-dash flip switch or just tie it to the ignition elements to run constantly when the engine is in operation.
 
Last edited:

markd89

Veteran Member
Joined
Oct 21, 2009
Location
Los Angeles
TDI
1978 VW Bus 1Z TDI
I do plan to mount a 5.25 inch Spal fan on top of the IC. I have not decided whether it should operate thermo controlled, an on-dash flip switch or just tie it to the ignition elements to run constantly when the engine is in operation.
Intercooler looks pretty :)

I've heard several opinions on the IC fan. I've decided to run mine (7" flex-a-lite) continuously when the engine is on rather than thermo controlled, for the following reasons...

1. Maximum cool air = lowest EGTs. Even if cruising along at low-ish PSI, the air is still being compressed and heated.

2. Amp draw is a relatively neglible load on the electrical system.

3. Like most moving parts, I think the start/stops are more wear on the fan than just keeping it running.

4. The fan is accessible and replaceable and if I have to replace it every few years ($80), that's OK.

5. No temp switch complexity. I'm going to be triggering the relay from the alternator D+ connection (alt-warning light), so the fan will only run when the engine is actually running.

Good luck!
Mark
 

AndyBees

Top Post Dawg
Joined
May 27, 2003
Location
Southeast Kentucky
TDI
Silver 2003 Jetta TDI, Silver 2000 Jetta TDI (sold), '84 Vanagon with '02 ALH engine
Coolant Return piping from Heater, Oil Cooler and Tank

EDIT: Since this post and installing the engine, I have modified the coolant pipe. Notice the long 90 degree section. Via a hose, it connects to the bottom of the Coolant Expansion Tank. Well, that section of metal pipe and hose was directly over the top end of the right side motor mount bracket and bolt. It was very difficult to access and remove the mount bolt. So, I moved the pipe near the end and angled it back and down toward he bottom of the Expansion tank (sorry, no pics). The mod was made in June, 2017.

Markd89, thanks for the comments and input. I'm leaning toward your suggestion of a continuous running fan.

Here are some photos of the Return Coolant Piping from the Heater, Oil Cooler and the Coolant tank.

This issue was discussed on page 18 at post #266. But, I will repost some of those photos again here.

The issue that I'm addressing here is the "directional angle" of the heater Return line at the engine. With the engine sitting in the Jetta that pipe pointed toward the firewall (in the Van that would be to the left side). I need it to point toward the front of the vehicle and slightly to the right (looking from rear of vehicle)

All Comments are at the top of the PHOTOs.

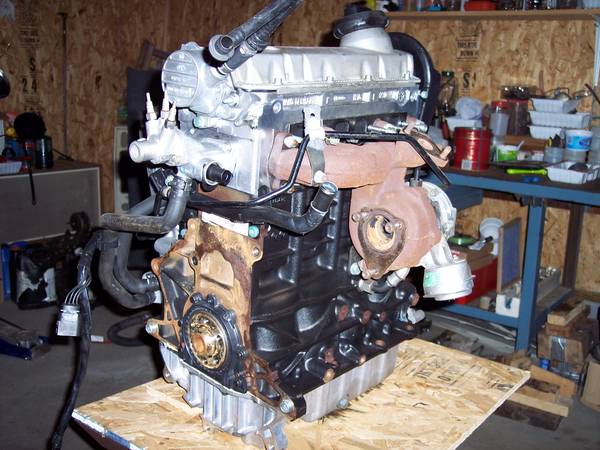
This photo shows the OE location of the pipe there at the back end of the engine block just below the end of the head...its black and pointing to the right and UP. You can see it there below the Turbo oil feed line.


In this shot, you can see where the top left coolant hose coming out of the Oil Cooler goes up and into the pipe .....that's return flow. The flow is to the left toward the water pump (into the T-stat housing).


Here, you can see in this close-up the short stub T return line from the Oil cooler. Notice that the other line coming from the heater has been cut-off (looks to be flush with the end of the block). That smaller black line is the oil feed for the Turbo.


This is another angle. You are looking directly into the return pipe from the Oil Cooler. See to the right where I cut off the return from the heater. Coolant flow would be IN and to the left toward the TB end of the Engine to the water pump housing on the block!


In this photo, you can see the complete coolant return pipe that involves the Heater return (top left), the Oil Cooler Return "T" pipe (center at between 6 and 7 inches) and the Round Coolant Tank return (to the right). The bottom part goes into the back of the Water Pump housing on the block.......the round rubber seal is slightly visible!


In this photo, you can see how it has been modified. The far end points to the right toward where the return heater hose is located in the Vanagon. The foreground of the photo is pointing toward the rear of the vehicle (timing belt end of the engine).

EDIT: In the pic below, see the T off to the right? Well, it is the return from the bottom of the expansion tank. In June of 2017, I cut it off and moved it to the right side of the bend at the top of the pic. It now points basically in the same direction. This gives me much needed access to the top bolt of the right side motor mount bracket which is located near the metal dip stick tube. edited on 12/28/2017


Here is another angle of the finished modification.


Here is a close-up of the modified end of the Coolant Return pipe. It will be buffed at the weld joints and painted!


Here the coolant return pipe is "sitting" in place.


Here is a similar angle as above. You can see the Starter and Clutch Slave in this photo.


These are the sort of things that slows a project to a grinding halt. But, in the end everything will fit better and, of course, look nice!
 
Last edited:

markward

Veteran Member
Joined
Jul 5, 2007
Location
Loxahatchee, Florida
TDI
82 Vanagon and 2011 JSW
Here you can see right into the Black rubber pipe where the EGR will reside.
Hi Andy, When you say EGR, are you referring to the intake manifold inlet? Are you going to delete the actual EGR cooler? I was able to leave my coolant bypass pipe intact. My heater outlet and return are on the low side of the engine where the egr cooler would have been. For the one unused pipe that comes up from the coolant return, I plugged it with a rubber cap.

My oil cooler failed internally, I I upgraded to the larger cooler from the PD. It was a tight fit, but was able to use the original coolant hoses on it. I found the information hear in another section. Was a huge mess, when it failed. And that is an understatement. mark
 

AndyBees

Top Post Dawg
Joined
May 27, 2003
Location
Southeast Kentucky
TDI
Silver 2003 Jetta TDI, Silver 2000 Jetta TDI (sold), '84 Vanagon with '02 ALH engine
Hi Andy, When you say EGR, are you referring to the intake manifold inlet? Are you going to delete the actual EGR cooler? I was able to leave my coolant bypass pipe intact. My heater outlet and return are on the low side of the engine where the egr cooler would have been. For the one unused pipe that comes up from the coolant return, I plugged it with a rubber cap.

My oil cooler failed internally, I I upgraded to the larger cooler from the PD. It was a tight fit, but was able to use the original coolant hoses on it. I found the information hear in another section. Was a huge mess, when it failed. And that is an understatement. mark

Yes, I plan to use the modified EGR assembly for the ASV purposes primarily. Also, it has been my plan to eliminate the EGR Cooler assembly as well.


I've not really looked into how the piping will all come into play that relates to the EGR Cooler. I have marked and roughed-in the main coolant pipes from a Jetta TDI. I don't think special piping will be necessary to purchase or piece together.

I lack the right side motor mount bracket which will finish that aspect of the project. The aluminum prototype bracket was duplicated in steel by the welder but has not been welded together yet. I've had it for tweaking purposes. It's now ready to be welded.

Also, I need to return the oil pan for addressing two leaks (freebie).

The electrical is something I need to get back to and finish!:eek:
 

AndyBees

Top Post Dawg
Joined
May 27, 2003
Location
Southeast Kentucky
TDI
Silver 2003 Jetta TDI, Silver 2000 Jetta TDI (sold), '84 Vanagon with '02 ALH engine
Update: Well, I finally got back to the project this afternoon. Although the motor mount brackets and related items have previously been discussed and photos posted, these photos are of the real deal in the rough.

Remember, comments are at the top of each photo. (EDIT: the engine mount bracket pictured immediately below, has been replaced by a one piece unit shaped very similar but also much thicker, about 3/8 inch.) Also, as of 6/12/16, I dumped the hydraulic motor mounts and went with the OE Diesel mounts.

This is the right side mount in the rough. It is not finished. The left side bolts to the engine and the right side to the motor mount. It is a three-piece item at this point with small bolts holding it together. The welder will finish-up and remove the bolts.


Here, you are looking straight down at the right side motor mount bracket. Notice, it is located just in front of the AC Pump (no pipes on the AC unit).


In this pic, you are looking toward the rear of the Vanagon on the right side. The outlets for the AC piping are visible (paper stuffed in the holes). Notice how the motor mount bracket goes below the AC unit for clearance of the piping. Also, there will be an "arcing" brace that will be slightly higher than the AC unit that will bolt up to the mount and somewhere up on the block part of the bracket.


This is the Left Side motor mount bracket. You can see the outlet to the Turbo. The Turbo outlet is "indexed" up away from OEM setting.


Here you are looking down at the Left Side motor mount bracket. The Charge pipe from the Turbo will go under the motor mount bracket but over top the engine carrier bar (black bar).


In this photo, you are looking up at the other end of the Left Side motor mount bracket. Notice, it has a C-clamp holding it to the main bracket that's bolted to the end of the block.


In this photo, you are looking down from the top of the Left Side motor mount bracket.


I did not take a photo of the "main bracket" on the left side that bolts to the Timing Belt end of the block. I'll add it later.
All the extra metal, rough cuts, etc., will be trimmed and painted prior to final installation!
 
Last edited:

AndyBees

Top Post Dawg
Joined
May 27, 2003
Location
Southeast Kentucky
TDI
Silver 2003 Jetta TDI, Silver 2000 Jetta TDI (sold), '84 Vanagon with '02 ALH engine
Greengeeker, on the bottom of the EGR assembly, I plan to use a plate with gaske. I will have the hole on top, where the rod went thru, either welded over or use it for a boost gauge access.
 

AndyBees

Top Post Dawg
Joined
May 27, 2003
Location
Southeast Kentucky
TDI
Silver 2003 Jetta TDI, Silver 2000 Jetta TDI (sold), '84 Vanagon with '02 ALH engine
Update

I'm trying to get all the welding finished. Last Friday, I dropped off the Air Conditioning fittings for the ALH AC compressor to the aluminum welder. I cut the #12 fittings off the back of the OE compressor from the Vanagon and shaped them to be welded to the aluminum lines coming off the OE AC compressor that's mounted to the ALH engine.

Although the photos below are not the end result, it will look similar.


I also dropped off the right motor mount bracket for final welding and fabrication.

Hopefully, I will have all this "stuff" ready for installation by the end of the week!

Electrical will be next!
 

bigbug86

Member
Joined
Oct 23, 2011
Location
Brookings Or
TDI
Lesharo
Hi Andy
I wonder if I could get some advice from you, I have a Lesharo Rv wait approximately 5,500 Lb I’m trying to purchase a 2010 VW Jetta TDI donor car it has a auto trans, the Jetta ways approximately 2,300 Lb also the Jetta tires are 25” tall and the Lesharo tires are 29” so I will have to install a lower Gear! How do I determine what size gear to use and also where do I purchase one? Can you help or can you steer me to some one that can!! I’m reading up on every thing that I can!! Thanks Walt
 

AndyBees

Top Post Dawg
Joined
May 27, 2003
Location
Southeast Kentucky
TDI
Silver 2003 Jetta TDI, Silver 2000 Jetta TDI (sold), '84 Vanagon with '02 ALH engine
Gearing

Hi Andy
I wonder if I could get some advice from you, I have a Lesharo Rv wait approximately 5,500 Lb I’m trying to purchase a 2010 VW Jetta TDI donor car it has a auto trans, the Jetta ways approximately 2,300 Lb also the Jetta tires are 25” tall and the Lesharo tires are 29” so I will have to install a lower Gear! How do I determine what size gear to use and also where do I purchase one? Can you help or can you steer me to some one that can!! I’m reading up on every thing that I can!! Thanks Walt
I've read your Thread and been giving it some thought. I am familiar with the Lesharo. A few years ago, I done some on-line research, followed prices in various traders, including eBay and actually test drove a few of them. As I recall, the engine is in-line with the front wheel drive. Also, I do remember something about Winnbago selling out or something like that. And, there have been problems with those trannys. As I recall, there is some on-line support and following for both the diesel version and gassers.

So, right off, you have to make a decision as to whether you want to mate the TDI engine to the Lesharo tranny or do a complete swap. A complete swap would been deeply involved, including such things as motor mounts, tranny mounts, axles, hubs, suspension mods, etc.

Also, seems I read some suggestions to use a Passast or Audi tranny keeping the in-line configuration.

As for gearing, if you are talking about the auto tranny, I have not seen anything. And, I am not familiar with the later TDI engines and feel any comments there would be sort of biased...... as you can see, I am working with an '02 ALH engine.

Here is a link to a web site for caculating tire size and affect of changes. You need to know the info on tire sizes of the two vehicles. I believe a comprimise may work best........here is the link: http://www.net-comber.com/tirecalc.html
 

AndyBees

Top Post Dawg
Joined
May 27, 2003
Location
Southeast Kentucky
TDI
Silver 2003 Jetta TDI, Silver 2000 Jetta TDI (sold), '84 Vanagon with '02 ALH engine
Update on few things. As I stated in a previous post, these items were all picked up from the welder last week.

This is a pic of the Vanagon OE AC lines with the adaptors. Unfortunately, when I was ordering these, I just assumed the threaded fittings were #10 & #8. So, they would not work. The supplier did not carrier these fittings with the correct end, #12.


So, in the following pics you will see how I had to improvise.
This is the end off the OE Vanagon AC compressor.......#12 fittings.


Pic of the end being cut to remove the fittings.


These are the #12 ends welded onto the TDI ALH AC Compressor line fittings.

EDIT: The fabricated adapters below proved to be problematic due to the welding. The cast and pure aluminum would cause mini craters that would allow Freon to leak out. I did do an on the bench vacuum of each piece and allow epoxy to move into the cracks and pits. That worked fine for a long time. Then, in the summer of 2016, the pressure hose blew just above the transmission. So, I replaced all the hose and fittings, and used the acorn adapters pictured above, with new stuff from Coldhose.com. It all works great. edited on 12/28/2017


This is a pic of the modified oil pump pick-up tube. It was cut and oriented to fit the new oil pan.


Another angle!


These next photos are of the Coolant Heating Glow Plug Assembly. As you may recall, I cannot leave it mounted on the end of the head due to clearance issues with the Van engine bay tin. So, instead, I will be adding a flange from a VW Rabbit engine to the end of the main coolant flange on the back of the head. Then, as you can see here, I am adding a modified flange from a VW Rabbit engine to the Coolant Heating GP Assembly which will be mounted over the Transmission up and behind the starter.


Last edited:

AndyBees

Top Post Dawg
Joined
May 27, 2003
Location
Southeast Kentucky
TDI
Silver 2003 Jetta TDI, Silver 2000 Jetta TDI (sold), '84 Vanagon with '02 ALH engine
Update:

Well, I didn't want my Thread to fall of the bottom!

Anyway, over the past two weeks very little has been done on the project. I have went over wiring diagrams, especially for those cirucits that will involve the Vanagon circuits.

I've said it before, I hope things to start moving a little better next week! My biggest hang-up has been my steel welder! He just never gets in a hurry with my stuff!
 

AndyBees

Top Post Dawg
Joined
May 27, 2003
Location
Southeast Kentucky
TDI
Silver 2003 Jetta TDI, Silver 2000 Jetta TDI (sold), '84 Vanagon with '02 ALH engine
Welding

Nice adaptations on the ac and coolant lines...one day your frustration with the welder will find you in northern tool shopping for your own ;)
Yep, my wife said the same thing a few weeks ago!......go buy your own welder and teach yourself to weld!

My cousin teaches welding at vocational school in a nearby county.

Well, I'm very close to where everything is going to start falling together pretty fast. I could actually start placing all the wiring now. But, I need to pull the engine for flywheel/clutch installation. At the time I was setting the engine in over the back of the Vanagon engine bay area, I was not sure it was possible. So, to reduce weight, I left off the flywheel, Intake, AC compressor, etc.

So, when I pull the engine back out, that will give me more room to get in the bay and do some drilling for fuel filter mount, power steering reservior mount, fuel line routing, heater hose routing, cutting wiring hole access under the back seat, AC line support bracket (over tranny), and, I want to do some painting in the engine bay and up over the tranny.

I can see the light at the end of the tunnel!:)
 

AndyBees

Top Post Dawg
Joined
May 27, 2003
Location
Southeast Kentucky
TDI
Silver 2003 Jetta TDI, Silver 2000 Jetta TDI (sold), '84 Vanagon with '02 ALH engine
Update:

Finally, yesterday, I got from the welder the right side engine bracket for the motor mount.

So, this week I'll be seeing how well it fits. I'm going to bolt everything up and let the weight down on the mounts.

If all is well, I plan to re-visit the CAT. I initially located it in a bad place. If interested, go back to Post #294, 295, etc., and take a look. In that position, it will be too close to the harmonic balancer as well as the oil fill pipe I plan to install for access at the license plate pull-down.

I hope to post a few photos this week!
 

AndyBees

Top Post Dawg
Joined
May 27, 2003
Location
Southeast Kentucky
TDI
Silver 2003 Jetta TDI, Silver 2000 Jetta TDI (sold), '84 Vanagon with '02 ALH engine
Update

Disappointment! The right side engine mount bracket works great! The left side engine mount bracket will need reinforcement from the tranny end of the engine.

Here are a few pics to refresh your memory.
In the pic below is the left motor mount and the bottom part of the engine bracket.


The pic below shows the top part of the engine bracket and where it bolts (now bolted) to the piece on the end of the block.
Well, the problem is that piece on the end of the block. Even though it is 1/4 inch thick, the weight of the engine twists it down and back. Either that piece will need to be thicker or add another brace from the tranny end of the engine.......the latter seems the best way to go........now back to the drawing board.


So, now than I am done with the first welder, I will take the bracket to the guy who has been doing my aluminum welding. The first welder is a great guy but he got a new job about the time I started using him.
 
Last edited:

AndyBees

Top Post Dawg
Joined
May 27, 2003
Location
Southeast Kentucky
TDI
Silver 2003 Jetta TDI, Silver 2000 Jetta TDI (sold), '84 Vanagon with '02 ALH engine
Okay, here are a few pics of the right side engine bracket/mount. It looks a little rusty and rough, but I feel really good about it's strength as well as fit-ment!

Below is a view from the top right side of the engine bay, which is similar to previous photos. However, here you can see the arch for providing stability. The welder was having a little difficulty coming up with something to use ......... I suggested using rebar. So, there you have it....3/4 inch rebar! I temporarily connected the AC lines for fit-ment. They can be seen in the other photos below. The OE bend in the AC lines looks to be in the wrong direction. However, it actually works quite well in moving the lines away from the engine and allowing a gentle arc up and over the tranny. I will add a support for the AC lines above the tranny. The length of the lines is perfect.


Below, you are looking from the bottom toward the back of the vehicle

Below is another angle from the bottom


Of course, the plan is to clean and paint every piece upon final assembly!

As I stated in the previous post, the left side bracket is proving to be a PITA. I plan to add another support brace from the tranny end of the engine. I've taken measurements, etc., and determined that's the only logical solution.
 
Last edited:

jjordan11

Veteran Member
Joined
Jan 5, 2008
Location
Lehi, UT
TDI
1988 Audi 80 quattro PD130, 1982 Westfalia TDI
Andy, how's the conversion going.

I like the new profile picture, I don't recognize him though :).
 

AndyBees

Top Post Dawg
Joined
May 27, 2003
Location
Southeast Kentucky
TDI
Silver 2003 Jetta TDI, Silver 2000 Jetta TDI (sold), '84 Vanagon with '02 ALH engine
Project update and profile photo

Andy, how's the conversion going.

I like the new profile picture, I don't recognize him though :).
Well, Jon, only you and a few others would know that the profile photo is not me. I put that pic up sort of as a joke but will replace it soon. Actually a long story that started a few weeks ago..:D

Behind the scenes out in the garage, things are moving, although slower than I like. The left "bracket brace" that will support the engine on the motor mount needs further "engineering." So, that's been addressed and maybe will be ready to try very soon.
 

markward

Veteran Member
Joined
Jul 5, 2007
Location
Loxahatchee, Florida
TDI
82 Vanagon and 2011 JSW
Andy, its a new year. How are things going? Santa brought us an Espar heater and a Sirius satellite for Christmas. Supposed to get cold here tonight. The plan is to have the heater installed and the sirius for a VW camper GTG on the Suwanee River end of this month. Hope you and your family are well. mark
 

AndyBees

Top Post Dawg
Joined
May 27, 2003
Location
Southeast Kentucky
TDI
Silver 2003 Jetta TDI, Silver 2000 Jetta TDI (sold), '84 Vanagon with '02 ALH engine
Moving right along

Andy, its a new year. How are things going? Santa brought us an Espar heater and a Sirius satellite for Christmas. Supposed to get cold here tonight. The plan is to have the heater installed and the sirius for a VW camper GTG on the Suwanee River end of this month. Hope you and your family are well. mark
Mark, I believe Santa rewarded you for a good year! I bet you cannot wait to try those new gadgets!

Well, things have actually been moving rather slow! I've been pre-occupied with a couple of things, 1. helping my brother re-model a house and 2. Baby sitting with the two grandchildren.

I've got to get back to my project in a more serious way!

As part of the re-engineering of the left motor mount bracket, I need to incorporate a torque limiter as you did! I have a couple of ideas to considered!

I wish you and yours a Happy New Year!
 

AndyBees

Top Post Dawg
Joined
May 27, 2003
Location
Southeast Kentucky
TDI
Silver 2003 Jetta TDI, Silver 2000 Jetta TDI (sold), '84 Vanagon with '02 ALH engine
Okay, I'm sure everyone that's following this conversion project would like to see some progress and more updates.

As you may have concluded, personal things have kept me away from the project physcially. But, it is on my mind daily.

I turned on the heat in the garage this morning and hope to address some things this afternoon.
 
Top