
fnjimmy!
Chucklechump
(Mods, please move this if it belongs in a different forum.)
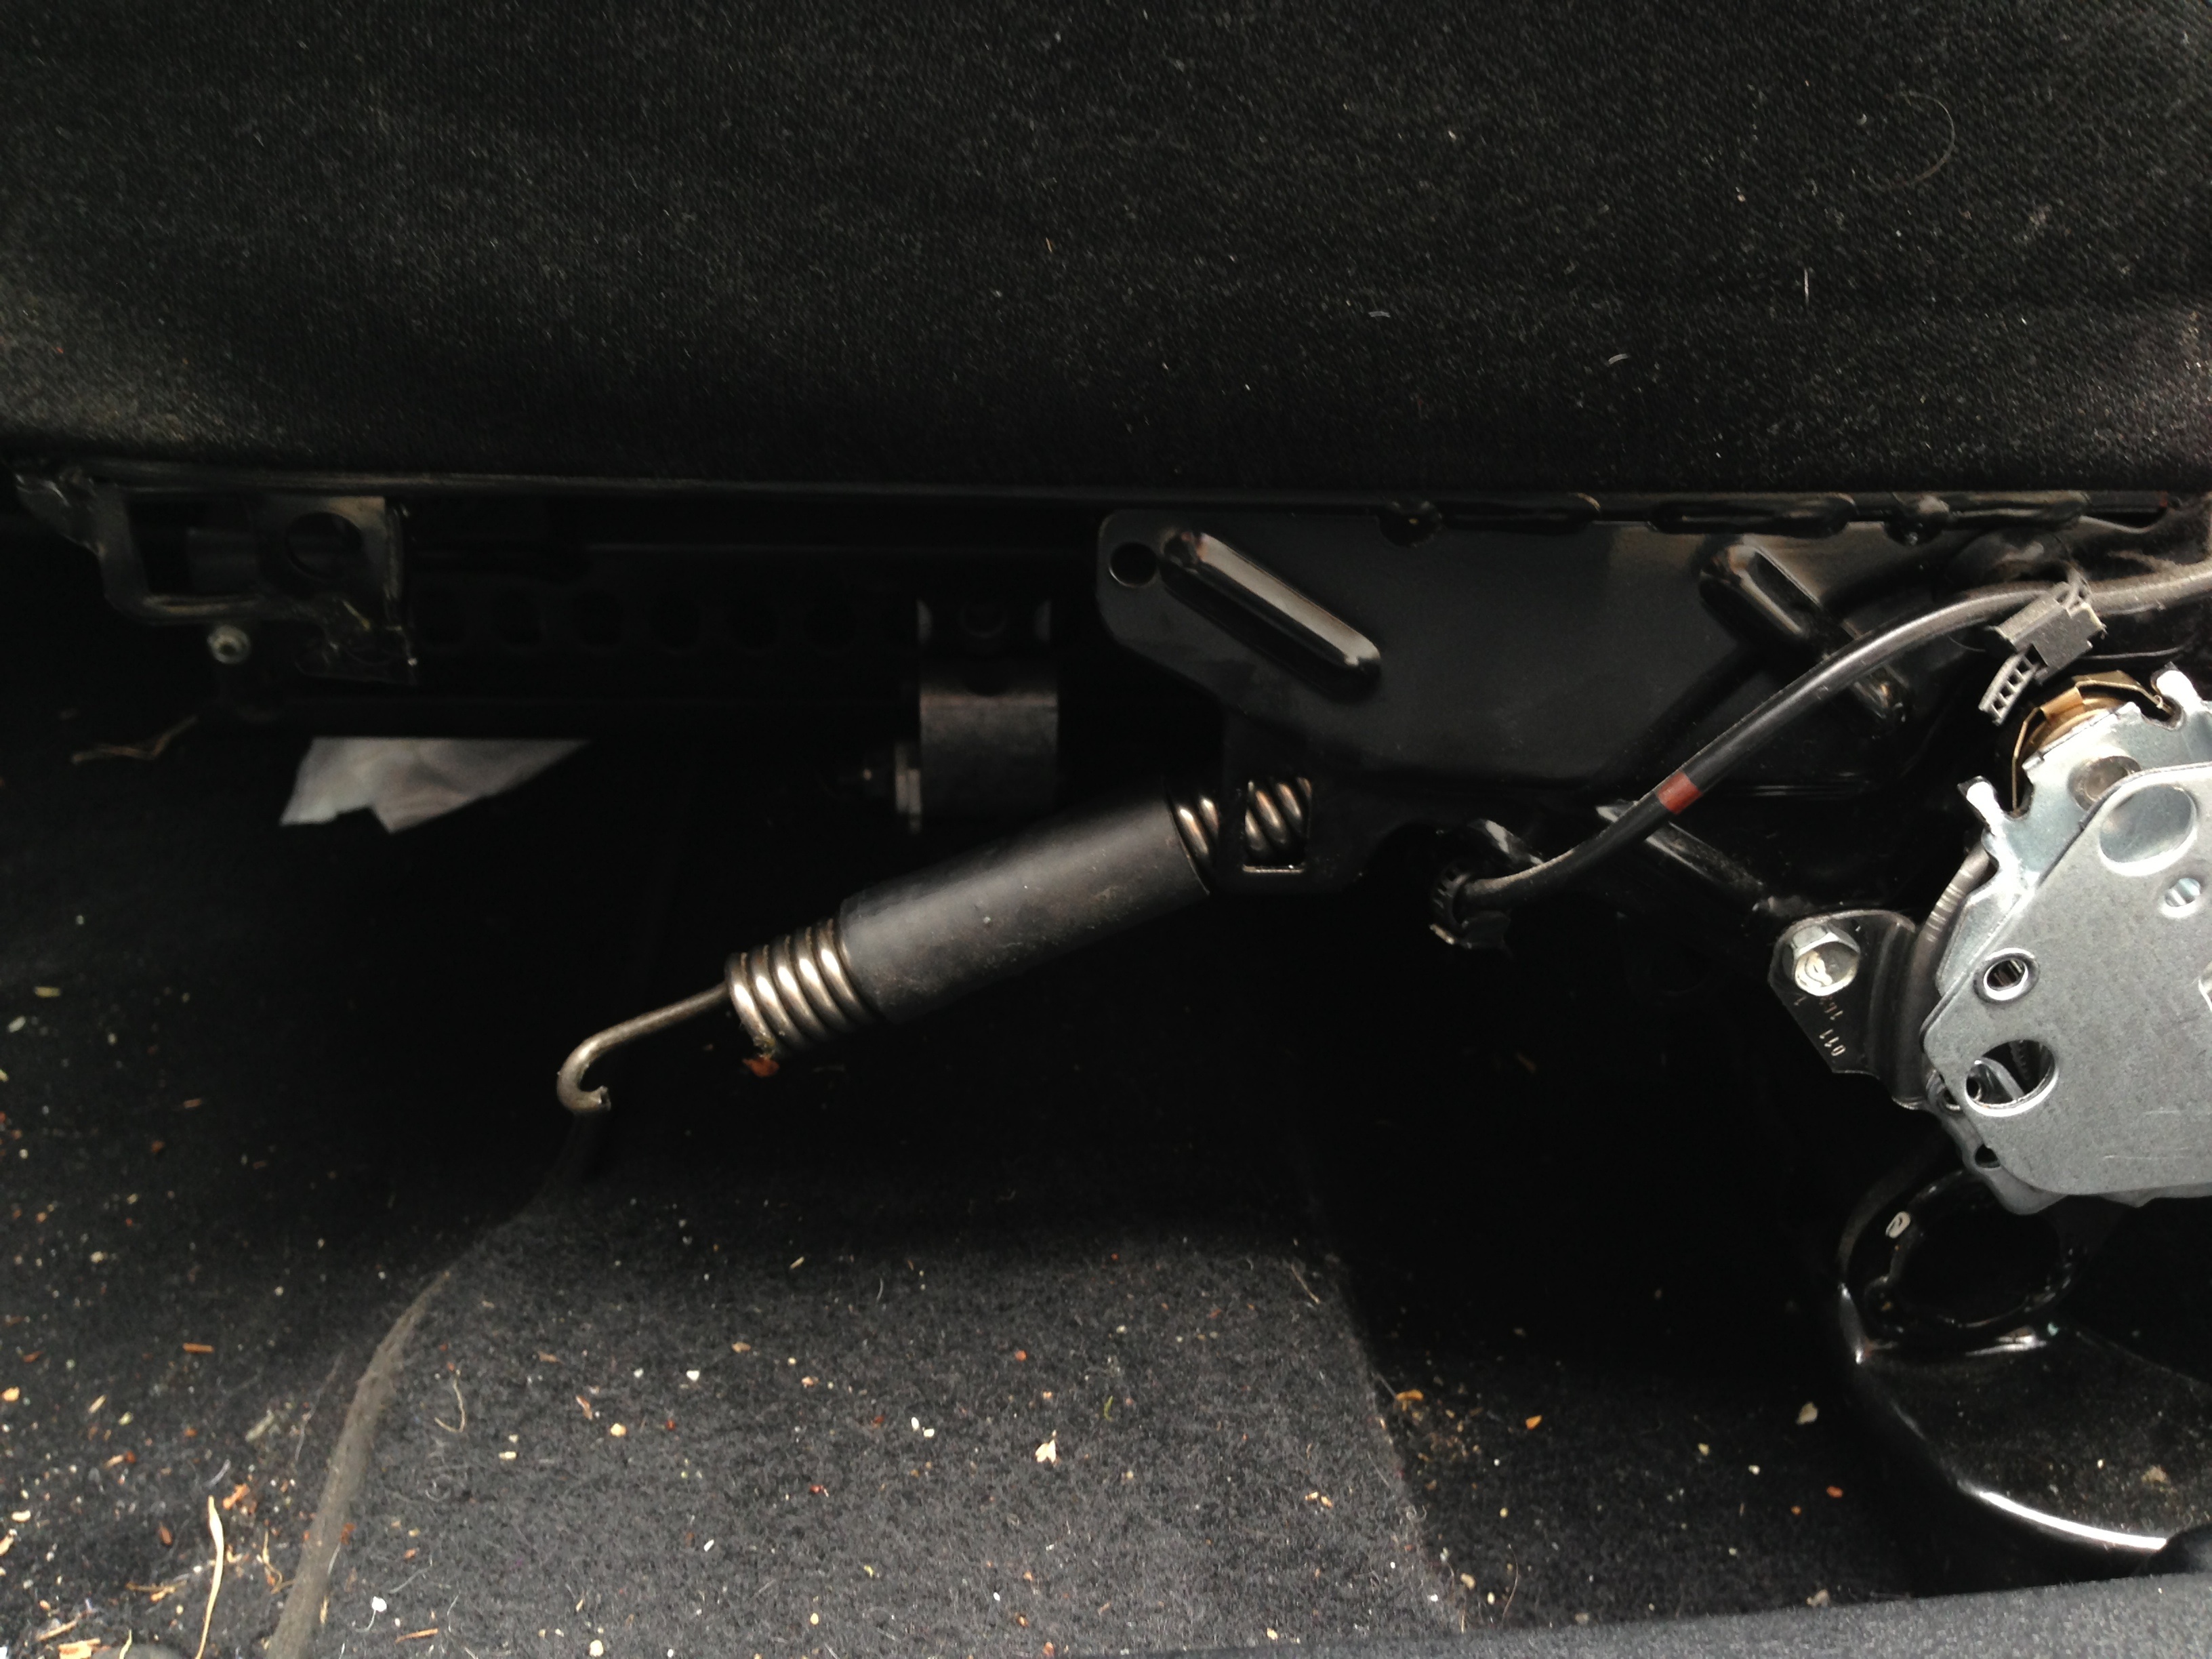
You may have heard of this mystery spring Mk4 owners find underneath their seat:

A lot of people claim this spring is to help the seat slide forward and backward and that it isn't necessary. They're wrong about both claims.
The spring is a helper spring to alleviate stress from and assist the seat height adjuster assembly:

If you've had to replace your seat height adjuster, you know they aren't cheap. Sadly, it's likely that the premature failure of the height adjuster was indirectly caused by the failure of the rear attachment point for that spring. Most have failed by now, and mine wasn't hanging down like the picture indicates but was really just laying in the seat frame. I only noticed the problem when I saw that there was a gap between the front hook on the spring and an the place on the seat frame where it attaches. When I touched it I felt it was loose and not under tension.
This write-up is an explanation of how to fix this problem and save your seat height adjuster, whether you're replacing one that's failed or you prefer to prevent failure of your good adjusters. Please ignore my dirty carpet as I've had a broken seat adjuster, which is why it looks brand new in the pictures.") The second time I did this the entire job took just under 30 minutes. Someone doing a speed run could probably do it in about 10 but I'm patient and drink beer while I work on my car so it adds time.
The second time I did this the entire job took just under 30 minutes. Someone doing a speed run could probably do it in about 10 but I'm patient and drink beer while I work on my car so it adds time.
Tools required:
Small thin screwdriver or prying apparatus to get the plastic screw cover plugs out of the seat height adjuster lever
T25 bit/driver etc to remove the seat height adjuster lever screws from the seat height adjuster
Phillips screwdriver for the two trim screws on the front of the seat
10mm combo wrench
Punch, less than 1/4" diameter tip
Small hammer
Taper tap (more on this later)
Screw (same size and thread pitch as tap)
Medium flat screwdriver or other appropriate prying apparatus for reinstallation of spring.
Carefully remove the plastic plugs/screw covers from the seat height adjuster lever. Don't gouge up the plastic.
Using the T25 tool, remove the two screws holding the seat height adjuster lever to the seat height adjuster.
Carefully remove the seatback angle adjustment knob cover, these are easy to crack.
Remove the two phillips screws on the front of the outer seat trim. One is on the outside, and is obvious, the other is just above and behind it, underneath the inboard seat trim. It overlaps so you may have to wrangle the trim around a little to get at it.
Gently remove the outer trim from the seat base. There are a few tabs on the top and bottom you want to be careful not to break. There is also a peculiar fastener just forward of the opening for the height adjustment lever. It is a spreader like a plastic rivet, has a cone tip, and is over an inch long. It should be pulled out of the trim from underneath the seat before you attempt to remove the trim. Here's a link to a pic of the passenger side trim, removed from the seat, with the fastener installed:
http://pics.tdiclub.com/data/500/photo1.png
and removed:
http://pics.tdiclub.com/data/500/photo11.png
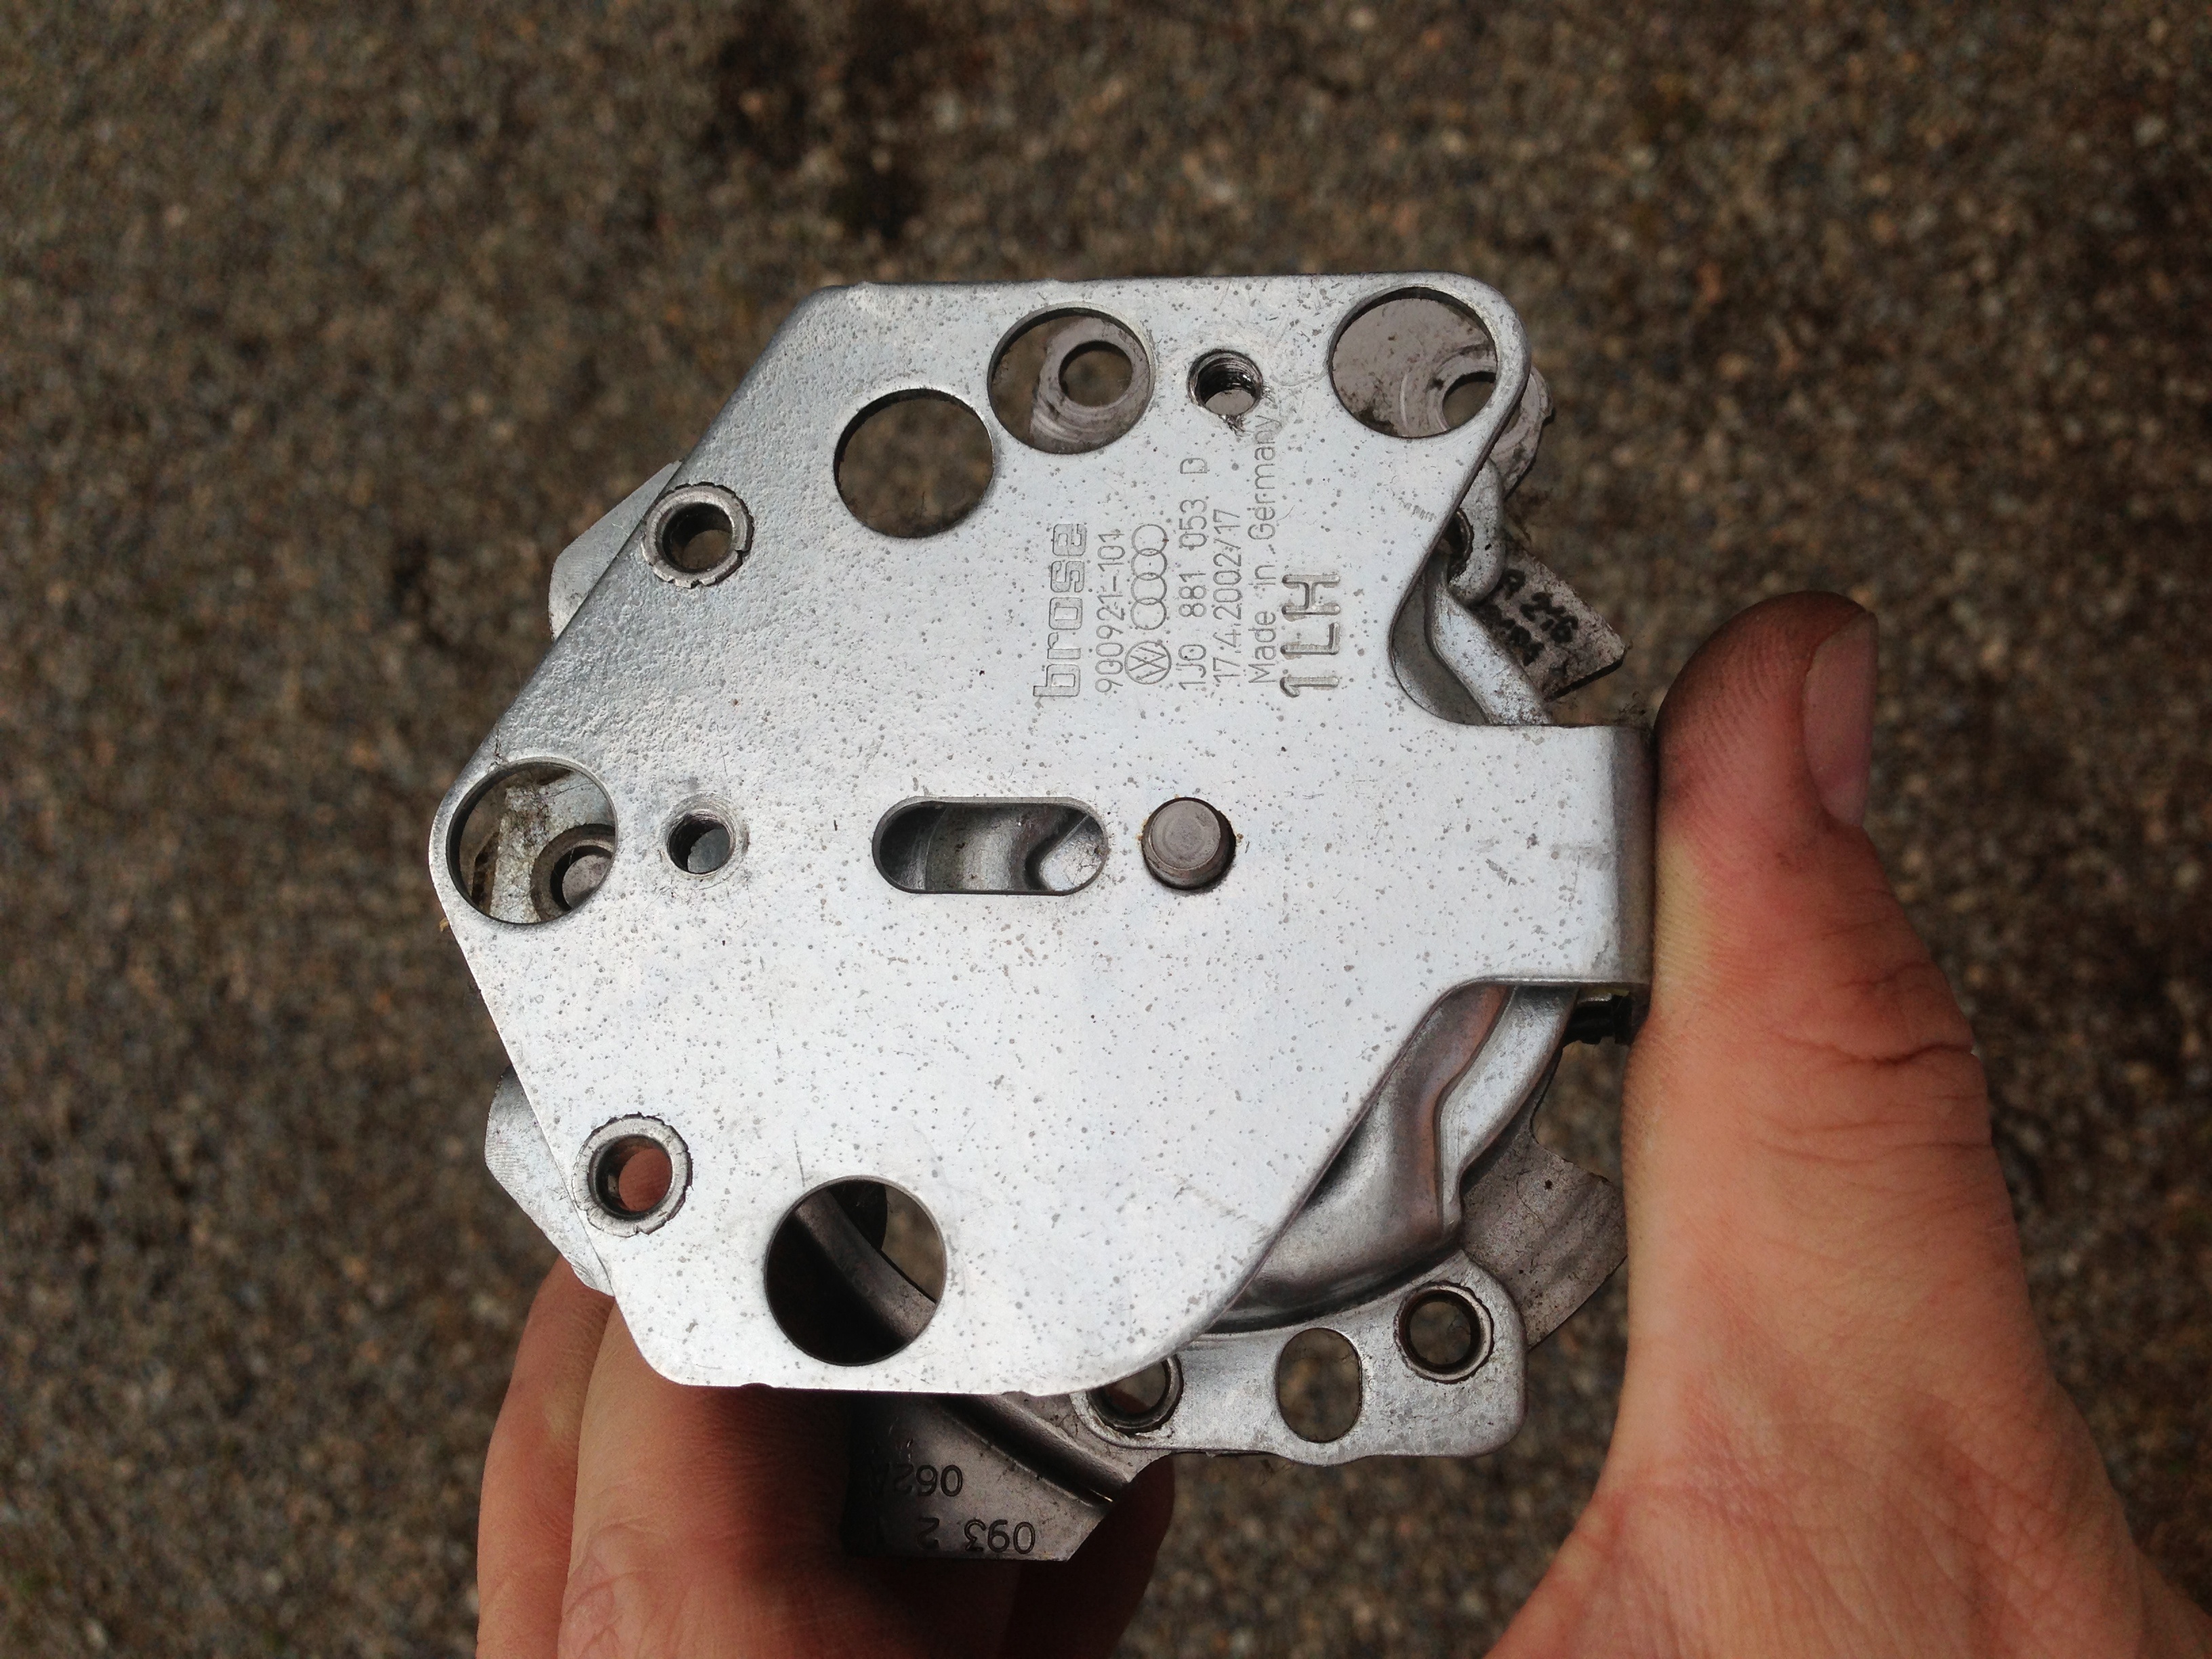
Now remove the seat height adjuster. It's 3 10mm-head hex bolts, one on the front side and two at the rear. I ran into some interference with sockets so I just used a combo wrench.

Now wiggle and pull the adjuster out. You may have to push/pull on the seatback a little to get the adjuster free. Careful, the seat can now drop to the floor. If it can't, get the crap out from underneath it before you proceed.
Now you should have something that looks like this:

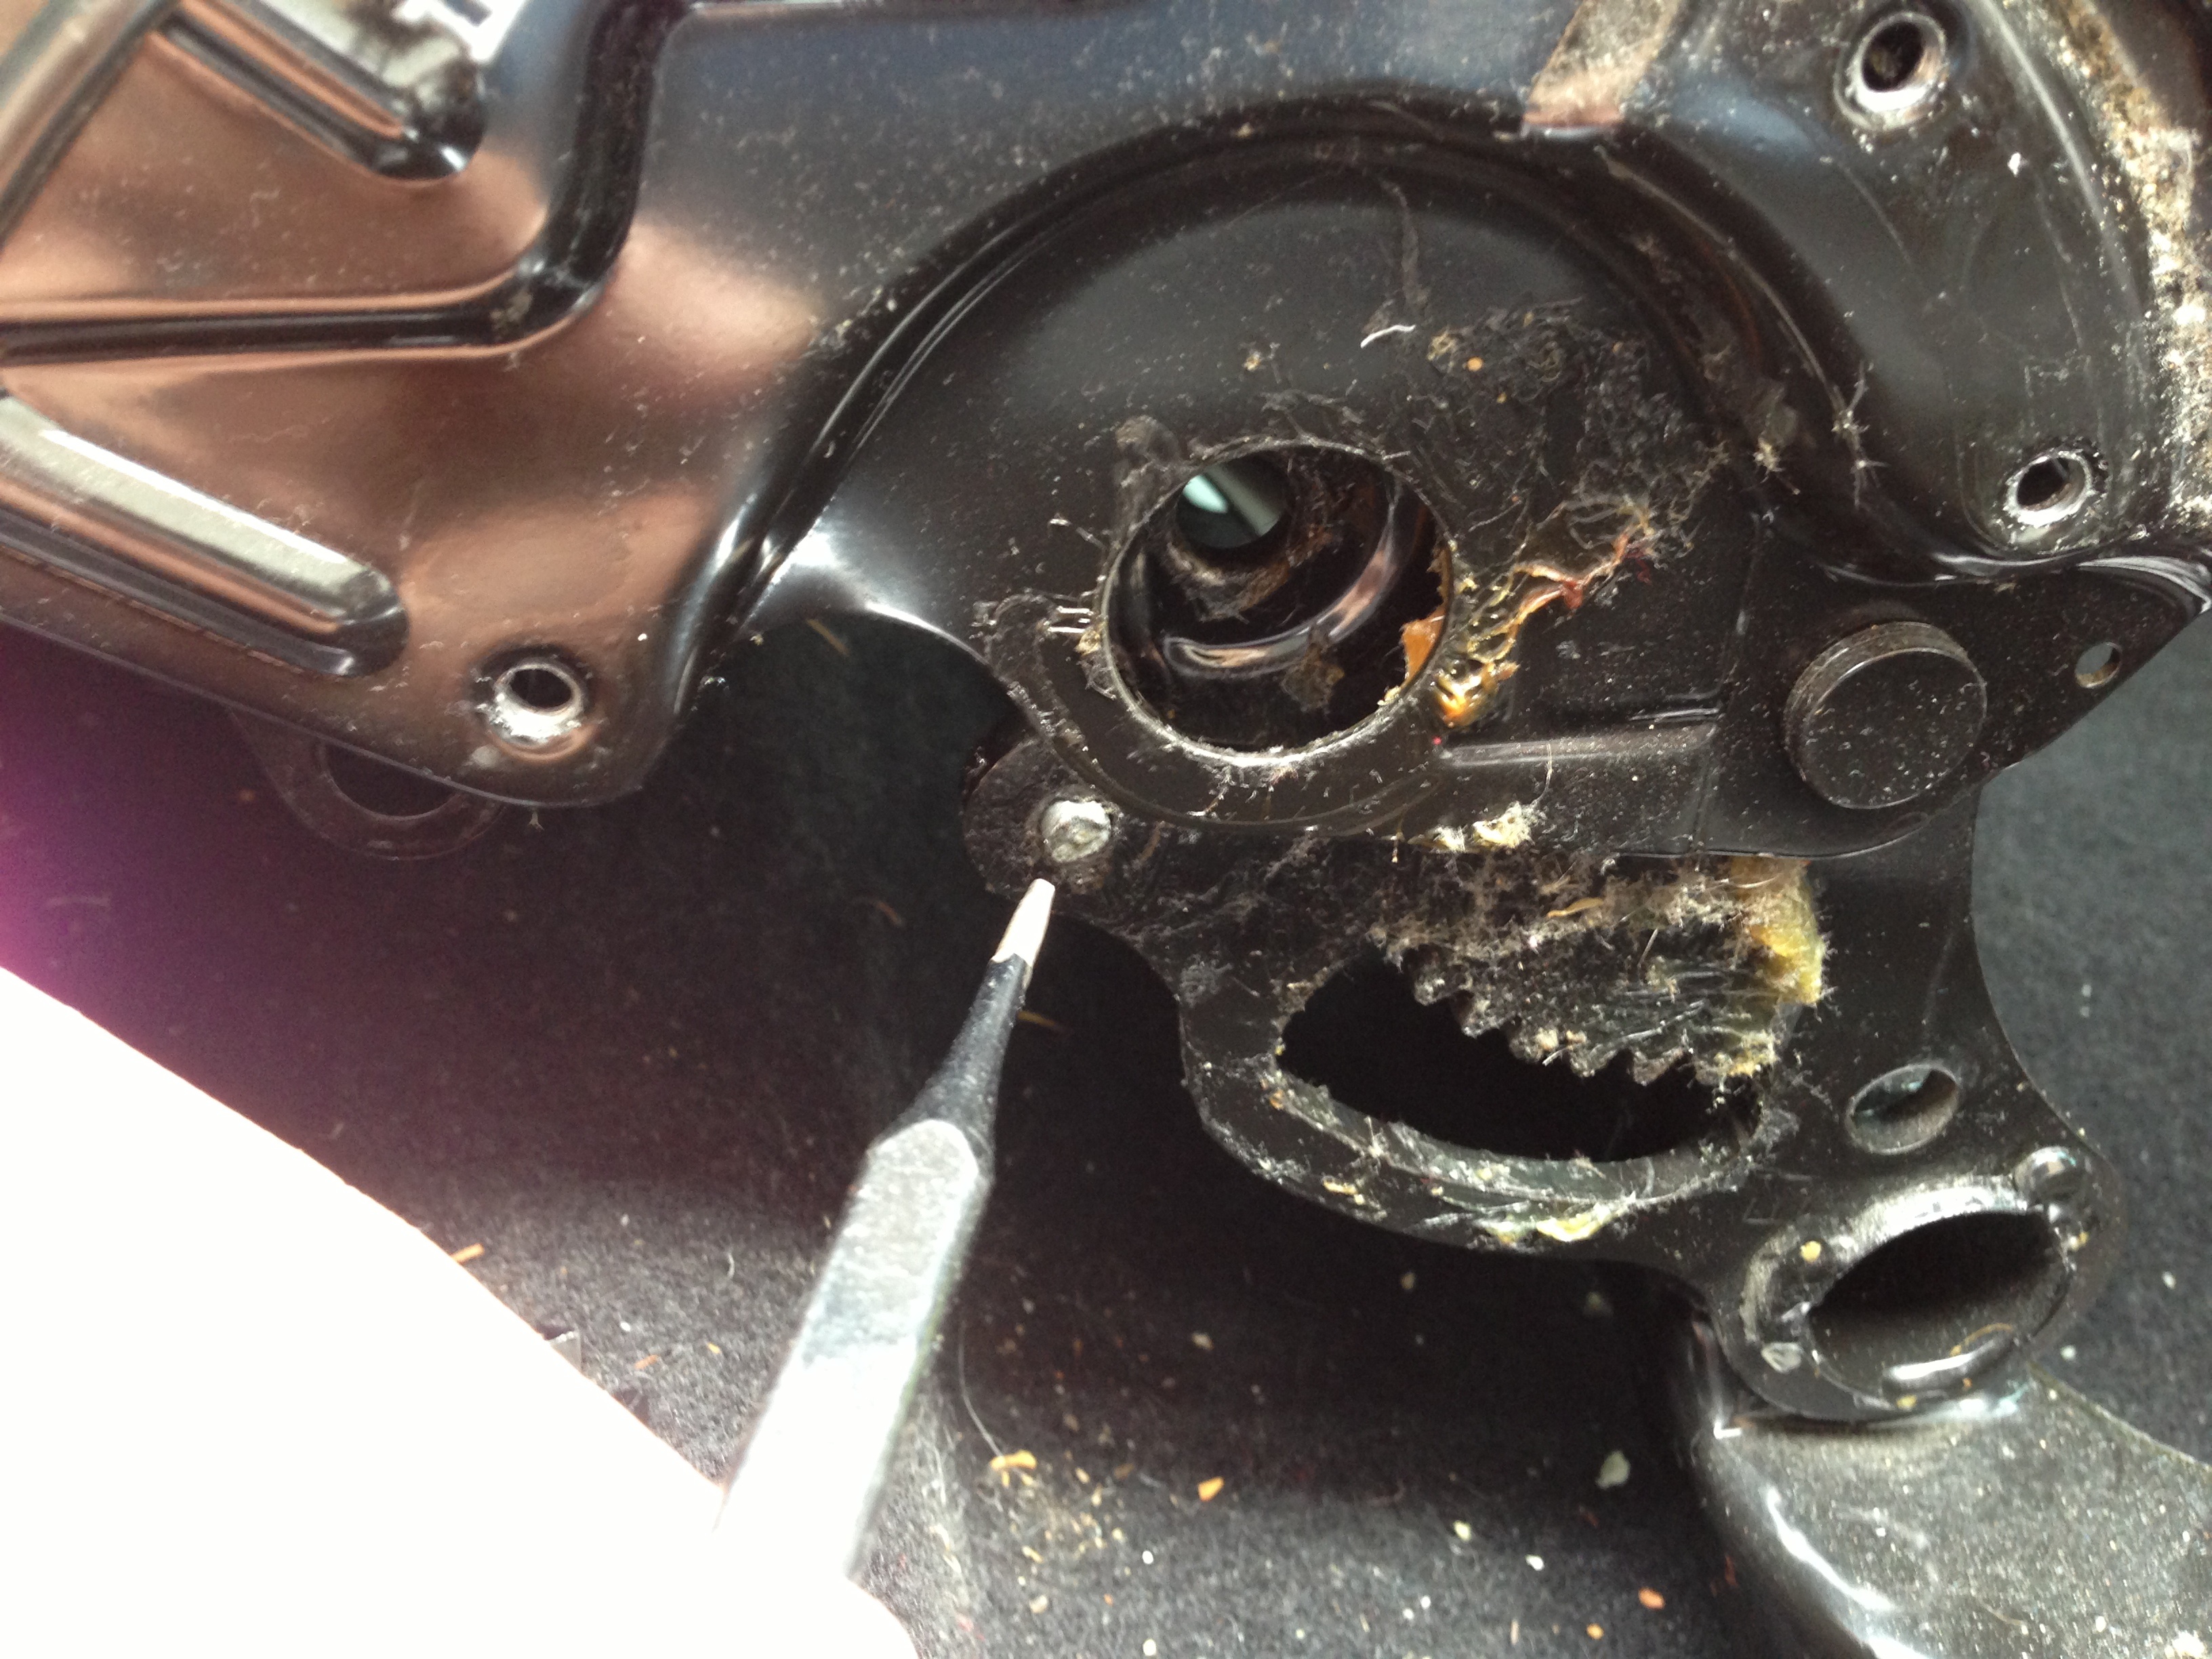
Flop the seat up and forward as far as you can, over-center, so that it is at its farthest forward position. Note, this is farther forward than the adjuster is capable of, so depending on your seating position you may need to move the seat rearward in the track to have enough room to do this. Now you can see our culprit:

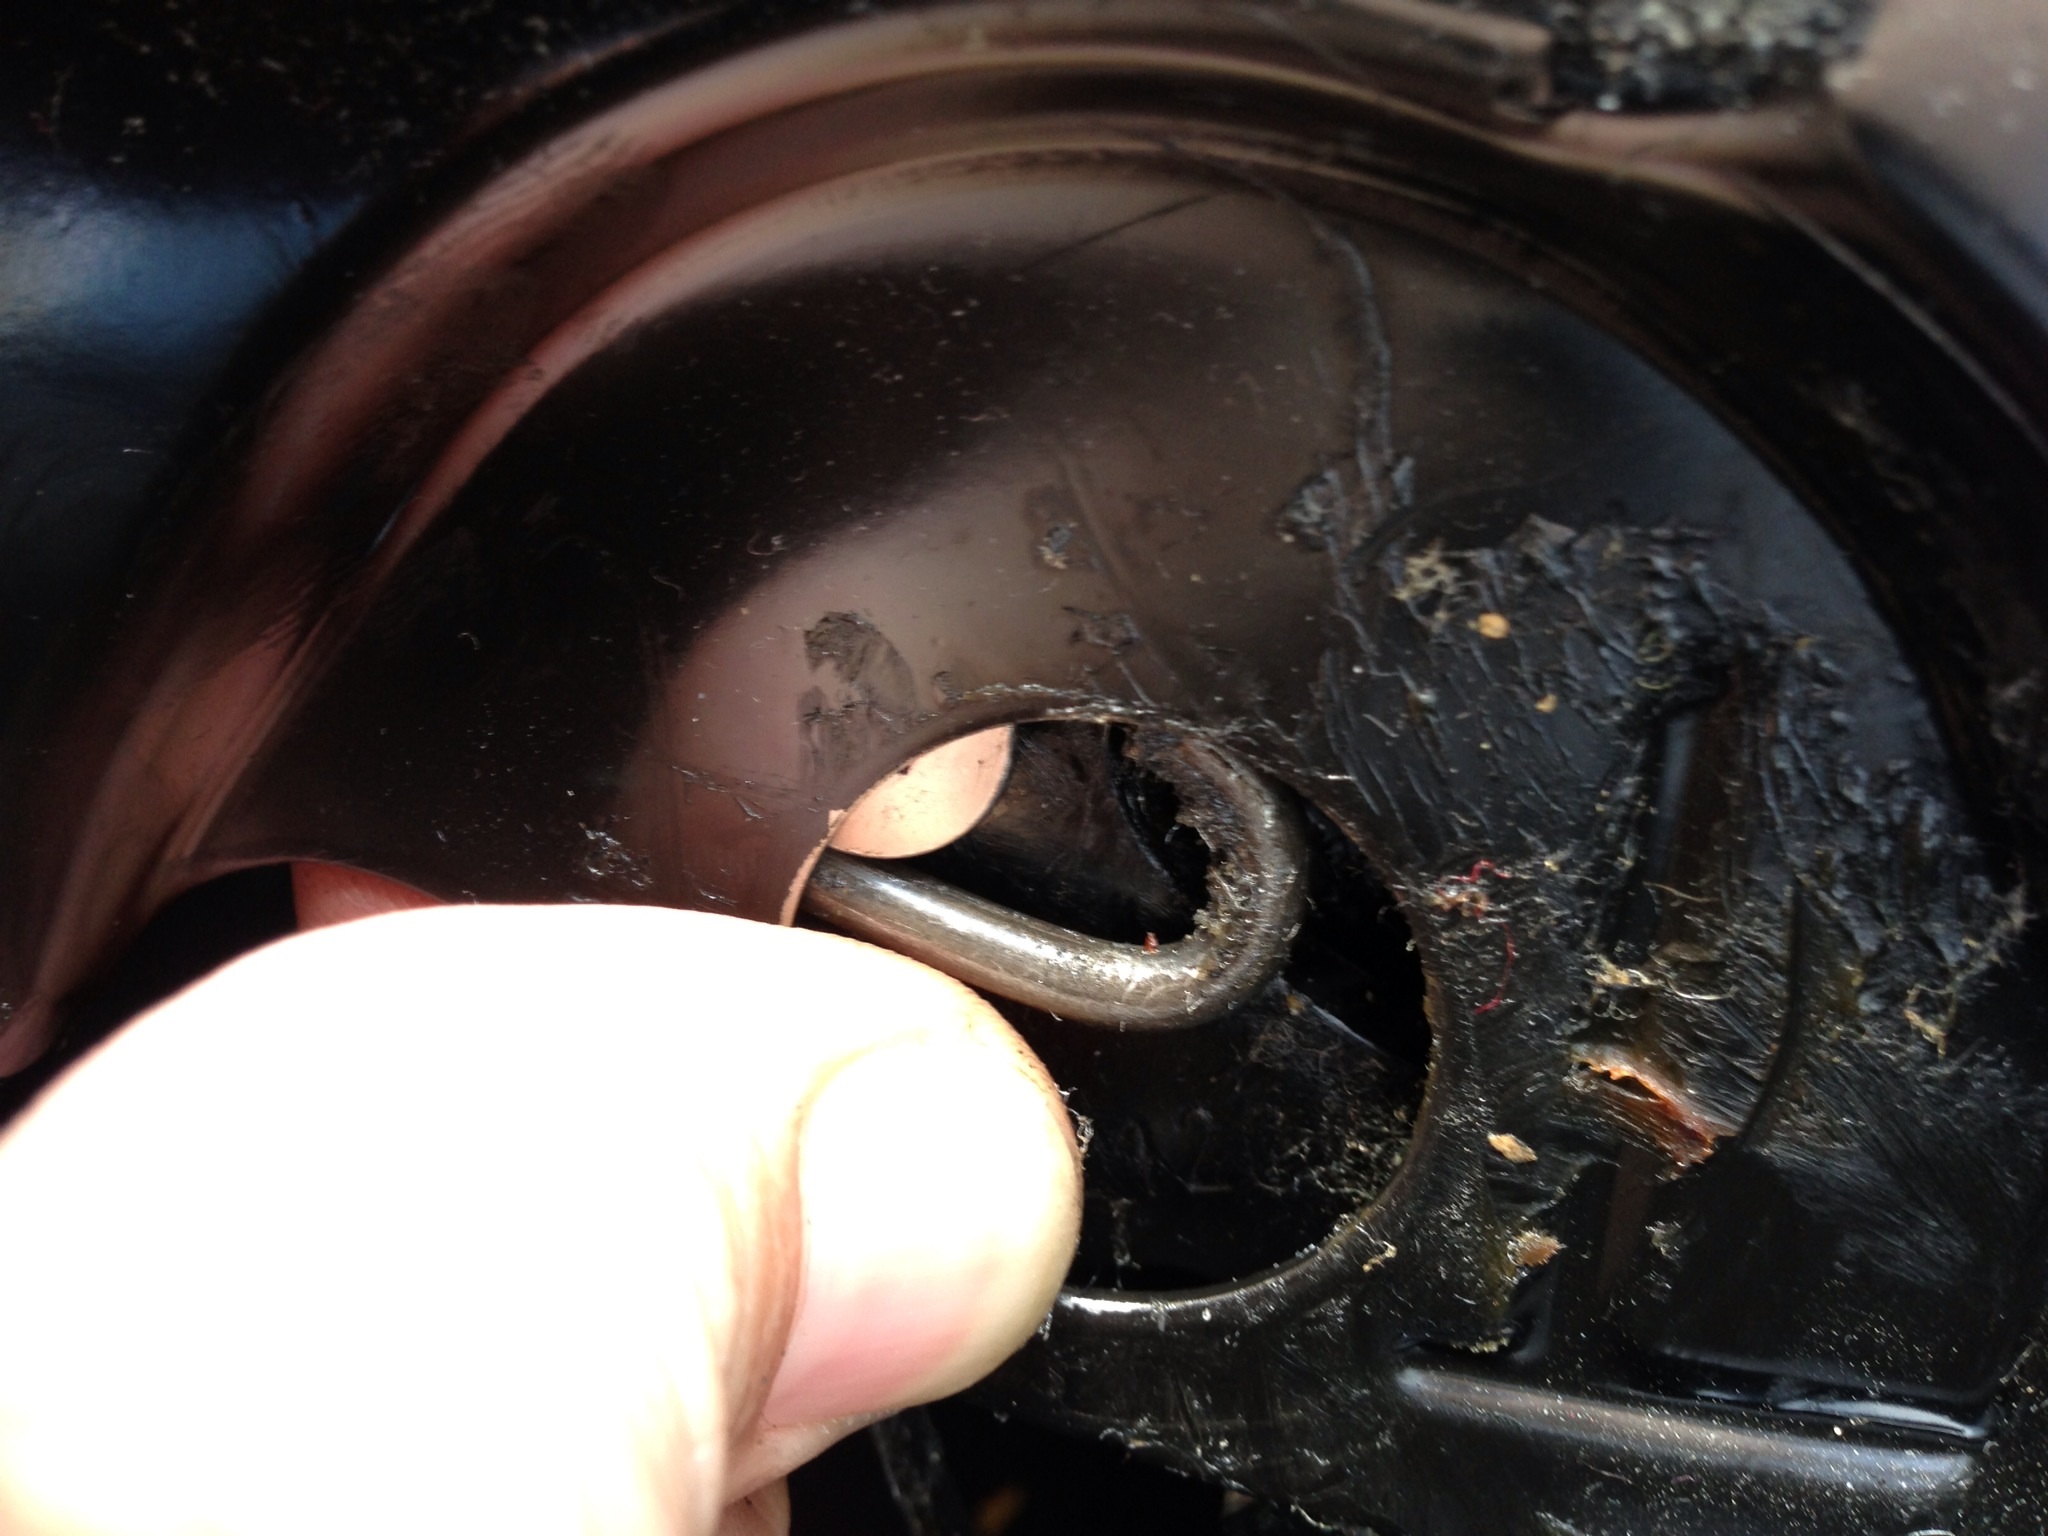
The tip of the punch is pointing at what's left of the spring attachment point.
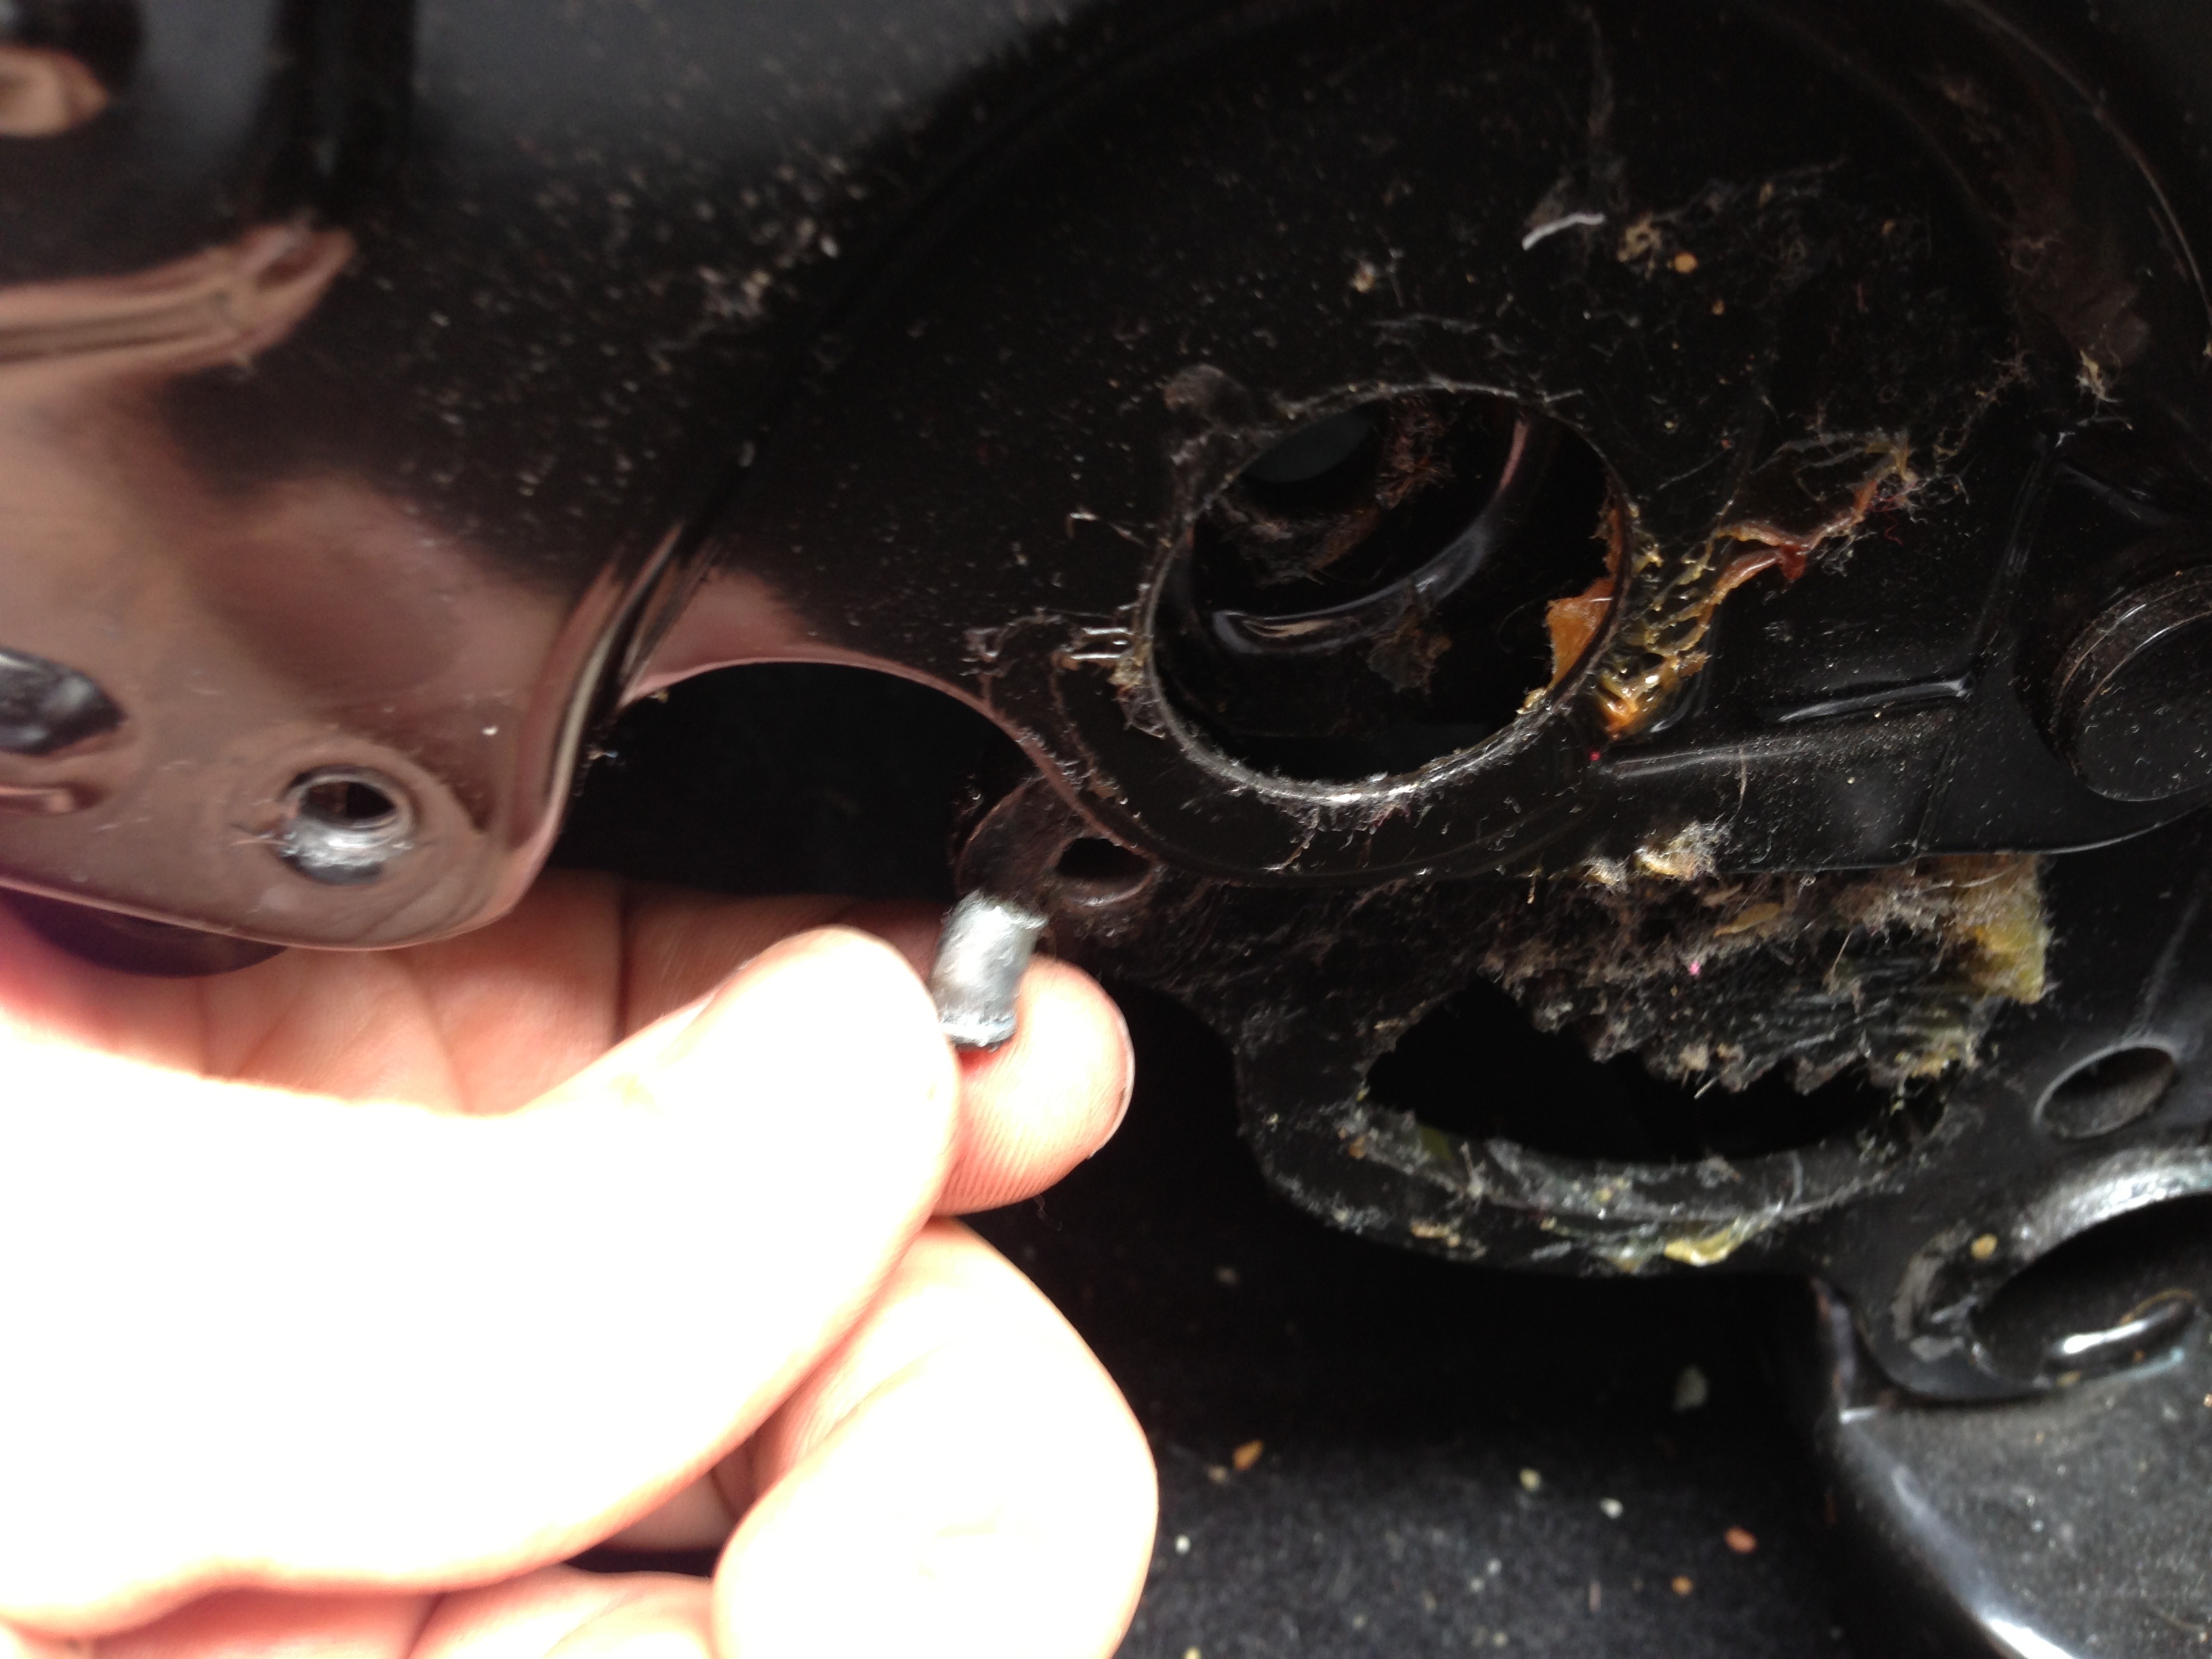
Take your punch and hammer and tap it out. Here it is:

At this point you have a clean hole in the seat mechanism, so whatever method you use to make a new anchor for the spring is up to you. The clearance is very tight however and there isn't really room on the back side for a fastener of any meaningful thickness. I chose to tap a hole in the seat and use a 1/4-20x1/2" stainless tapered allen head screw. I used standard instead of metric because I had it handy. Apart from not being metric, it was pretty much exactly what I needed in terms of length and head diameter. I took this pic after I was finished so you'll notice the screw already installed in the seat.

It was a little tricky tapping it, I unscrewed one side of the tap handle so I would have a longer range of motion before hitting interference with the floor of the car. Also worth noting, it's helpful to not tap the hole completely through as there's no room for a fastener on the back, tapping it slightly tapered allows a compression fit for fine adjustment. What you want to do is turn the screw in far enough for the head to just clear the seat frame as the mechanism moves through it's range of motion as the seat moves up and down. This is tricky. I kept turning the screw in until the only place it rubbed was at the very top of the arc of the seat movement. I didn't have to force anything, I just felt a slight resistance. This is a point well above the functional range of the seat once the height adjustment mechanism is installed, so it's not an issue. Verify you can move the seat all the way back down to the floor, then flop it forward again and reinstall the spring, rear end first:

This can be a little tricky as well. The spring slides through a narrow channel in the seat frame and hooking around the head of the screw requires you to fish the end of it around a bit while you get the seat into position. I found that when I tried to install the spring with the seat all the way forward, it popped loose when I returned the seat back to the operating postion of the height adjuster. It may take some fiddling around to get a feel for it but it's not that tough. I also found out that the taper head on the screw I used didn't allow the spring slip all the way down to the shank of the screw so it rides more toward the outer edge of the head but it's not an issue and I don't expect it will become one. If you wish you can grind or otherwise modify your fastener as long as you don't exceed the maximum size to clear the seat frame.
When you think you have it, hold a little tension on the spring from the front so it doesn't fall off the head of the screw and move the seat into position. You want to make sure the spring is placed correctly and isn't binding or interfering with anything else, it should be almost straight from the point on the seat where it hooks to where it wraps around the head of the screw. Here's a pic of the spring placed in the seat in the forward position. Be sure you flop the seat back down before attaching the spring at the front.

If everything checks out, hook the spring onto the front of the seat:

I found it was easiest to start out with the tip of the screwdriver toward the rear of the car, stick the screwdriver through the loop on the end of the spring, pivot the shaft of the screwdriver on the front spring hook on the seat frame, and then pull the handle of the screwdriver toward the rear of the car and let the spring slide down the shaft of the screwdriver onto the hook on the front of the seat frame. Then slide the screwdriver out carefully.
Now bounce up and down on your spring-loaded seat a few times and make sure everything still works like it's supposed to and you dont have any noises or binding/interference. If everything seems ok, put your seat back together. You may want to have a buddy help you put a little pressure on your seat and wiggle it a little while you re-install the height adjustment mechanism, now that the seat is under tension it makes a little harder to replace that piece. Be sure to tighten the three bolts gradually and evenly.
Finally, replacing the seat trim is a pain, be patient and don't force anything, it's easy to screw that plastic up.
Now replace the height adjustment lever and note the orientation of the plastic plugs you removed. They're asymmetrical and go in a specific way. Replace the outer plastic seatback angle adjustment knob. It has three tabs that fit in specific gaps on the metal part of the knob. Line it up correctly and it pops right back on easily.
You're done! Celebrate by adjusting your seat height!
I hope this helped you!
You may have heard of this mystery spring Mk4 owners find underneath their seat:
A lot of people claim this spring is to help the seat slide forward and backward and that it isn't necessary. They're wrong about both claims.
The spring is a helper spring to alleviate stress from and assist the seat height adjuster assembly:
If you've had to replace your seat height adjuster, you know they aren't cheap. Sadly, it's likely that the premature failure of the height adjuster was indirectly caused by the failure of the rear attachment point for that spring. Most have failed by now, and mine wasn't hanging down like the picture indicates but was really just laying in the seat frame. I only noticed the problem when I saw that there was a gap between the front hook on the spring and an the place on the seat frame where it attaches. When I touched it I felt it was loose and not under tension.
This write-up is an explanation of how to fix this problem and save your seat height adjuster, whether you're replacing one that's failed or you prefer to prevent failure of your good adjusters. Please ignore my dirty carpet as I've had a broken seat adjuster, which is why it looks brand new in the pictures.
The second time I did this the entire job took just under 30 minutes. Someone doing a speed run could probably do it in about 10 but I'm patient and drink beer while I work on my car so it adds time.Tools required:
Small thin screwdriver or prying apparatus to get the plastic screw cover plugs out of the seat height adjuster lever
T25 bit/driver etc to remove the seat height adjuster lever screws from the seat height adjuster
Phillips screwdriver for the two trim screws on the front of the seat
10mm combo wrench
Punch, less than 1/4" diameter tip
Small hammer
Taper tap (more on this later)
Screw (same size and thread pitch as tap)
Medium flat screwdriver or other appropriate prying apparatus for reinstallation of spring.
Carefully remove the plastic plugs/screw covers from the seat height adjuster lever. Don't gouge up the plastic.
Using the T25 tool, remove the two screws holding the seat height adjuster lever to the seat height adjuster.
Carefully remove the seatback angle adjustment knob cover, these are easy to crack.
Remove the two phillips screws on the front of the outer seat trim. One is on the outside, and is obvious, the other is just above and behind it, underneath the inboard seat trim. It overlaps so you may have to wrangle the trim around a little to get at it.
Gently remove the outer trim from the seat base. There are a few tabs on the top and bottom you want to be careful not to break. There is also a peculiar fastener just forward of the opening for the height adjustment lever. It is a spreader like a plastic rivet, has a cone tip, and is over an inch long. It should be pulled out of the trim from underneath the seat before you attempt to remove the trim. Here's a link to a pic of the passenger side trim, removed from the seat, with the fastener installed:
http://pics.tdiclub.com/data/500/photo1.png
and removed:
http://pics.tdiclub.com/data/500/photo11.png
Now remove the seat height adjuster. It's 3 10mm-head hex bolts, one on the front side and two at the rear. I ran into some interference with sockets so I just used a combo wrench.
Now wiggle and pull the adjuster out. You may have to push/pull on the seatback a little to get the adjuster free. Careful, the seat can now drop to the floor. If it can't, get the crap out from underneath it before you proceed.
Now you should have something that looks like this:
Flop the seat up and forward as far as you can, over-center, so that it is at its farthest forward position. Note, this is farther forward than the adjuster is capable of, so depending on your seating position you may need to move the seat rearward in the track to have enough room to do this. Now you can see our culprit:
The tip of the punch is pointing at what's left of the spring attachment point.
Take your punch and hammer and tap it out. Here it is:
At this point you have a clean hole in the seat mechanism, so whatever method you use to make a new anchor for the spring is up to you. The clearance is very tight however and there isn't really room on the back side for a fastener of any meaningful thickness. I chose to tap a hole in the seat and use a 1/4-20x1/2" stainless tapered allen head screw. I used standard instead of metric because I had it handy. Apart from not being metric, it was pretty much exactly what I needed in terms of length and head diameter. I took this pic after I was finished so you'll notice the screw already installed in the seat.
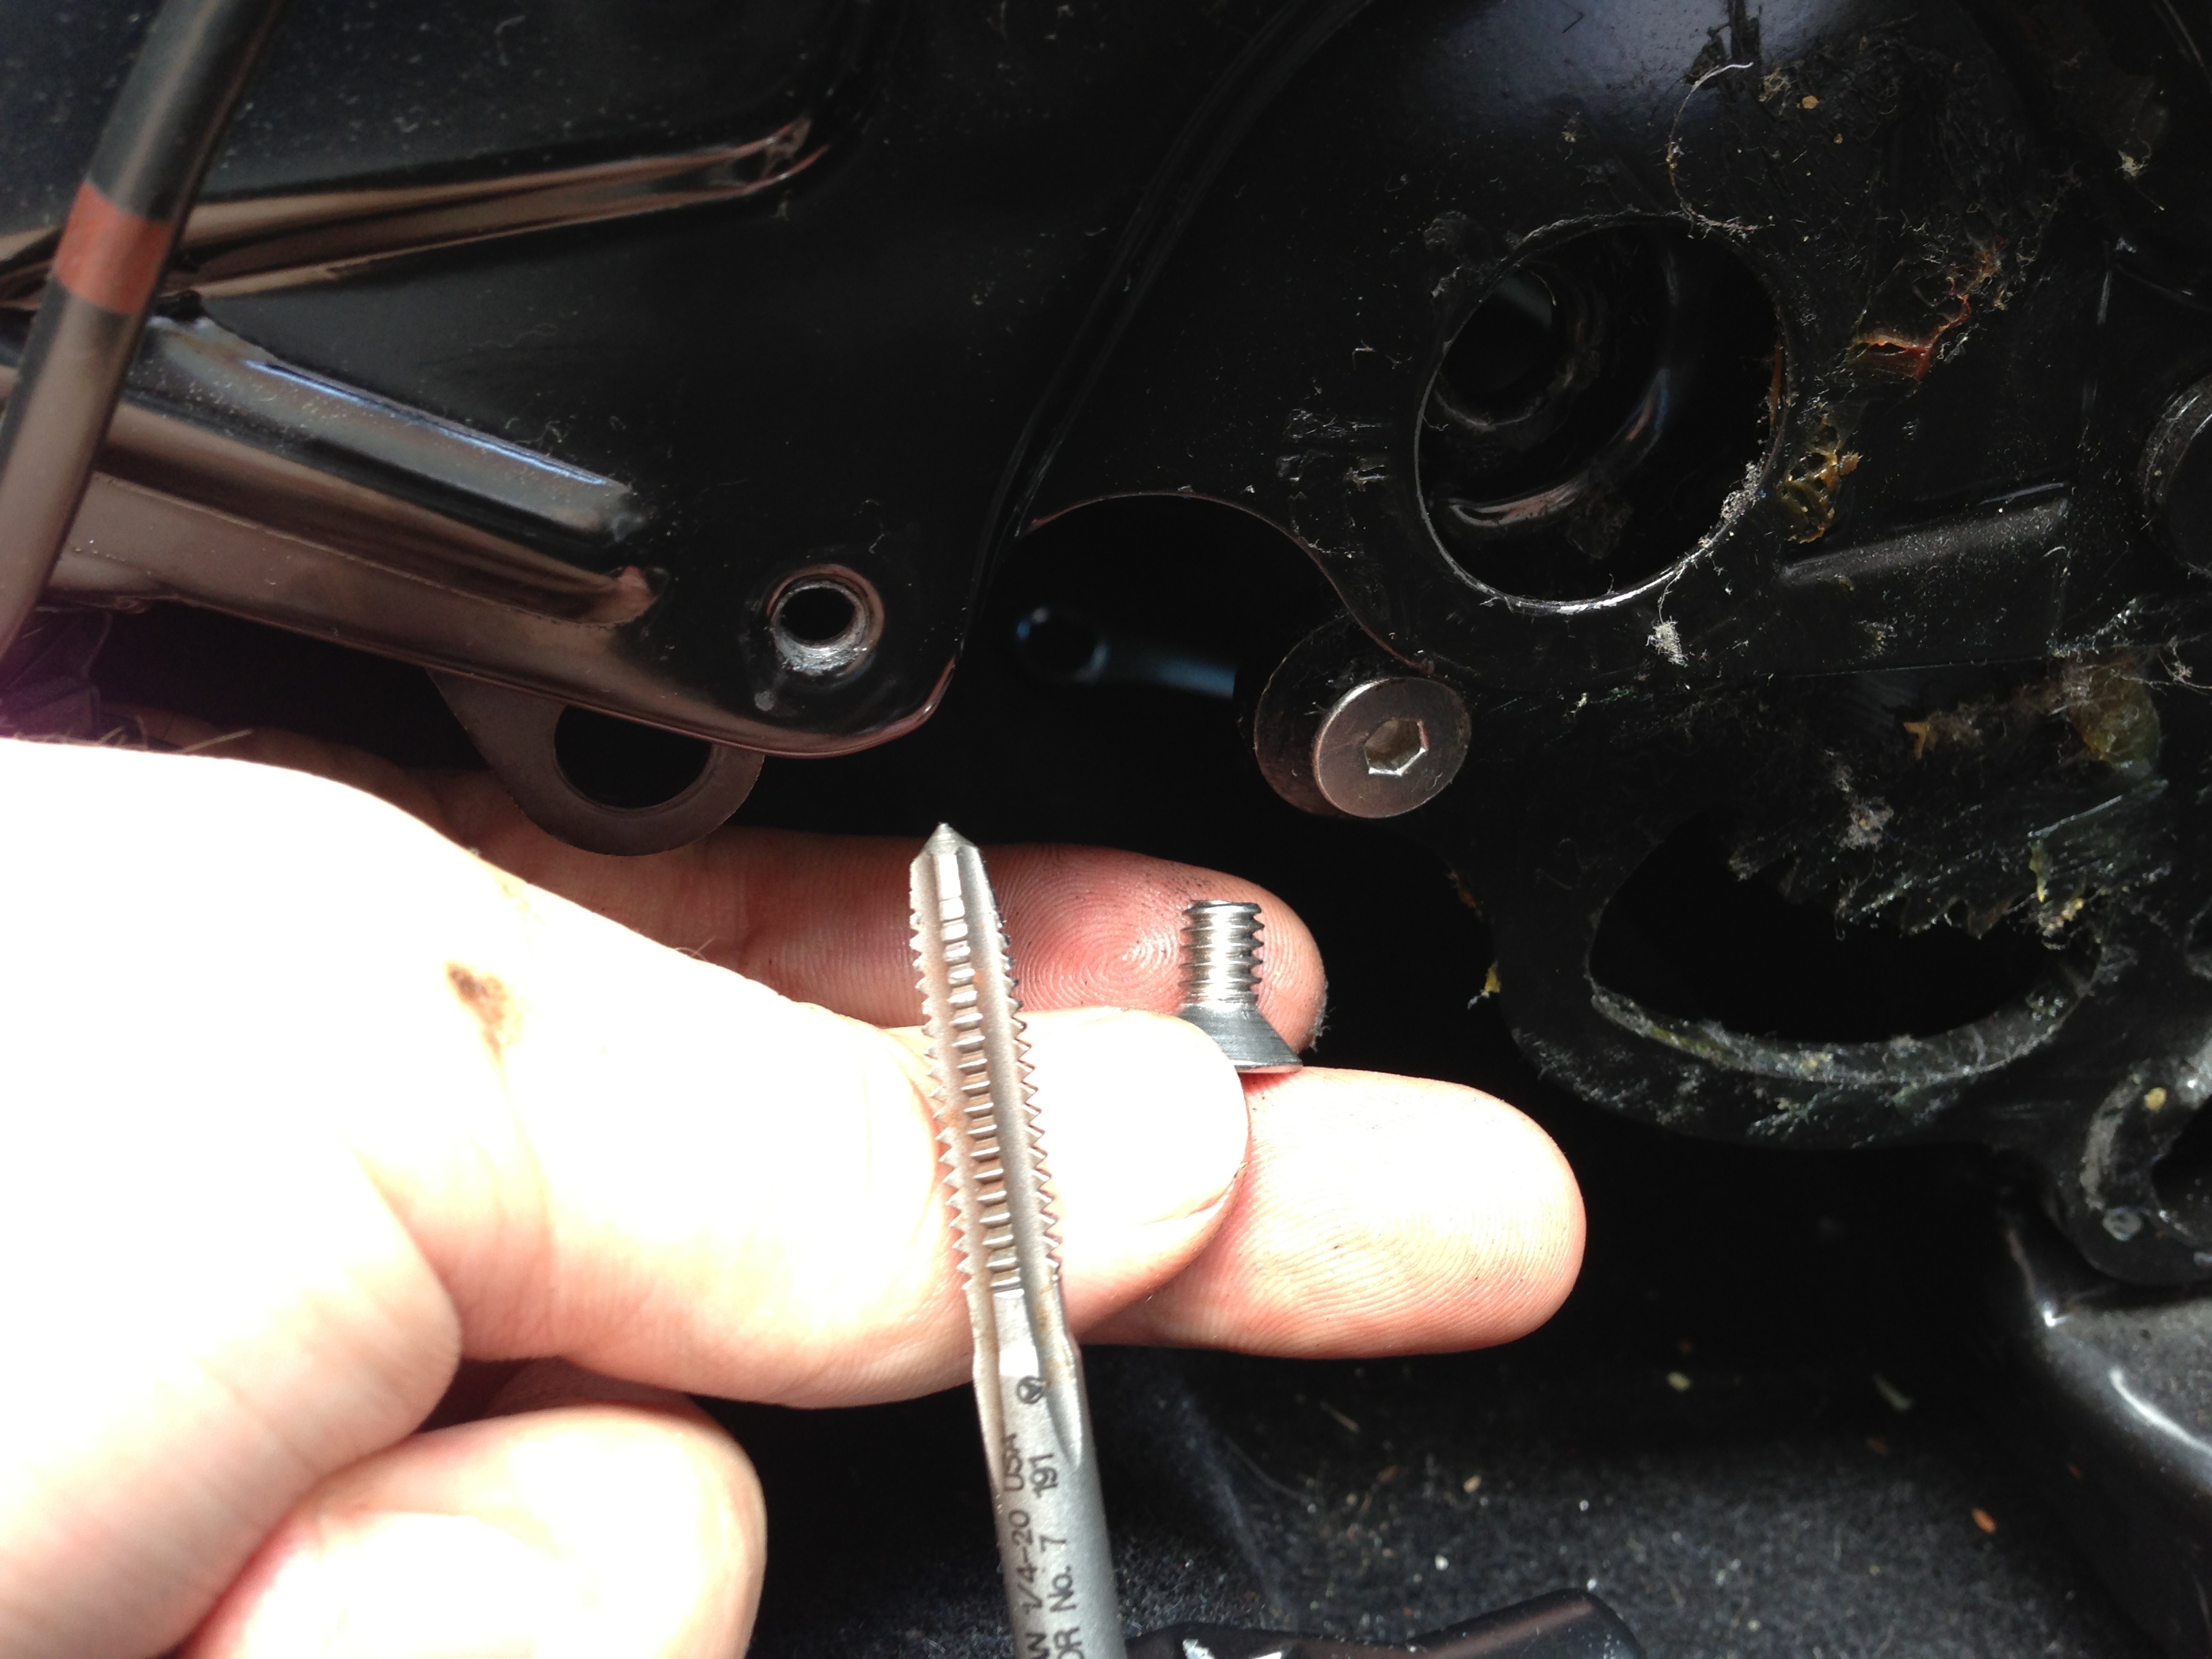
It was a little tricky tapping it, I unscrewed one side of the tap handle so I would have a longer range of motion before hitting interference with the floor of the car. Also worth noting, it's helpful to not tap the hole completely through as there's no room for a fastener on the back, tapping it slightly tapered allows a compression fit for fine adjustment. What you want to do is turn the screw in far enough for the head to just clear the seat frame as the mechanism moves through it's range of motion as the seat moves up and down. This is tricky. I kept turning the screw in until the only place it rubbed was at the very top of the arc of the seat movement. I didn't have to force anything, I just felt a slight resistance. This is a point well above the functional range of the seat once the height adjustment mechanism is installed, so it's not an issue. Verify you can move the seat all the way back down to the floor, then flop it forward again and reinstall the spring, rear end first:
This can be a little tricky as well. The spring slides through a narrow channel in the seat frame and hooking around the head of the screw requires you to fish the end of it around a bit while you get the seat into position. I found that when I tried to install the spring with the seat all the way forward, it popped loose when I returned the seat back to the operating postion of the height adjuster. It may take some fiddling around to get a feel for it but it's not that tough. I also found out that the taper head on the screw I used didn't allow the spring slip all the way down to the shank of the screw so it rides more toward the outer edge of the head but it's not an issue and I don't expect it will become one. If you wish you can grind or otherwise modify your fastener as long as you don't exceed the maximum size to clear the seat frame.
When you think you have it, hold a little tension on the spring from the front so it doesn't fall off the head of the screw and move the seat into position. You want to make sure the spring is placed correctly and isn't binding or interfering with anything else, it should be almost straight from the point on the seat where it hooks to where it wraps around the head of the screw. Here's a pic of the spring placed in the seat in the forward position. Be sure you flop the seat back down before attaching the spring at the front.
If everything checks out, hook the spring onto the front of the seat:
I found it was easiest to start out with the tip of the screwdriver toward the rear of the car, stick the screwdriver through the loop on the end of the spring, pivot the shaft of the screwdriver on the front spring hook on the seat frame, and then pull the handle of the screwdriver toward the rear of the car and let the spring slide down the shaft of the screwdriver onto the hook on the front of the seat frame. Then slide the screwdriver out carefully.
Now bounce up and down on your spring-loaded seat a few times and make sure everything still works like it's supposed to and you dont have any noises or binding/interference. If everything seems ok, put your seat back together. You may want to have a buddy help you put a little pressure on your seat and wiggle it a little while you re-install the height adjustment mechanism, now that the seat is under tension it makes a little harder to replace that piece. Be sure to tighten the three bolts gradually and evenly.
Finally, replacing the seat trim is a pain, be patient and don't force anything, it's easy to screw that plastic up.
Now replace the height adjustment lever and note the orientation of the plastic plugs you removed. They're asymmetrical and go in a specific way. Replace the outer plastic seatback angle adjustment knob. It has three tabs that fit in specific gaps on the metal part of the knob. Line it up correctly and it pops right back on easily.
You're done! Celebrate by adjusting your seat height!
I hope this helped you!
Last edited:
