ALH TDI engine transplant into '84 Vanagon

AndyBees

Top Post Dawg
Joined
May 27, 2003
Location
Southeast Kentucky
TDI
Silver 2003 Jetta TDI, Silver 2000 Jetta TDI (sold), '84 Vanagon with '02 ALH engine
Head seal

I thought you were gonna have Matt put seals in it at TDI fest. Wish I could do it.

Well, the leaks stopped in a day or two after I got the engine running in the garage. I just assumed that it would do better with use.... and, actually, there were times it would start almost immediately.

...... I guess doing a re-seal is something I need to learn and put the experience on my resume' .....:D

I do have an IP, if necessary!
 

AndyBees

Top Post Dawg
Joined
May 27, 2003
Location
Southeast Kentucky
TDI
Silver 2003 Jetta TDI, Silver 2000 Jetta TDI (sold), '84 Vanagon with '02 ALH engine
Yeah, but .... but, what if a re-seal doesn't help? The thing didn't start much better with the IV hanging overhead.

I've not had time to deal with it today .....maybe later this week!
 

runonbeer

Maintenance EnthusiastVendor
Joined
Apr 15, 2002
Location
Austin, TX/Chapel Hill, NC
TDI
'00 Golf 02M, '10 Golf 02E, '02 UTE 02M
Worst case is it won't help but at least you have ruled out that variable. It's like $25 worth of parts. They're all going to leak eventually.
 

AndyBees

Top Post Dawg
Joined
May 27, 2003
Location
Southeast Kentucky
TDI
Silver 2003 Jetta TDI, Silver 2000 Jetta TDI (sold), '84 Vanagon with '02 ALH engine
Re-sealing the IP

Well, I just finished watching all 7 YouTube videos on re-sealing the pump ... I can do that!:D

Actually, sevearal months ago, I did watch the first two clips!

Okay, you've convienced me that I need to do this .......and, considering the head did leak on the initial attempts to start the engine and for a couple days, it should be done!

On another subject: Well, unless someone has a better idea, I'm going to purchase the steel 6" X 15" rims with a 30 ET from Van Cafe. Considering my intentions, the steelies will be the best choice! I'll be running 215/75/15 Uniroyals. The extra diameter sure helps to bring down the RPM at cruising speeds in 4th gear!
 

AndyBees

Top Post Dawg
Joined
May 27, 2003
Location
Southeast Kentucky
TDI
Silver 2003 Jetta TDI, Silver 2000 Jetta TDI (sold), '84 Vanagon with '02 ALH engine
Update/Comments

Okay, this evening I found some time to check out the engine to determine a course of action.

Using a "crudely" made vacuum pump set-up (no laughing, it worked), I was able to pull fuel and lots of air up thru the fuel feed line via the small return fuel line on the Injection Pump. Throughout the procedure there were blurps of air, off and on, without ceasing. I re-connected everything and attempted to start the engine......no start. I vacuumed more.... same thing. Then, I vacuumed again... followed by bleeding the injectors, two at a time. I then vacuumed again and tried to start.... still no start! Then I vacuumed again and attempted to start ....... just as I thought the battery couldn't take it any longer... the engine come to life and never made a mis-fire...........idled very smooth!:confused:

While doing the vacuum, I did choke off the main "return" fuel line (I feel 100% positive there was nothing coming back thru the return line during the vacuum process). In fact, I removed the choke to see how much fuel/air would be pulled back thru the return fuel line ..........nothing but air at first followed by a constant stream of fuel.

As I may have previously mentioned, there is a strange noise coming from the engine. We (wife and I) thought it to be in the valve train area as we listened from the top ... not the IP area. From the bottom, the noise is definitely a little louder and on the TB end of the engine as opposed to the other end.

So, I'm thinking the noise is coming from the oil pump sprocket/chain/tensioner..... it is a noise that is repetitious ......like something in motion repeating the sound every 360 degrees of rotation, obviously. With the TB cover off, engine running, everything looks okay.

Anyway, I think it's obvious the IP needs a re-seal. I could not find even the slightest fuel leak at any connection from tank to IP, including the filter, which I made sure was tight. In fact, I re-tightened each fitting/clamp, etc.

Anyway, here are a few pics just for your viewing:D...... as usual, comments are at the top of each pic.


In the pic below, you can see a two diaphram vacuum pump from an old (80s vintage) emmissions testing device that I used for pulling vacuum. In the foreground is a 1/2 gallon glass jar with the vacuum line on the left and the smaller "pull" line on the right which is connected to the small return line at the IP.


Below is a close-up of the 1/2 gallon jar ... not much to see, but notice the method of connecting the fittings on the lid...;)


Below is how I'm leaving it parked tonight. Maybe the fuel will not siphon back to the tank........"siphoning" could be part of the problem considering that the IP is much higher than the fuel tank.


Another shot of the Vanagon looking skyward!
 

AndyBees

Top Post Dawg
Joined
May 27, 2003
Location
Southeast Kentucky
TDI
Silver 2003 Jetta TDI, Silver 2000 Jetta TDI (sold), '84 Vanagon with '02 ALH engine
Testing for wierd sounds

Have you tried to isolate the sound source using a long screwdriver?
Well.......seems this web site has been down for a couple of hours!


No, until this evening, I've really not bothered with it.

The Blazer AC compressor bearing went south back before Labor Day ... had to deal with that this week, among other things. Also, the PS pump on my '00 Jetta began whinning yesterday ............ dang, it needs my attention. Also, I need to install the hidden hitch on the Jetta ...... have trailor, will haul!:D

Back to the Vanagon....I really need to remove the oil pan for either a repair or have another one built. So, inspecting the oil pump chain could be done while the pan is off.

I will give the screw drive test a try tomorrow!

Wheels have been shipped.....
 

markward

Veteran Member
Joined
Jul 5, 2007
Location
Loxahatchee, Florida
TDI
82 Vanagon and 2011 JSW
Andy, my engine at one point was making a noise similar to what you describe. I was going to pull the pan and replace the pump chain. I was sure that was where the noise was coming from. Most noticable after start up on ambient temp engine.

First time, It ended up being the Alternator pulley clutch. All was better for a while and a similar noise came back. This time it was one of the alternator bearings. Since you don't need the belt to run the water pump. It is easy enough to remove the serpentine belt and run the engine and listen for a noise.

On our last trip, out of the blue, we stopped for a hike and noticed we were not at the correct trail head. I went to move and the engine would not start. It would crank and crank. I tried four more times looking at my wife and her looking at me. It started and never did it again the rest of the trip.

I try to drive the van on Saturdays. The no start problem seemed to be getting worse. I added a testlight to the key on circuit to be sure the ignition switch was working and a test light to the pump switch. I finally caught it acting up. I am pretty sure it was my main power relay. It had some corrosion on the terminals. I am using fog light type relays not the OE ones. Anyhow, replacing the relay and cleaning the wire terminals seems to have helped.

Sounds like you are sure the pump is loosing prime. I can't really tell though from your description. I have toyed with adding an electrical supply pump between the tank and the filter, but would rather not have the extra circuit and point of failure. It would be more there for priming after a filter change or if I managed to run out of fuel. I even thought about adding a hand primer bulb from the outboard marine industry. I could not tell if the rubber would hold up to diesel though.

I can't believe your fuel mileage. You and Jon make me envious. I guess the difference is the drag of the camper top and the 20 tons of camping supplies and gear we carry. I am happy with my average economy though.

If you intention is to upgrade the rim/tire package, you need to consider the spare as well. The stock location does not hold a very big tire rim combo. I still have the stock spare for emergencies, but on a trip, I managed to bend a rim 1200 miles from home on a Saturday morning. There was no way to get the rim fixed and we needed to be home Sunday night. Luckily the bent rim was still holding air and I was able to rotate it to the rear for the trip home. Van Cafe has a spare adapter you could probably copy or you could end up with a spare on the back, not our choice since we are in and out of the rear hatch all the time. Samba also has some clever DIY ways to hang a larger spare in the stock location. The steering rod and rad hoses are what get in the way if you can fit between the frame rails. mark
 

AndyBees

Top Post Dawg
Joined
May 27, 2003
Location
Southeast Kentucky
TDI
Silver 2003 Jetta TDI, Silver 2000 Jetta TDI (sold), '84 Vanagon with '02 ALH engine
Comments

Mark, the fuel system seems to be tight as far as not seeing any "dampness" of fuel at any connection, including a totally dry Injection Pump. However, seems the gurus have stories similar and a re-seal of the IP stopped the hard starting issues in those cases.......... Sort of puzzling, since my 2000 Jetta has 312k miles on it and will start in about one revolution of the engine..........and not a single fuel leak anywhere.

I did change-out the 109 Relay resulting in no change. I have checked my wiring schematics, connections, etc., to determine if there may be some sort of issue there. One thing we did notice when we first attempted to start the engine was that the Fuel Shut-off valve circuit only holds 12 volts for a few seconds and then it drops to about 5 volts, if I remember correctly. The valve does have a very distinct click when the key is turned on. Maybe that is something I need to re-visit.

As for the spare tire, well, I'm going to keep the OE size tire in the spare hole. Ironically, that old spare, definitely OE, brought us home from the maiden voyage to west Kentucky. On the way back, we had a flat, which I did not mention in any of my posts. The valve stem cracked allowing the left front tire to slowly lose air...then all of a sudden, the air that was left, blew into the damaged outer sidewall... that tire had knots on it bigger than my fist. Anyway, the 28 year old Continential OE spare tire brought us home. Yes, I know, I really need to replace it with a new one...:eek:

VC shipped my new wheels yesterday .......... happily awaiting their arrival.:D

This evening or tomorrow, I plan to do the fuel vacuum again. This time, I will actually use a plug on the main return fuel line. In the procedure referenced above, I used small Vice Grip pliers to squeeze the line shut. Although, I feel it was adequate, I really need to be absolutely positive that it is sealed. Also, I think it would be appropriate to connect the IV fuel setup while doing the vacuum test. That would confirm or rule-out the IP seal(s). Then, if that proves to be okay, I can vacuum the fuel line at the IP to determine if there is a leak in that system back thru the filter all the way to the tank....if I get air, then maybe pressurized air would help identify the problem area(s).

Edit: That's a good idea about removing the Serp belt to see if there are changes. Removing the oil pan has to be done anyway. So, hopefully, if anything is going on with the oil pump chain it will stick out like a sore thumb! And, removing the valve cover to inspect the cam and lifters really needs to be done too!
 
Last edited:

jimbote

Certified Volkswagen Nut
Joined
Jul 10, 2006
Location
spiral arm, milky way (aka central NC)
TDI
Tacoma 4x4 converted to TDI
the engine in van sat for five? years...the seals can dry out in that time....your current jetta has been driven pretty much continuously, all leaks in injection pumps are not fuel...some leaks are one way, ie pulling air in and not leaking fuel out....
 

AndyBees

Top Post Dawg
Joined
May 27, 2003
Location
Southeast Kentucky
TDI
Silver 2003 Jetta TDI, Silver 2000 Jetta TDI (sold), '84 Vanagon with '02 ALH engine
Jimbote...... excellent point. And, as you may recall, the IP did leak fuel for a couple of days after I got the engine going!

Well, I'm out of here for a most of the day. Hopefully, this evening I can give it some more attention!
 

markward

Veteran Member
Joined
Jul 5, 2007
Location
Loxahatchee, Florida
TDI
82 Vanagon and 2011 JSW
Andy, when testing my fuel cut off voltage, Key on, battery voltage. Cranking the voltage dropped to the cranking battery voltage about 10 something volts from memory. I recall wondering about that design. I was thinking of some sort of relay to power the electronics off of my auxilary battery while cranking, but I have not moved on that. I think 5 volts is sort of low. I recall there is an audible click. As a test, why not power the pump switch independent of the vehicle battery? You could use a small trickle charger after you remove the power wire from the solenoid switch.

What are you using for a starter? It is possible the starter maybe drawing available power from the rest of the system during cranking. Our's starts just like your jetta except when I started having that intermittent problem. I am using the stock vanagon diesel fuel filter. Same as the one that came in the rabbit and dasher. It has only one line in from the tank and one line out to the pump. Seems to work fine. mark
 

AndyBees

Top Post Dawg
Joined
May 27, 2003
Location
Southeast Kentucky
TDI
Silver 2003 Jetta TDI, Silver 2000 Jetta TDI (sold), '84 Vanagon with '02 ALH engine
Today, I plan to run down on all the suggestions.

I'm using an OE diesel starter for the 1.6L engine. It is a Bosch remanufactured. It really spins the engine nicely. I think the cranking RPM in my case is just fine. As I stated previously, when I thought the battery was nearing it's available power, after several attempts to start, the engine fired-up and idled perfect without missing or stumbling. So, all the previous cranking attempts were much faster cranking ........ which involved several attempts!

As with the Old School, the battery Postive Cable goes to the starter. From there all the systems receive their power, including the ALH system. The ALH system also recieves part of its power via the Vanagon key switch over to the Jetta ignition which turns on the ECU, among other things such as relays, etc. However, the power is local off the starter over to the main fuse box that was originally on top of the battery. (confusing, I know, but actually simple) The ALT wire connects to the fuse panel as OE with the Jetta.
 

AndyBees

Top Post Dawg
Joined
May 27, 2003
Location
Southeast Kentucky
TDI
Silver 2003 Jetta TDI, Silver 2000 Jetta TDI (sold), '84 Vanagon with '02 ALH engine
Nothing much to comment about.

No opportunity to spend any time with the Van today. However, I did have to move it from where it was parked (see pics above). Awesome, it fired right up immediately. So, fuel siphoning back to the tank is part of the problem. Of course, an IP re-seal would probably stop that.
 

markward

Veteran Member
Joined
Jul 5, 2007
Location
Loxahatchee, Florida
TDI
82 Vanagon and 2011 JSW
Andy, I can't tell from your pictures, but do you have a clear fuel line going into the pump? When all is well, there should be no air bubbles in the clear line with the engine running. I would think if the pump is losing it's prime, there would be lots of air in that line while you are trying to start the engine. If you don't have a clear line, you will want to add one. It is probably the best indicator when troubleshooting. mark
 

AndyBees

Top Post Dawg
Joined
May 27, 2003
Location
Southeast Kentucky
TDI
Silver 2003 Jetta TDI, Silver 2000 Jetta TDI (sold), '84 Vanagon with '02 ALH engine
Fuel line, not clear

Mark, no clear line from the fuel filter to the IP..........

Yeah, you are so right. And, it's ironic that you would comment on this, as I just discovered why my '84 Jetta, with the IDI 1.6L diesel, is dying out on the road.

Monday, I started it (the IDI 1.6L) and while it was idling, I could see bubbles going thru the very discolored fuel line. The sun was hitting it at a perfect angle to show the bubbles ......... presto!

Well, the re-seal kit for my ALH VE IP will be here tomorrow! And, hopefully, the new wheels will be delivered too.

In the meantime, besides tinkering with the ol' 84 Jetta, I've been trying out my new 2700psi pressure washer .........yep, all engines around here will soon be squeeky clean.:D
 

AndyBees

Top Post Dawg
Joined
May 27, 2003
Location
Southeast Kentucky
TDI
Silver 2003 Jetta TDI, Silver 2000 Jetta TDI (sold), '84 Vanagon with '02 ALH engine
Wow! The Injection Pump re-seal kit come this afternoon. So, I'll be doing that this evening/night. I may take some pics for posting. I will also install the check-valve in the fuel line ...... it is for a diesel from a local supplier to the coal industry!

I need to go back and watch Runobeer's YouTube flicks again (7 of them) to refresh my memory!

Also, the new steely rims from Van Cafe arrived today as well!
 

markward

Veteran Member
Joined
Jul 5, 2007
Location
Loxahatchee, Florida
TDI
82 Vanagon and 2011 JSW
Andy, check your IQ at operating temp before you tear into the pump. It does not take much movement of the top to have it way off even if you mark it. I did the pump head O ring first. I then moved on to the top seals. There is a pin that needs to fit a cog in the pump. I must have lifted the top 10 times to be sure I had the pin in the pump. This job will empty the pump, so be prepared to reprime it and the injector lines. Once you have it started recheck the IQ and adjust as necessary.

My pump is the only one I have done. I was nervous as could be, but when it was done, I realized I worried about nothing. Good luck oh and get that clear hose going into the pump. I can tell when it is time to change the filter by watching the hose. Often it is not air bubbles, but space bubbles caused by the low pressure and the restriction on the fuel system. mark
 

AndyBees

Top Post Dawg
Joined
May 27, 2003
Location
Southeast Kentucky
TDI
Silver 2003 Jetta TDI, Silver 2000 Jetta TDI (sold), '84 Vanagon with '02 ALH engine
ALH TDI Injection Pump Re-seal

Injection Pump re-seal....... (Scroll on down to Post #777 for more pics and narrative)

Okay, I watched the 7 YouTube clips in RunonBeer's link. In fact, I watched them twice (couple of days apart). I took notes as I watched the second time (detailed notes).

So, today, I embarked on the task of doing the IP re-seal. I've taken a lot of pics for posting (later). ......... later, because at this point I've ran into a problem.

In the YouTube clips, the instructions are to make sure you get out any pieces if the O-ring should it break. In fact, instructions are to use a mirror to look under the pump head to make sure you get it all out (the O-ring pieces, if it breaks apart).

Here's my problem ........ the O-ring is "peeling out" leaving bits of rubber in the sealing groove in the pump head. That sort of problem is not covered in the YouTube clips!

So, obviously, the IP head has to come off. Problem is, the small spacer will fall-out (you have to watch the YouTube to know what I am talking about). Instructions at that point are to completely remove the pump to re-install the spacer, if it falls out. Of course, that task is only if you screw-up by letting the pump head come out too far while installing the O-ring on the pump head.

Here is the $100.00 question: has anyone been able to re-install the spacer without removing the pump?

Rant here:
Lastly, from the source, I ordered the Bosch re-seal kit and also purchased the Viton O-ring for the head separate. The Viton O-ring is supposed to be better than the O-ring that comes in the Bosch kit. Question: Why were there two Viton O-rings in one package (never opened)? And, in the kit, what's the bolt for (looks to be a pump head bolt)? Yes, I know the kit contains everything to do a complete IP re-seal and will have parts/seals that I may never use.......at least I hope I don't need to use all of them.

Below are two photos of the pump head showing the O-ring. (comments at top of pics)

Here, the O-ring is very visible and ready to be removed. Using a paper clip in this case did not work. I had to use the point of an ice pick to "stab" and stretch the O-ring up and away from the groove in the pump head. Of course, the O-ring broke which is okay. However, as I began to pull it away from the pump head it left bits of rubber sticking very tight in the the groove.....see next pic.


The pic below hasn't made my day ...................:mad::eek: That O-ring left on there will not scape off ......... stuck as if it has been over-heated (which is not the case).


As stated previously, I have taken lots of pics and will take more. But, right now, I need some gurus to chime in!;)

I'll not be back on-line until much later tonight ...... have to go pay my respects to the family of a good friend who passed away!
 
Last edited:

jimbote

Certified Volkswagen Nut
Joined
Jul 10, 2006
Location
spiral arm, milky way (aka central NC)
TDI
Tacoma 4x4 converted to TDI
Andy you can use Vaseline to hold everything in place.... However it's possible to get the cam plate 180* out upon reassembly....let's say you have the pump head out and everything @ tdc the cam plate should be reassembled so it's drive pin is @ 2 o'clock (from rear of pump) .... If you have any issues you can give me a ring
 
Last edited:

markd89

Veteran Member
Joined
Oct 21, 2009
Location
Los Angeles
TDI
1978 VW Bus 1Z TDI
On another subject: Well, unless someone has a better idea, I'm going to purchase the steel 6" X 15" rims with a 30 ET from Van Cafe. Considering my intentions, the steelies will be the best choice! I'll be running 215/75/15 Uniroyals. The extra diameter sure helps to bring down the RPM at cruising speeds in 4th gear!
I have the 16" Van Cafe rims on my 78 bus and am happy with them. It's also possible, I hear to use some later VW rims which might have been better for my application because of ET 45 -- the back has 1/2" of clearance between the tire and fender. It doesn't hit, but it's close. For a Vanagon, the ET 30 ones might be better.
 

AndyBees

Top Post Dawg
Joined
May 27, 2003
Location
Southeast Kentucky
TDI
Silver 2003 Jetta TDI, Silver 2000 Jetta TDI (sold), '84 Vanagon with '02 ALH engine
Comments

Andy you can use Vaseline to hold everything in place.... However it's possible to get the cam plate 180* out upon reassembly....let's say you have the pump head out and everything @ tdc the cam plate should be reassembled so it's drive pin is @ 2 o'clock (from rear of pump) .... If you have any issues you can give me a ring
Jimmy, grease and/or vaseline did cross my mind.... actually when I saw the video that was something I thought about. But, I just wanted to know if it was possible. Good tip about keeping it in time.

Well, I've decided to wait until tomorrow afternoon to finish up. I got back late from the funeral home tonight......over an hour wait to see the guy......extremely well liked and will be missed.


I have the 16" Van Cafe rims on my 78 bus and am happy with them. It's also possible, I hear to use some later VW rims which might have been better for my application because of ET 45 -- the back has 1/2" of clearance between the tire and fender. It doesn't hit, but it's close. For a Vanagon, the ET 30 ones might be better.

Well, my 15" rims come Thursday evening. Since I already had over $500.00 in the Uniroyal Larados, I just stuck with them. Besides, there was cosmetic damage to the two front ones after they rubbed with the EuroVan rims (44 ET). I doubt the dealer would have given much on trade-in, considering the damage. The 15s from VC are 30 ET, which are advertised to work with their larger disc brake set-up!


Well, this Pump thingy is just a bump in the road! I'll tackle it tomorrow afternoon and post pics tomorrow night. Hopefully I can have it on the road Monday and get the rims switched!:D
 

syncrolloydy

Well-known member
Joined
Jun 21, 2012
Location
london
TDI
VW T3 AFN
Just caught up with this thread, some amazing work going on and help from all corners. It's these unexpected faults (like your ip problem) that really make you tear your hair out eh?
I'm just on the last fro's of my syncro 16" vanagon conversion, it has a AFN from a passat fitted in it, all documented on another forum but I'm thinking of replicating it on here.
I don't think these projects ever finish, always a little bit to tweak, an improvement here, a bit to cut off there ect lol
I'm now looking at dumping the K&N Apollo and fitting the passat air box, never stops :)
 

AndyBees

Top Post Dawg
Joined
May 27, 2003
Location
Southeast Kentucky
TDI
Silver 2003 Jetta TDI, Silver 2000 Jetta TDI (sold), '84 Vanagon with '02 ALH engine
IP re-seal progress

Alright ............ I got it all back together.:D I had to go to the "bottom" of the IP. I removed the IP head and used a dremel tool with wire brush, carb cleaner, parts cleaner, compressed air, etc., to remove the remaining bits of O-ring. I followed with a bristle brush on the dremel to polish the groove surface. Throughout the process, I was very careful about keeping things clean.

As Jimbote suggested, vaseline held the little shim in place.... actually, I had to use vaseline on two of the cam rollers and the center piece of the cam plate as well as use the paper clip for holding the top of the cam plate as I installed the pump head. (pics later tonight will show it all)

Well, I did get it started............ idle seemed very smooth. However, I was standing on the outside of the vehicle reaching in to operate the ignition. So, at this point, I cannot say if engine will rev. I need to move the vehicle outside of the garage .........my body doesn't cope very well with CO (Carbon monoxide).:eek:
 
Last edited:

AndyBees

Top Post Dawg
Joined
May 27, 2003
Location
Southeast Kentucky
TDI
Silver 2003 Jetta TDI, Silver 2000 Jetta TDI (sold), '84 Vanagon with '02 ALH engine
Well, the fueling value was above 14 (lean). VAG COM could only get it down to 12.2. Starting wasn't improved at all with that setting.

So, I did the hammer mod and then tweaked it with VAG COM to 3.4..... still starting was not much better.

One more time with the hammer mod and final VCDS tweaking, I set it at 2.2 where my car has been from day one! ........starting is a little better, but nothing like my car with over 300k miles on it.

I'm going to let it sit outside tonight. The temp is supposed to be down around 40f by morning.......... The battery is red hot, so we'll see in the morning.

One thing for the gurus ...... I did get a DTC but no check engine light (CEL).
P0128 Coolant Thermostat Value below control range, N214. I did not clear the code. However, after a test drive, more VCDS observation, etc., I noticed the code was gone. I don't have my manual here with me at the garage, so I need to see what the N214 is all about when I go inside.

EDIT: I did add a check-valve in the fuel line. I got it at a diesel parts supplier......they said it should work fine with my 4-cylinder engine!

I'll post pics a later tonight!
 
Last edited:

AndyBees

Top Post Dawg
Joined
May 27, 2003
Location
Southeast Kentucky
TDI
Silver 2003 Jetta TDI, Silver 2000 Jetta TDI (sold), '84 Vanagon with '02 ALH engine
ALH Injection Pump re-seal

Okay, here are the pics of the Injection Pump re-seal task. Please note: don't do this at home without watching the YouTube link (all 7 flicks) in RunonBeer's signature. Also, I am only posting to show what I did and this is not to be considered as "re-inventing the wheel."

So, with that in mind, I will post a number of the pics I took today with diesel fuel on my fingers/camera, etc. Nope, I did not use rubber gloves as the Diesel Geeks guys did.

First, I stress (re-stress what the DG guys said) ...... keep things clean. If my engine wasn't so nice and clean, I would have pressure washed it first.

Anyway, I did use parts cleaner and compressed air to start-off being clean and staying clean!

This will probably take three or more posts (all comments are at the top of the pics)

This pic is illistrative of what I'm trying to get across about being clean. Also, I used lots of paper towels (not shop towels) and clean old cotton rags.


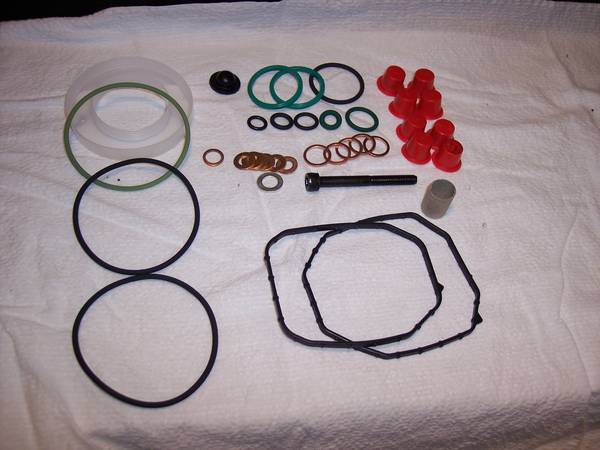
Below is what comes in the re-seal kit. Notice on the left bottom are two Viton O-rings (ordered separately, because they are not in the kit). I'm not sure why there were two in the unopened/sealed bag. They were smaller (less fat) than the Green One that come with the Bosch kit... Yep, I did not use the Viton seal...........explain to me why there were two of them. I didn't want to take any chances on a screw-up. And, I didn't have time to be chasing down this sort of thing.


Totally unnecessary, but I did set the engine on TDC. In fact, to get the IP internally "on high" cam, the IP pin had to be removed. (this is informational only)


Below, is the top of the IP removed and laying back away from the work area. I did cover it with a paper towel.


Below, is a view of the QA with the top of the IP off. Notice there is fuel all around the sides ,,,, indicating it is probably not leaking back. The vehicle had been sitting at least 6 hours before I removed the pump top.... plenty of time for a leaking O-ring, fuel line, or filter connection to leak down.


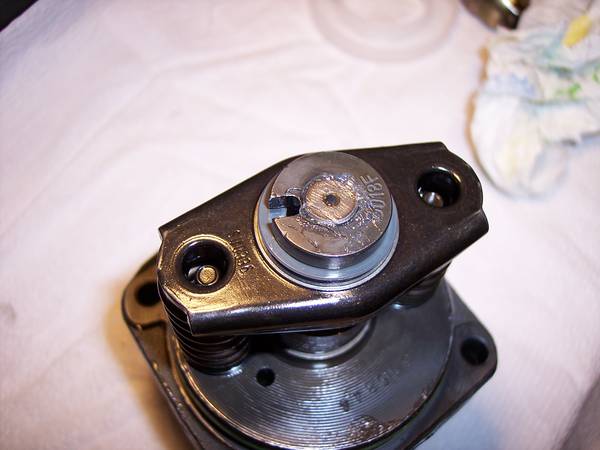
Below is another angle of the QA adjuster with the top off.

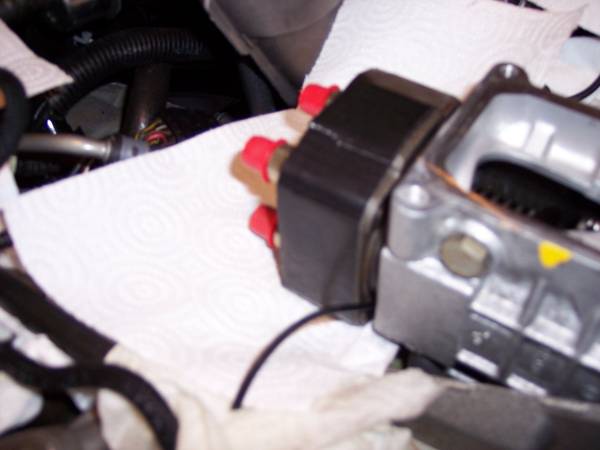
In the pic below, you can see that I have removed number 3 & 4 injector lines and installed the red protector covers. The other two injector lines were removed next.


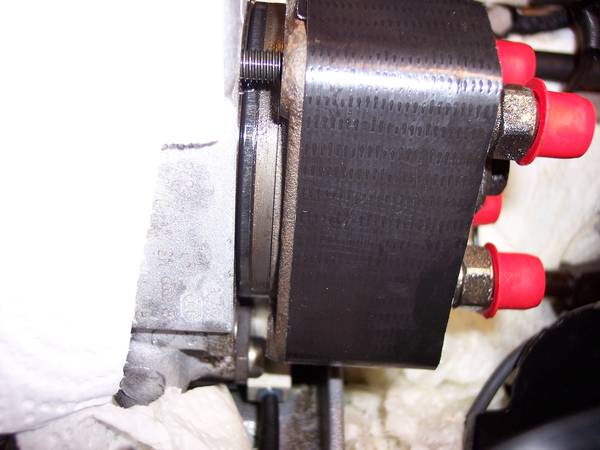
In the pic below, I am trying to show the "mark" I made on the pump body and the Quantity Adjuster ...... it is straight down from the gold colored bolt there.... not in focus, but there.


This pic, better shows the mark on the pump body and QA. In fact, I marked it just below both gold colored bolts on that side. (not talking about the yellow paint, that's factory). Putting the QA back "in alignment" is very important when you are ready to start the engine. If it is off just a little, the starting and running will be affected. Further adjustment doing the hammer mod and using VCDS will be necessary, regardless of how accurate you are in putting it back.........remember that!


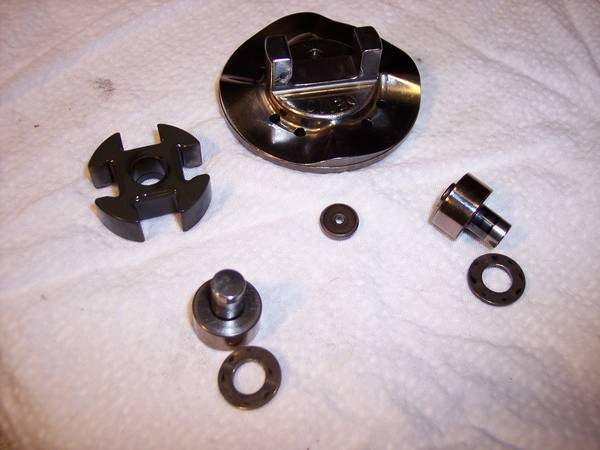
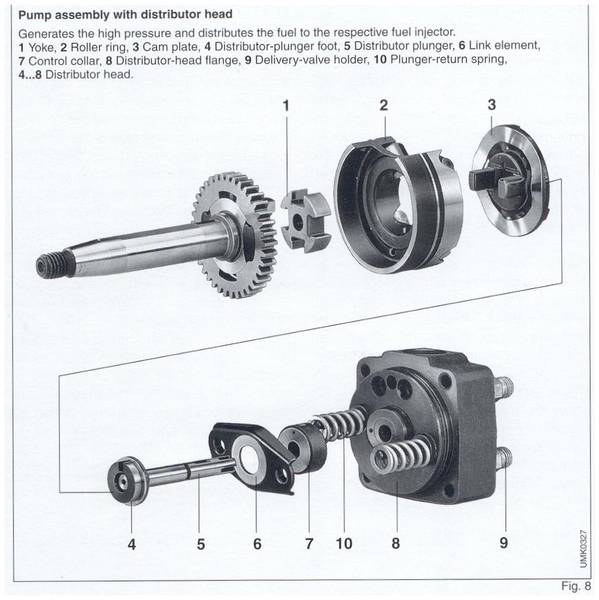
In the pic below, the Quantity Adjustor is laying over out of the work area as well. It was also covered with a paper towel. You can see the "motor rod" sticking down from the QA. The tip goes into the control collar (adjusting collar) ... the next post will show the control collar.
 
Last edited:

AndyBees

Top Post Dawg
Joined
May 27, 2003
Location
Southeast Kentucky
TDI
Silver 2003 Jetta TDI, Silver 2000 Jetta TDI (sold), '84 Vanagon with '02 ALH engine
Injection Pump re-seal continued

Injection Pump re-seal continued. (all comments are at the top of each pic)

Here, you can see my "improvised" suction device being used to remove the diesel fuel from the pump body. Remember, my engine is in a Vanagon and the IP sits basically level.


Below is a pic of the "crude" but very functional vacuum pump


The large vacuum hose on the right goes to the vacuum pump. The pump creates vacuum in the jar. The smaller hose on the left has a metal pipe on the end for reaching down into the Injection Pump body........ important to get the fuel out or you will have a mess.


Below, the diesel fuel removal is almost finished. Notice that the fuel shut-off valve is still installed in the pump head at this point.


Below, you can see the Pump Body has had all the fuel suctioned out. Also, you can see the control collar ....there in the center with the hole in it. The edge of the Cam Plate is barely visible at the bottom. It is important to rotate the engine at this point to put the Cam Plate on stroke (top of cam) so that pressure is applied on the distributor plunger foot and distributor plunger. There is a small shim that could otherwise fall out (more on this in the next post of pics)


Below, you can see that a simple adjustable wrench will remove the fuel shut-off valve.


In the pic below, you can see two efforts to maintain cleanliness.... IP body covered with paper towel (taped in place) and the fuel shut-off valve hole is plugged with a piece of paper towel (later vacuumed out prior to re-assembly).


In the pic below, you can see that I have wrapped black duct tape around the pump head. This is necessary to make it easy to slide the new O-ring over the pump head and into the sealing groove.


Below, you can see that I have backed out the two screws holding the head. This allows the head to move outward. The Cam Plate pressure will push it out. Always turn the screws out slowly and evenly.


In the pic below, the O-ring is very visible. At this point, you are supposed to use a paper clip or something similar to gouge the O-ring and peel it out. It is suggested to use a mirror to look under the bottom to make sure it is all out.


At this point, I had issues big-time. When I began peeling the O-ring out, it left bits stuck in the pump head sealing groove.

More pics and info in the next post.
 
Last edited:

AndyBees

Top Post Dawg
Joined
May 27, 2003
Location
Southeast Kentucky
TDI
Silver 2003 Jetta TDI, Silver 2000 Jetta TDI (sold), '84 Vanagon with '02 ALH engine
IP re-seal continued.

Injection Pump re-seal continued. (all comments are at the top of each pic)

Below, is a pic showing part of the old O-ring hanging out there to the side of the Pump Head (sorry about the focus).


As posted previously, below, is a pic that shows how the O-ring left bits stuck in the sealing groove of the Pump Head ......... At this point, I had no choice but to remove the Pump Head. Of course, the shim referred to previously did fall out as well as two of the Cam Plate rollers and the Cam Plate.


In the pic below, the Pump Head is sitting in my old vise (paper towels keeping things clean). You can see the O-ring bits stuck in the sealing groove of the PH. I used a Dremel tool with wire brush, carb cleaner, parts cleaner, paper towels and compressed air to get that stuff out. I used a bristle brush in the Dremel to polish the groove ... everything took about an hour.


In the pic below, you can see how the Pump Head groove is beginning to clean up.


Below, you are looking inside the Pump Housing from the Pump Head end (looking toward the TB sprocket end). What's important about this pic? See there near the bottom at about 6:30...? Yes, that's a huge fruit fly... went in last night before I knew that I would be pulling the head... I never did see it fly back out! So, there it is. Also, notice that the two other two cam plate rollers (10:00 and 2:00 o'clock) are missing ......they fell out........see next pic and explantion.


Below are various pieces parts pertaining to the Cam Plate and it's function. There in the center is the little shim, if it falls out while you are replacing the Pump Head O-ring, you are supposed to pull the pump to finish the job .......Jimbote says no! And, I do too!...... read on! The two items on either side are the Cam Plate rollers and pins. The thingy to the left is called the yoke! Of course, the other thing is the Cam Plate.... the little shim goes on the other side of the Cam Plate.


Below, is the Pump Head. You are looking at the part that goes inside the pump housing and fits against the center of the Cam Plate. There in the center of the "Distributor-plunger foot" is the little shim held in place with Vaseline....


Below, you are looking into the pump body. The paper clip is holding the Cam Plate in place. I used Vaseline to "stick" the cam rollers, yoke and Cam Plate in place. However, the paper clip was necessary to make sure they didn't fall out.


The pic below gives a zoomed out perspective.


In the pic below, you can see that the Pump Head has been installed with the Distributor plunger, Element link, Control collar, etc.... notice that the paper clip is still in place.
 
Last edited:

AndyBees

Top Post Dawg
Joined
May 27, 2003
Location
Southeast Kentucky
TDI
Silver 2003 Jetta TDI, Silver 2000 Jetta TDI (sold), '84 Vanagon with '02 ALH engine
IP re-seal continued ....last post in the series

Injection Pump re-seal continued. (all comments are at the top of each pic)

In the How To threads, I borrowed the pic below from Drivbiwire's write-up on the ALH TDI Injection Pump. This pic will give you a better understanding of how things fit in the IP ...... there's excellent reading in Drivbiwire's Thread in the How Tos.
The referenced "shim" fits in the center of the end of the Distributor-plunger foot (#4 in the pic below, the shim is not shown)


Unfortunately, I did not take any pics of installing the Quantity Adjuster nor the top of the IP. However, I will point out that the QA must be set so the motor rod fits into the control collar, otherwise, you have screwed-up. Also, once the QA is slightly bolted down, you need to align it with the marks made on the side before torqueing down the bolts.

Below is a pic of priming the IP .......notice the fuel swelling-up in the jar. Well, at that point, the vacuum was pulling fuel back up thru the return line. I had to clamp that line to force vacuum on the feed line.


The pic below shows the use of lots of paper towels during the injector line bleeding task. I always bleed two lines at a time. It was not difficult to bled the fuel lines.....engine fired up pretty quick!


This is a pic of the "in-line" check valve that I install as part of the IP re-seal project. Yes, those are two different sizes lines with a 5/16 inch nipple in play. However, I did re-size one side with forced-on clear plastic line. They fit snugg!


Well, as I said in the earlier posts this past evening, I am not sure if the re-seal has solved the problem..........hard starting. Yes, I have a good new battery.... yes, it spins the starter really fast!

At this point, I am a little disappointed.......but, I do have the "re-seal experience" to add to my resume'. Just maybe I'll be a guru one day!:D
 
Last edited:
Top