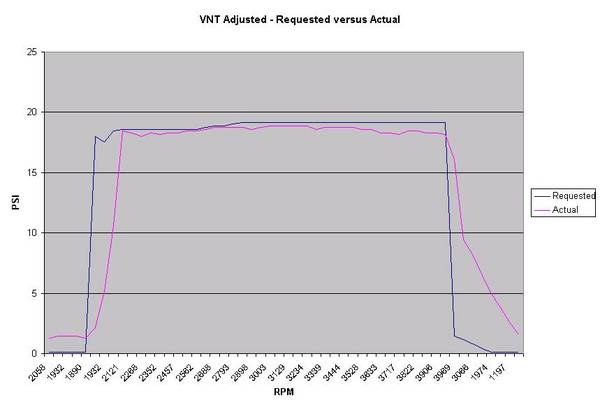
Proper VNT 17 adjustment? (*NOT* a +/- vnt adj qstn)

BuzzMC

Veteran Member
Joined
Apr 22, 2003
Location
Bay Area, California
TDI
2003 Jetta GLS TDI
OK, so I upgrade from vnt15 to vnt17... entire manifold fwiw, turbo already installed.

Is there an adjustment procedure? As far as I know it wasn't adjusted to any car. *Guessing* (though I'll find out for sure soon), it was a rebuild, bench tested for 'whatever', etc, but never setup for a tdi.

So is there a procedure for this?

I'm asking 'cause I have some serious boost. Low or high rpm, all over... But I can get sustained boost way in excess of 25. I've seen 30 already, and I've yet to hit WOT.

I took a mirror and did the "-1 VNT". While doing this I would swear to you that the rod was the shortest it could ever be. Certainly there was only *one* direction I could even turn the rod. While under the car looking up at the turbo the rod was turned counter clockwise one full turn.

I don't think the adjustment did squat to my performance. I still have seriously high boost, and again easily see 30 in 2nd gear waiting until around 3k to give it some go-pedal, just to be nice to the lower RPM range.
 

clove911

Veteran Member
Joined
Apr 27, 2004
Location
Harford County, Maryland
TDI
2001 Golf, blue
Your going to have to elaborate a little for us. Do you have a boost valve to control spikes? Do you have any other mods including a chip tune to control requested boost? If you only have the turbo and nothing to control it, good luck, cause it will only last so long at 30psi sustained.
 

KERMA

Vendor , w/Business number
Joined
Sep 23, 2001
Location
here
TDI
99 beetle and 04 jetta
The rod should be just long enough that there is just a tad of tension on the vnt actuator diaphragm spring when there is no vacuum applied.

Start to move off full open when 3-5 inHg vacuum applied, full travel stop at 18-22 inHg.
This is the garrett factory specs.
 
Last edited:

03_01_TDI

Banned
Joined
Dec 10, 2003
Location
Denmark
TDI
Na
there is also an adjustable stop-- that limits the max position of the vnt lever.

Are you using a new turbo or a old turbo?

If old are the vnt vanes clean?
 

jsrmonster

Veteran Member - TDIClub Enthusiast
Joined
Apr 22, 2002
Location
Red Lion, PA
TDI
15 Golf SW DSG, RC3 piped, 99.5 Jetta Rocket PD150 6spd 4motion, 2000 ASV110 RC6 "Silverbullet" 5spd Race Car, 2003.5 Cummins QCLB 4x4 "Blue Monster" Jeep CRD juiced, MB Sprinter van juiced up
Hi,

In order to adjust the vnt actuator, I remove the 2 screws from the bracket to the actuator, leaving the bracket still bolted to the turbo. Carefully pull the snap ring retainer off, (big magnet nearby) and remove the actuator to adjust it properly. You may also need to remove the intake pipe to ease access from the top. Do not adjust it in place or you will destroy the rod end and ball joint won't fit right. When adjusted properly, it should be about 1/16-1/8" away from the bracket with the ball joint inserted on the lever. This preloaded compression is important to keep the high backpressure from pushing or back-driving the vnt vanes open to prevent overboost. If you have a handheld vaccume pump, the actuator should not begin moving until 8-10" Hg vaccume is pulled. Oem will usually crack at about 6"Hg.

Do not tamper with the vnt stop adjustment. This is set at the factory to allow some weld tolerance on the lever during manufacture. You need the turbo removed on the bench to adjust this set screw properly so you can see the vanes don't hit. If they hit, they will stick and cause overboost for sure. A stuck turbo will die quickly.

Jeff
 
Last edited:

jsrmonster

Veteran Member - TDIClub Enthusiast
Joined
Apr 22, 2002
Location
Red Lion, PA
TDI
15 Golf SW DSG, RC3 piped, 99.5 Jetta Rocket PD150 6spd 4motion, 2000 ASV110 RC6 "Silverbullet" 5spd Race Car, 2003.5 Cummins QCLB 4x4 "Blue Monster" Jeep CRD juiced, MB Sprinter van juiced up
Hi,

The PD actuators can be adjusted in place very easy. Loosen the 2x 10mm nuts on the rod and lengthen the rod 1/16"- 1/8" so the vaccume gage reads 8-10" hg to just crack open the lever, then tighten the nuts.

Jeff
 

TDIEB

Well-known member
Joined
Nov 20, 2003
Location
MA, USA
TDI
2003 Golf blue
question jsrmonster

When you state that ("it should be about 1/16-1/8" away from the bracket with the ball joint inserted on the lever.") What are you refering to, the thread on the rod being 1/16 1/8" ?

Mike
 

BuzzMC

Veteran Member
Joined
Apr 22, 2003
Location
Bay Area, California
TDI
2003 Jetta GLS TDI
TDIEB said:
When you state that ("it should be about 1/16-1/8" away from the bracket with the ball joint inserted on the lever.") What are you refering to, the thread on the rod being 1/16 1/8" ?

Mike
Mike,

Took me a bit to figure this out, and you'll never "get it" if you're not removing the actuator from the turbo.

After you have the unit removed, you adjust. Then you place it back in the car, and with it in place, the surface that mates to the bracket that you left on the car - That's where you want the 1/16" to 1/8".

After you've done this and *KNOW* what you're doing with the adjustment I think if you can figure out a safe way to loosen the nut w/o twisting/breaking/etc the balljoint and adjuster, you can safely adjust this in the car, providing you have a vacuum pump.

But note that if you do try and adjust it while in the car, the adjuster is a royal pain to move, especially when you start to get some preload going. But it is possible. I'd highly recommend against doing this until you've had the actuator/adjustment rod *IN HAND* so you know what you're working with.

I *just today* did all this. I set the actuator up w/jsrmonster (Jeff's) instructions, I used the vacuum pump to check and see that the actuator was moving when about 9 hg?, was applied.

My boost below 2k seems pretty in check now, and from 3k on it climbs, and settles in at 20-21 sustained. I may tweak some more and get it up to 22-23, but I'm not worried about it at the moment. I'm going to drive the car for a few days, let things settle in, and see if anything changes.
 

TDIEB

Well-known member
Joined
Nov 20, 2003
Location
MA, USA
TDI
2003 Golf blue
BuzzMC

I have a new VNT 17 sitting right on my desk. So what I understand you are saying is that I remove the two nuts holding the vacume device to the bracket and loosen the nut and turn in the silver shaft until there is 1/16 to 1/8" play between the end of the shaft and where it would sit in the vacume device???

Mike
 

BuzzMC

Veteran Member
Joined
Apr 22, 2003
Location
Bay Area, California
TDI
2003 Jetta GLS TDI
TDIEB said:
I have a new VNT 17 sitting right on my desk. So what I understand you are saying is that I remove the two nuts holding the vacume device to the bracket and loosen the nut and turn in the silver shaft until there is 1/16 to 1/8" play between the end of the shaft and where it would sit in the vacume device???

Mike
I don't think so. You need to make the adjustments and then check-fit it in the car/on the turbo. So, if you have the turbo installed in the exhaust manifold, sitting on your desk, then you can do this.

You remove the two nuts, and the e-ring (snap ring) on the top of the adjustment shaft so you can remove the entire vnt actuator.

Then you can loosen the nut on the adjustment rod, and then you can move the adjustment rod to your hearts content, though most people advise to only do "-VNT" adjustments, which would be to make the rod longer, which is what I did.

In any case, the place you're looking for the 1/16-18 is between the actuator and the bracket that you've left installed on the exahst manifold, which means you have to re-install the actuator, at least to the point of getting the balljoint end back onto the turbo, and fitting the vnt actuator back into the bracket. It shouldn't seat w/o you applying some pressure (that's where the 1/8" or so is!).
 

TDIEB

Well-known member
Joined
Nov 20, 2003
Location
MA, USA
TDI
2003 Golf blue
BuzzMC close...

Now I think I'm starting to understand. When you lengthen the rod it will put a so call pre-load on the vacuum device. What I mean is when the vacuum unit does not seat right on the bracket, where it is 1/16 to 1/8" above the bracket that is what you are talking about, where the clearance is correct???
 

BuzzMC

Veteran Member
Joined
Apr 22, 2003
Location
Bay Area, California
TDI
2003 Jetta GLS TDI
TDIEB said:
Now I think I'm starting to understand. When you lengthen the rod it will put a so call pre-load on the vacuum device. What I mean is when the vacuum unit does not seat right on the bracket, where it is 1/16 to 1/8" above the bracket that is what you are talking about, where the clearance is correct???
Correctamundo.
 

PapaBare

Veteran Member
Joined
Dec 8, 2004
Location
Regina, SK, Western Canada
TDI
Jetta GLS, 2005, Shadow Blue
Is this similer to the K39 that is in the 2004-5 PD's?


If so , could someone point out where this mod is accomplished?

I do not have easy access to a garage or lift and working out on the car when it is -25C (It's warming up at least) is no fun.

Right now the highest level that shows on the boost gauge is only about 12lb - 13lb at any time. :(

PS Thanks to RichC for posting some pictures!
 
Last edited:

BuzzMC

Veteran Member
Joined
Apr 22, 2003
Location
Bay Area, California
TDI
2003 Jetta GLS TDI
Its not really a mod in my opinion - it's much more just an adjustment. When people start looking at this as a "mod", they'll start making the "+VNT" style adjustments to get "more power", and more than likely grenade a turbo or two.

If I were any good w/mspaint or something I'd cut up the pic and show ya, but with what jsrmoster already posted I think you should be able to figure it out.

Remove the two nuts from the top of the vnt actuator. If you remove the two bolts that go into the exhaust manifold then you can still get the vnt actuator off, but you can't see if you have the 1/16" to 1/8" clearance between the actuator and bracket when you've adjusted the rod properly.

So remove those two nuts. Then remove the e/snap ring that holds the adjustment rod on to the shaft (near where the blue line is in the pic).

Now you can remve the vnt actuator.

Loosen the nut that's keeping you from adjusting the rod.

Now you can spin that knurled "nut" either way, but almost certainly you're going to want to turn it counter clockwise I believe (whatever way lengthens the rod!).

Test fit it back in the bracket and check for the clearance. If you have that, put it back together (after tightening the nut that keeps the adjustment rod from losing its adjustment), throw a vacuum gauge on it, and check to see if the rod starts to move at around 8-10hg on the gauge. If it does, you're golden. If not, adjust again. If it moves at +10, shorten the rod, if it moves at -8, lengthen the rod.
 

dabear95

Veteran Member
Joined
Sep 26, 2002
Location
Roseville, MI
TDI
2002 Golf GLS, Silver
OK, VNT is adjusted but I have a question regarding the allowable spike. I'm smoking a bit more since the adjustment (understandably). I want to know what is the acceptable boost spike (to minimize lag and smoke) with the VNT15.


Before:


After:


It's probably a loaded question as it likely depends on my risk tolerance. I'm just looking to those with more experience for some feedback.


Thanks!
Jason
 

KERMA

Vendor , w/Business number
Joined
Sep 23, 2001
Location
here
TDI
99 beetle and 04 jetta
looks like your "before" would have been acceptable.
 

dabear95

Veteran Member
Joined
Sep 26, 2002
Location
Roseville, MI
TDI
2002 Golf GLS, Silver
22 psi, using the boostvalve to regulate the spike is acceptable? I'm talking reliabilty of the turbo, not max power. Or are you indicating that 22psi is an acceptable spike? I was thinking to adjust to get a 21psi spike...


Edit - Stock, the VNT cracked at 3'' HG in my case, and it would surge bad at low speed. This is a stock VNT15, not 17. I just thought I would keep it in this thread.


Jason
 
Last edited:

KERMA

Vendor , w/Business number
Joined
Sep 23, 2001
Location
here
TDI
99 beetle and 04 jetta
If you have a brief spike, followed by sustained very close to requested under full throttle, then I wouldn't mess with it. Boost valve can contain the brief spike. If you over-adjust, you are just going be overdamped and get more lag and smoke from it. Stock has a spike built in to suppress smoke, and its magnitude depends on a number of things. If there's no spike whatsoever, the response is very sluggish in feel.
 
Last edited:

KERMA

Vendor , w/Business number
Joined
Sep 23, 2001
Location
here
TDI
99 beetle and 04 jetta
Double post. Oops.
 
Last edited:

dabear95

Veteran Member
Joined
Sep 26, 2002
Location
Roseville, MI
TDI
2002 Golf GLS, Silver
Thanks Kerma, that makes perfect sense. I never did log my stock setup but I have seen graph's of the stock spike.


Jason
 

Rockwell

Veteran Member
Joined
Nov 23, 2009
Location
Manchester, NH
TDI
2003 Jetta TDI (R.I.P.), 1.6TD Toyota pickup, 2011 BMW 335d, 1996 Passat TDI
Hi,

In order to adjust the vnt actuator, I remove the 2 screws from the bracket to the actuator, leaving the bracket still bolted to the turbo. Carefully pull the snap ring retainer off, (big magnet nearby) and remove the actuator to adjust it properly. You may also need to remove the intake pipe to ease access from the top. Do not adjust it in place or you will destroy the rod end and ball joint won't fit right. When adjusted properly, it should be about 1/16-1/8" away from the bracket with the ball joint inserted on the lever. This preloaded compression is important to keep the high backpressure from pushing or back-driving the vnt vanes open to prevent overboost. If you have a handheld vaccume pump, the actuator should not begin moving until 8-10" Hg vaccume is pulled. Oem will usually crack at about 6"Hg.

Do not tamper with the vnt stop adjustment. This is set at the factory to allow some weld tolerance on the lever during manufacture. You need the turbo removed on the bench to adjust this set screw properly so you can see the vanes don't hit. If they hit, they will stick and cause overboost for sure. A stuck turbo will die quickly.

Jeff
This procedure also apply to the GTB 1756?
 

geez

Veteran Member
Joined
Jan 18, 2005
Location
Canyon Country CA, USA
TDI
Jets-'10, '09, '98-sold
The rod should be just long enough that there is just a tad of tension on the vnt actuator diaphragm spring when there is no vacuum applied.

Start to move off full open when 3-5 inHg vacuum applied, full travel stop at 18-22 inHg.
This is the garrett factory specs.
Hey Kerma,
Thank you! I've posted this thread: https://forums.tdiclub.com/index.php?threads/p00af-fixed-now-p2563.519942/#post-5710547
To be sure before I go back into the VNT or VGT, we have a 2010 Jetta TDI. is your well explained procedure in this thread applicable to our turbo? How do I know which turbo I have? Garrett or the other one?
Thank you so much!!!
 

geez

Veteran Member
Joined
Jan 18, 2005
Location
Canyon Country CA, USA
TDI
Jets-'10, '09, '98-sold
Update:
All is well on the 2010 TDI Jetta that had a P00AF then after replacing the VGT or VNT got a P2563.
This is the Borgwarner Turbo.
Tried putting the top nut on the VNT in the same spot as the old one by measuring from the bottom of the housing of the VNT to the top of the top nut. I was off and thus the P2563 poked it's head above the crowd to be noticed.
While I've posted threads within this thread above, that I've read and participated in regarding this...
Here is the final assessment/measurements that stopped the P2563 from trying to stand out/up above the norm.

First measurement between the housing and the top of the top nut:
13.65mm and I did not check the psi level of vacuum the plunger started to move. CEL
Second, based on a video my son and I watched:
11.44mm with movement of the VNT plunger starting at 3 lbs of vacuum. CEL
Third, based on reading insight from those in this link and the other link posted above:
13.48mm with movement of the VNT plunger starting at 6 lbs of vacuum. CEL
Forth, guessing that I needed a higher vacuum number based on readings done on tdiclub:
14.00mm with movement of the VNT plunger starting at 5 lbs of vacuum.
BUT IT WORKED!!! NO CEL!!!
So a thought or two.
Maybe this being a Borgwarner, the vacuum numbers and procedure is a bit different? Stands to reason.
I thought that extending the top nut further away from the bottom of the VNT housing would require more vacuum to get the plunger to start moving, based on the above numbers. Further; reading the comments above suggested that the vacuum needed to be much higher than I was currently achieving...thus I moved the Nut further away and guessed I would have been around 8 lbs of vacuum before the VNT moved.
That was not true.

So in summation:
The top nut on the bad VNT must have rotated away (lefty loosie or counter clockwise) from the base of the VNT on its own during removal because it was moving freely upon removal. My measured guess of 13.65mm was only off .35mm, but that was the difference the cars computer needed to see, and is now happy!
It is important to note that I reinstalled the VNT and put a vacuum testing device on it to check when the VNT plunger started to move.
 

PakProtector

Veteran Member
Joined
Jan 5, 2014
Location
AnnArbor, MI
TDI
Mk.4's and the Cummins
BuzzMC

I have a new VNT 17 sitting right on my desk. So what I understand you are saying is that I remove the two nuts holding the vacume device to the bracket and loosen the nut and turn in the silver shaft until there is 1/16 to 1/8" play between the end of the shaft and where it would sit in the vacume device???

Mike
What you are doing here, is setting the point where the vanes just begin to close( 3-5 is the spec, just a little bit lower than ambient), and the point where it is fully closed( much lower pressure; 18-22 per Kerma ). The adjustment for this is rod length; shorter and the start pressure drops, longer and it raises. So straddle the just moving point and the up against the stop point as best as you can.

The hand vac pump is quite useful. Keep in mind it is a cheap gage and don't sweat the decimal points.

Can't help so much with the what do you turn/loosen/tighten...it has been too long. Suggest looking up VNT adjustment with Google and read a handful of the TDI Club threads it presents you.
cheers,
Douglas

Just don't mess with the stop screw. Period... :)
 
Top