Show what you tow!

Fix_Until_Broke

Top Post Dawg
Joined
Aug 8, 2004
Location
Menomonee Falls, Wisconsin, USA
TDI
03 Jetta, 03 TT TDI
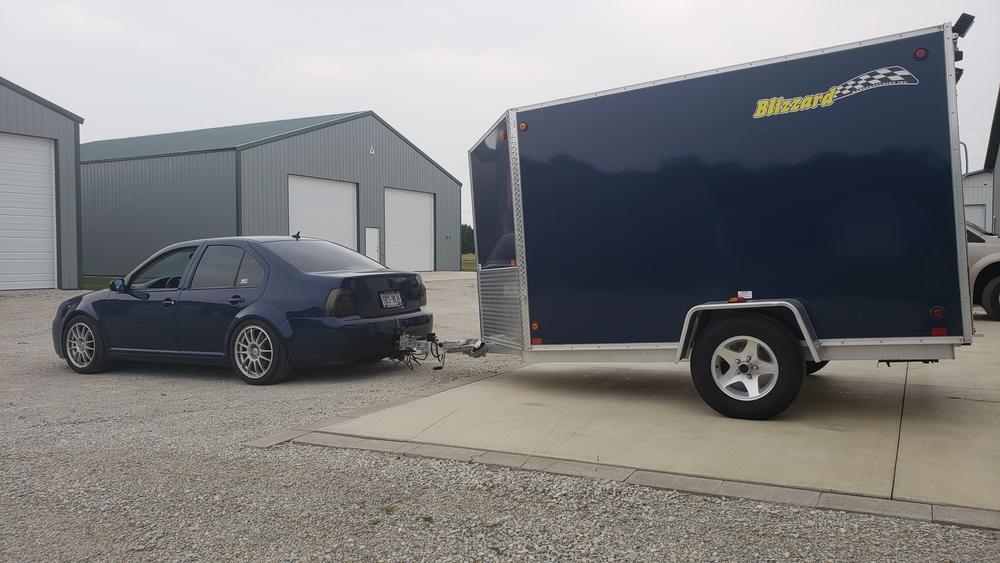
Finally "finished" the tongue extension on my trailer referenced in post 3219 above.

- Made a box for the tool box to sit in ahead of the railing
- Added a spare tire
- Re-located the jack eliminating the "clamp" system and did a direct bolt on to the tongue
- Added a handle to the tongue
- Added 24 feet of 2x4 box tube for reinforcement
1) 8 foot piece directly above the original for vertical stiffness
2) 8 foot pieces going out to the corners for side/side stiffness

All the joints are mitered, chamfered and TIG welded full perimeter where possible - I'm getting better at TIG'ing aluminum - over 22 feet of weld in this tongue extension!

The bounce/jerk/tug is as good or better (less) than before I extended the tongue.

Next step - 2nd axle with hydraulic surge brakes. Need to get a few other projects done first though :)


Fix_Until_Broke

Top Post Dawg
Joined
Aug 8, 2004
Location
Menomonee Falls, Wisconsin, USA
TDI
03 Jetta, 03 TT TDI
The tongue weight was originally 155 lb (measured) and is now 102 lb (by sum of moments calculation). This does not include the spare, so maybe 110? now?

The tool box is full of ratchet straps, bungee cords, corner protectors, etc.
 

jason_

Veteran Member
Joined
Jun 2, 2014
Location
michigan
TDI
2015 s wagon dsg
I know that trailer backs up so easy.

Long tongues = towing orgasm.

Sent from my 2PS64 using Tapatalk
 

kjclow

Top Post Dawg
Joined
Apr 26, 2003
Location
Charlotte, NC
TDI
2010 JSW TDI silver and black. 2017 Ram Ecodiesel dark red with brown and beige interior.
Isn't it more the distance from the ball to the axle? I agree that the long tongue helps.
 

Fix_Until_Broke

Top Post Dawg
Joined
Aug 8, 2004
Location
Menomonee Falls, Wisconsin, USA
TDI
03 Jetta, 03 TT TDI
It used to look like this...

[/IMG]

[/IMG]

The new and improved one looks like this...

[/IMG]


It's a pair of 1.5" x 0.125" wall box tubes with a 3" x 0.625 top plate to mount the ball.
It needs a coat of paint and a 1" hole punched in for the ball, but otherwise I like how it looks.
It should be much stronger in the side to side direction (think wagging trailer) and less suceptable to fatigue with the large smooth radius on the inside of the bend. I tacked the box tubes together then made 4 cuts through the 3 sides leaving the inside corner un-cut. I then bent the tubes to fit the curve of the back bumper then welded the now wider gaps full so it's like a formed piece of 1.5" x 3" box tube with a 1/4" thick reinforcing web in the middle.
I'll try and get some pictures of it on the car once I get it painted and mounted up.
Actually, it's much more stout than it looks I think.
The chains attach to the point right below/behind where the original drawbar broke and it held up to the tug from the hitch breaking and dragging the trailer with a blown tire at 70 MPH.

The two bolts are 5/8" Grade 8 in shear so they have a yield load of 73,631 lbf so I think it's good there.

Immediately behind the two mounting bolts on each side are some forward mounting cross braces that attach to the "frame" up behind the rear tire. This distributes the load nicely between 4 locations on the rear of the car and triangulates the structure nicely. I have pictures but can't post them here at work...

EDIT - Picture of forward reinforcement
[/IMG]

The two mounting bolts attach to the car through a 1/4" plate bracket mounted between the "frame" and the 5 mph bumper. There's a piece of ~1-1/2 box tube welded to the plate with a 5/8" nut welded inside the top end of the box tube. The bolts go in from the bottom and hold the cross bar.
The only thing I think I've seen that is more stout is some guy from Wisconsin removed his crash bumper and used 3x3x1/4 stainless box tube for the cross member, ran rails down the frame like the bosal setup and then welded a bosal like deal down from the middle of the 3x3 cross tube and then back up the outside of the bumper cover.
How is your hitch mounted?

The trailer is probably 2000-2500 lbs - those tables are steel with 1/2" thick tops, 2x2x1/4 steel legs/frame work.
So, way back in 2010, I said I'd get some pictures of how my hitch was mounted behind the bumper cover....well, last time I pulled my trailer, I heard some extra noises I hadn't noticed before, so I pulled the bumper cover off thinking I might have finally loosened a bolt or something but either way a good chance to get some pictures to share.
Well, when I took the cover off, I was a bit surprised to find that all the attachment points were fatigued and broken in the body of the car.


Ooops - Looks like the lower reinforcements were the only thing doing all the work for quite a while!


There's not much besides paint and some seam sealer holding those nuts in.
And finally, here's how the two brackets originally fit in with the lower reinforcement bars as shown in the posts above.


All things considered, it's held up well for what I've put it through. There's a new design in the works that I'll try and fab up this weekend and get some pictures as well. It'll be significantly stronger than this setup
 

romad

Top Post Dawg
Joined
May 27, 2011
Location
Prescott, AZ
TDI
2005 Jetta GLS Wagon "Cranberry"
FUB, why not use the mounting points DESIGNED by VW for that purpose? They are the two box channels in your pictures, and each one has two bolt points on the side facing outward. They are behind the wheelwell liners and are covered with tape and probably rustproofing, mine were. Here is a photo to help locate them.


The Oris-Bosal hitch I installed had M10 nuts welded on the the bars that went inside the channels and used M10x32 bolts though if you fab your own mount, 3/8" should work.
 

SilverGhost

Veteran Member
Joined
Mar 25, 2005
Location
Back in So Flo - St Lucie
TDI
'05 Golf - totaled :(, wife's '13 Beetle - buy back, TDIless
Sorry FUB, but I made, and found, that mistake several years ago. Those 4 bolts can take no more load than holding the impact bumper in place.

I cut a flat plate, roughly in a "L" shape and attached it to a section of box tubing. That tubing bolted to the frame rail like the OE hitch, and the plate sat flush with the body where the stock bumper bar attaches. I then sandwiched the stock bumper bar between my hitch and the plate. It solved the legal issue of keeping my 5mph bumpers and allowed me to have a sturdy hitch.

Wish I had some pictures of the part that goes down the frame rail, but the car is gone.

Jason
 

TDIJetta99

Top Post Dawg
Joined
May 17, 2005
Location
Port Jervis, New York, USA
TDI
03... Faster than yours =]
I remember expressing some concern with that mounting.. I'm surprised it took that long for it to fail. It's a good thing you noticed something wasn't right before it came completely off


That's probably fine for what you tow depending on how you drive.. What I would be concerned about is when you put weight down on the tongue, it wants to bend the bolts, kind of like rotating the hitch down.. I can see something like that breaking off after repeated dips in the road with a decent amount of tongue weight, like having a full sized motorcycle on a trailer.......
Safety chains don't do anything if the hitch comes off haha..
 

[486]

Top Post Dawg
Joined
Mar 1, 2014
Location
MN
TDI
02 golf ALH
So, how much did the longer tongue really help, with the "before" having the hitch not actually bolted to the car and all. :p

I drilled holes in the bumper struts, welded them solid, then welded flat bar on the bottom with captive nuts to bolt to the two large provided holes in the subframe back there. One's a few inches inside the car, and the other's a foot or so, on a golf at least. Jetta's probably a little deeper in there with the extension pieces and all...
 
Last edited:

Fix_Until_Broke

Top Post Dawg
Joined
Aug 8, 2004
Location
Menomonee Falls, Wisconsin, USA
TDI
03 Jetta, 03 TT TDI
I appreciate all the comments - The lower support bars which connect just behind the rear wheel wells were doing most of the "work"

This hitch was put on around Thanksgiving 2005 and I've accumulated over 25,000 miles of trailer towing since then. This was built from scraps in my friends shop one evening and to echo TDIJetta99's comments, I too am surprised how long it lasted.

The new one will use 2x2x.25 angle running inside the rails with nuts welded on and large washers outside to attach to the car as romad mentioned above. The angle will stick out past the face (where the broken part is now) at least 3" I believe there are 5 total locations to run a bolt through between the side and bottom - I plan to use them all :).

Then will be a 2x3x.125 box tube that runs side to side in place of the original bumper support. This will sit down inside the angle and be welded full perimeter to the angle. From this cross bar, there will be two vertical 2x3 bars that run down below the rear valance which will be mitered into another cross bar that will run across the bottom.

In the middle of this cross bar will be a 2" receiver tube and I may put a 3rd vertical bar on the top of the receiver to the upper cross bar as well. The same .5x2 flat reinforcing struts will be re-installed to just behind the rear wheel wells.

Here's a sketch - What I wrote above will be most likely what I'll do, the sketch has a few different variations, not all of which I'll do. I might be able to retain the 5 MPH bumper (man that thing is heavy!), but will have to see how it goes. Any opinions on keeping it or not?

I'll try and make sure to take good pictures of the process along the way to share


[486]

Top Post Dawg
Joined
Mar 1, 2014
Location
MN
TDI
02 golf ALH
I kept the bumper iron, I like the option of getting a quick and dirty push-start without caving in the plastic bumper (and hatch).

Actually I should revise that statement to 'I used the bumper iron as the hitch cross bar after welding in a piece of 1/8" steel to box in the open back side of the C section.'
 

GEFP

Veteran Member
Joined
Jan 22, 2018
Location
Southern Alberta Canada
TDI
2- 2001 Jettas, 2 - 2002 Jettas (1 for parts) 2003 1.8t Jetta (parts) 2014 Jetta
Actually I think you are building this hitch too strong. If you look at how a European hitch is designed, it has a lot of flex built into it so that by the time the harsher bumps get to the frame they are mostly absorbed. Your building an American bull strong hitch for a European car. Your mounting points are going to continue to break out until you design some flex into the hitch.
 

Fix_Until_Broke

Top Post Dawg
Joined
Aug 8, 2004
Location
Menomonee Falls, Wisconsin, USA
TDI
03 Jetta, 03 TT TDI
GEFP - I understand what you mean, the hitch I'm replacing had a lot of flex in it - particularly the cross bar had a lot of torsional flex which I think both helped and hurt.

The flex takes the shock load out of the system, however I think it might also setup a resonance with the trailer and cause an oscillation which significantly increases the number of cycles applied.

I'm hoping that by distributing the forces out over a minimum of 3x the area (probably more like 10x) will reduce the alternating stresses enough to avoid fatigue failures again. This is at the risk of increasing peak forces due to the lack of flex as you describe.

I wonder if I were to get rid of the upper cross bar (the one that connects to the angles up top, and took the uprights and connected them to a torsion spring that went to the opposite side? Something like the front springs on an 88-98 chevy truck?

Rough sketch of the idea..


I wonder if I can design the flex into the part that inserts into the receiver someow?
 

GEFP

Veteran Member
Joined
Jan 22, 2018
Location
Southern Alberta Canada
TDI
2- 2001 Jettas, 2 - 2002 Jettas (1 for parts) 2003 1.8t Jetta (parts) 2014 Jetta
I was thinking more along the lines of getting rid of the two pieces coming down on each side and adding one to the middle. Then sizing your cross bar to flex. By cross bar I mean where you have the torsion assembly in your drawings.
 

SilverGhost

Veteran Member
Joined
Mar 25, 2005
Location
Back in So Flo - St Lucie
TDI
'05 Golf - totaled :(, wife's '13 Beetle - buy back, TDIless
Here are some pictures of my hitch (first try anyway);

Here it is tucked inside the stock 5mph bumper (with bumper cover off)

Here is the 2" receiver sticking out under the 5mph bumper

This is how I originally had it bolted on. Same fatigue failure as FUB

Another shot showing how the cross beam tucked inside the 5mph bumper and how it bolted on.

And a picture showing how it poked out through the lower valence. This is were I wish I had made it a little different.
Sorry I don't have any pictures of how I added the reinforcement in the frame rail behind the 5mph bumper mounting plates.
Jason
 

3L3M3NT

Veteran Member
Joined
Jun 16, 2008
Location
Sturgeon Bay, WI
TDI
04 Jetta GLS TDI, 04 RTDI
Well after quite a hiatus of having nothing to post here, I finally remembered to take some pictures of my 5x9+3' V-nose trailer I had Blizzard make for me so I could take tools, tires, jack, spare parts, and most importantly my wheelchair to different events in the area.

The trailer is hooked up because I'm taking the Jetta to Road America tomorrow for a High Performance Driving Experience (HPDE). Even though I don't drive I still have that need for speed, so what better way then opening up my car on the 4 mile road course.

So if you're in the market for a quality aluminum trailer and you live in the eastern part of the US and Canada look no further than http://www.blizzardmfg.com/


And of course my dog thought he should be the center of attention. ;)
 

Fix_Until_Broke

Top Post Dawg
Joined
Aug 8, 2004
Location
Menomonee Falls, Wisconsin, USA
TDI
03 Jetta, 03 TT TDI
So this weekend was hitch weekend (among other things...).

Started by getting the M12 flange nuts welded to the 2x2x1/4 angle iron that runs up each frame rail. Similar thing on both sides


Then I cut the 2x3x1/8 cross member to length and made a series of cuts every 4" to give it some curve that matched the body lines.


Once this was tacked up, it was pulled out and the drop leg (2x3x1/8 x 4-1/4 long) and 2" receiver were tacked on


After that, everything was welded out


The whole thing was cleaned up and given a couple coats of Krylon High Temp Aluminum paint. The idea behind this was that it would give the gussets a bit of protection so that rust doesn't get to them as fast. The paint can be welded on without issue and doesn't burn off easily so there's at least some protection there.

The gussets were made from a ~17" long piece of the same 2x3x1/8 box tube cut diagonally corner to corner. The idea behind these was to provide some side to side strength without adding a lot of torsional rigidity (hence the open bottom).


Continued on next post...
 

Fix_Until_Broke

Top Post Dawg
Joined
Aug 8, 2004
Location
Menomonee Falls, Wisconsin, USA
TDI
03 Jetta, 03 TT TDI
The cross bar distorted even with my 3 point tacks on each cut so there's a little kink in the middle to get it to go back in the car. Not a big deal, but was a bit disappointed.


The pull from the trailer is more/less straight on with a 6" rise ball so the only moment on the cross bar is the tongue weight.


There were a bunch of 1/4" thick plates in the scrap bin at the shop so I bolted a bunch of them together and cut them up to use for washers to bolt the angle iron brackets to the frame of the car.


There's 4 more (2 on each side) behind the rear inner fender wells so it's well supported.

All in all, I'm very pleased with how it turned out, I have a lot of confidence that it will be solid and safe for a long time. It makes the back of the car look much cleaner now too!

I have ~$200 in it (~100 in steel from onlinemetals.com + 40 shipping) The 2" receiver was from Curt along with the safety chain loop - both on Amazon for ~15 and 7 respectively. The rest was in bolts, nuts, paint, etc. Total time is ~16 hours including repairing the damage from the original install.

I did end up painting what sticks out from the bottom black. Still need to buy a ~6" rise ball mount. The one in the pictures is a solid forging weighing ~30lb that has a 17k rating which is just silly big/heavy for what I need so will have to add in that cost as well.


jason_

Veteran Member
Joined
Jun 2, 2014
Location
michigan
TDI
2015 s wagon dsg
The nuts on those angle pieces, are the holes quite tight for line up on the vehicle? Or a bit in a bigger side so it's more forgiving?

Sent from my 2PS64 using Tapatalk
 

SilverGhost

Veteran Member
Joined
Mar 25, 2005
Location
Back in So Flo - St Lucie
TDI
'05 Golf - totaled :(, wife's '13 Beetle - buy back, TDIless
Now, from my own experience, don't lean on or bump into the bumper. Without the metal bumper the plastic will cave relatively easy and make the paint crack.

Did you not have a pipe bender or brake where you work? Just wondering why you made all the cuts instead of just bending a nice gently curve into the tubing.

Jason
 

Fix_Until_Broke

Top Post Dawg
Joined
Aug 8, 2004
Location
Menomonee Falls, Wisconsin, USA
TDI
03 Jetta, 03 TT TDI
Thanks for the kind words - hopefully I'll get to make use of it. See this thread for the "rest of the story"

jason - The bottom holes are about 1" wide x 2" long and oval shape so lots of room there which is part of the reason the flat plates are as big as they are. The side holes are just a bit bigger than a M12 bolt and probably 3/4" of an inch long so these are much less forgiving.

What I did to make everything fit up was to mark and locate the bottom nuts so they're relatively centered in the holes (or biased forward/back if you desire). Then I installed the rails and tightened the bolts down super tight to "squish" everything together. Then I loosened the bottom bolts, used a prybar and pushed the angle iron to the outside and re-tightened them again. Then I marked the side bolt holes and drilled/welded the nuts on.

Using this process (and assembling it in the car the same way) it all just bolts in.


SilverGhost - The back bumper has a few scuffs in it already so I'm not too worried. What I installed fits pretty close to the factory piece. I don't have a bender that will bend 2x3x1/8 box tube the hard way - I wish I did because then I wouldn't have had to re-bend it once I welded everything up and it distorted!
 
Top