Rickstah
Veteran Member
OK, I finished the job, wow pretty tedious and not easy to hold those little plugs when you have them greased up with rtv. I had some earlier comments but decided to just do a start to finish with some pics, hopefully I learned a couple of things that will help you. I think I would have gone with the tape if I had known how tedious it was to use rtv and the plugs. Also, keep super glue handy. When you remove the center console (see youtube instructions in an earlier post from me) you may find some edges that hold the t20 screws to be cracked or missing.
I got the opening cut out. I was able to put small led light down in the channel and it worked ok.

The front door was devoid of foam, the back door had foam on all the holes but the top left one, can't see in the pic, however it is deceiving, the foam over the holes is vapor-thin so will need to clean them all off. I was a bit concerned about the amount of force needed to clip the plugs into the holes, didn't want to knock that door off those itty bitty flanges holding it in place, plus it is further back than I expected almost an arms length. I can see why adhesive tape of some kind has its uses in this repair.
The front door went first. The rectangular plugs, at least, will insert with minimal difficulty, a bit more difficult to remove if you do it before adding the rtv. Using the black Right stuff sealant with 90 minute cure time. I did discover that the selector switch for it (dash/floor-dash/defrost) moves an unseen door up under the dash somewhere to send it all to the windshield when you select defrost. Now I wonder if it has foam on it, too, hmmm.
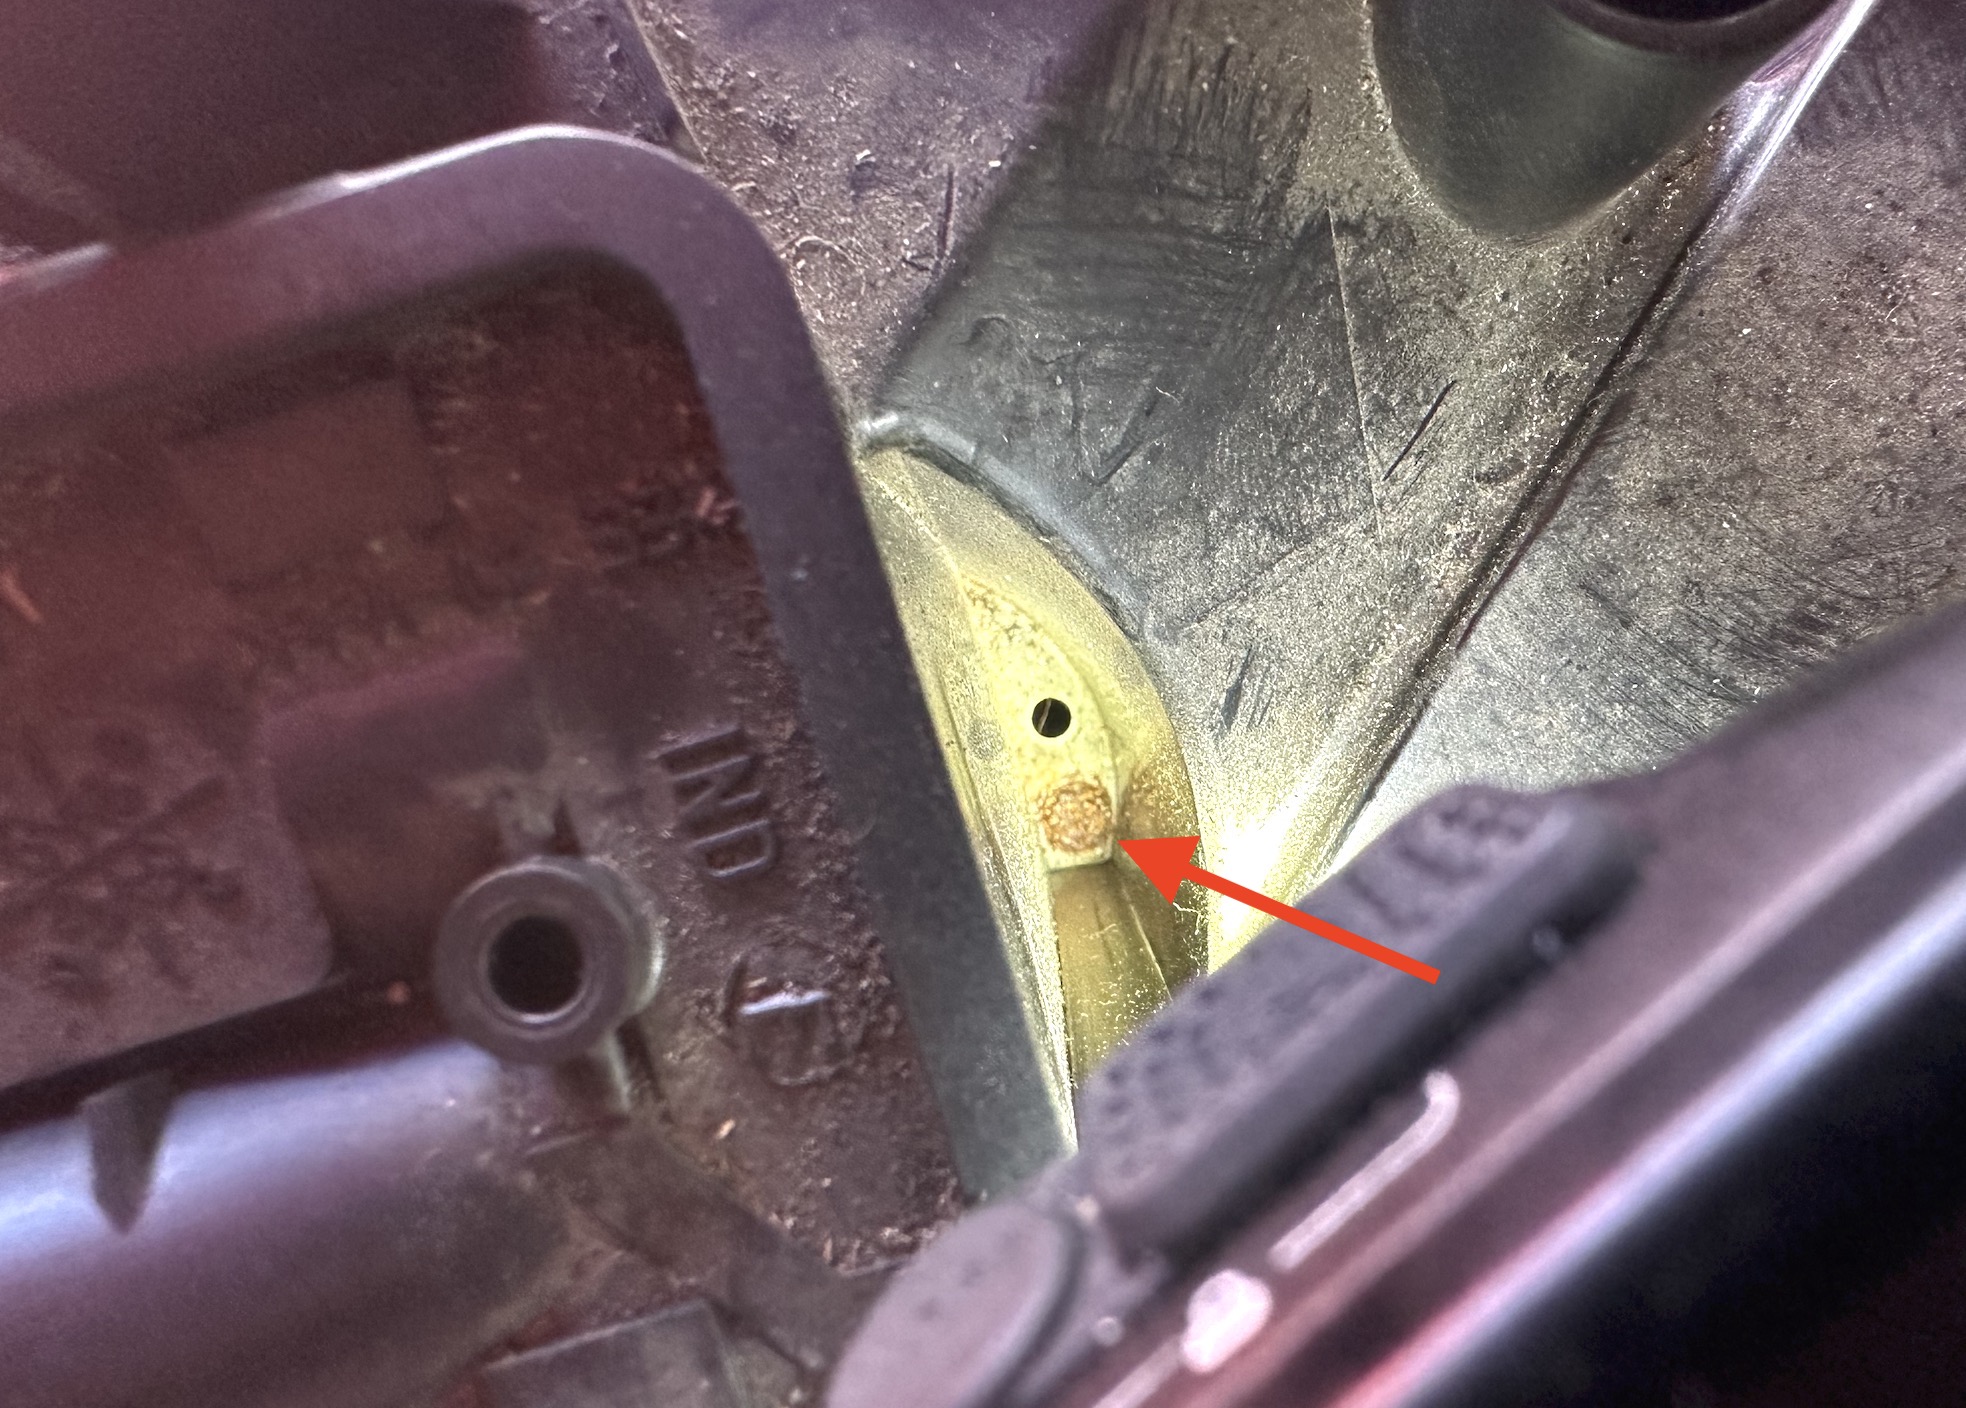
The red arrow points to the left side of the rear door (heat blend). I didn't see it at first but then discovered there are seven round holes in that narrow area. Also, keep that thing up against the little channel as much as possible because there is a stable wormhole underneath that door and it leads to the Delta quadrant.

I dropped one small round and one mid-size round plug. they bounced into that opening and never made a sound, they could still be falling. Anyway, you will have to risk dialing it back some when you go to plug the bottom hole and it is awkward because about a quarter of the hole is below the level of the channel. Since I was missing one round plug I had to use the high-temp aluminum tape. The adhesive on that stuff is crazy sticky and a bit difficult to maneuver but if you use small strips it is still difficult but after three or four tries you will still need two or three more tries until you get a couple on there that still leave a small gap at which point you mumble screw it and call it good. Maybe that won't happen to you. The place isn't exactly hermetically sealed anyway, you will see when you move the doors back and forth. If you go with the plugs on ebay you may want to negotiate an extra midsized round plug and maybe two extra small round plugs, they can disappear in a blink.
About the mid-sized round plug that also turned into dark matter and went on the rear door, I also used some tape for one of those holes, if you cut a couple of squares 1.5x1.5 inches you will then need to cut a smaller strip to compensate for your lack of eyesight since I had already used the other round plugs and it was one of the ones on the right side. If you are smart you will overnight some kevlar arm sleeves to wear when you do this job, at least a long-sleeved shirt. My forearms look like I played slapjack with Edward Scissorhands. I advise trying to fill the heat blend door holes from the right first, that way if you lose one you got the most difficult ones done first and the tape is easier to apply to the others.
Make sure you have one of those spring grabbies in case the plug squirts out of your fingers and goes through the opening behind the door . It worked out the first time. There are also more than one size rectangular openings on mine. Don't do what I did and choose the smaller size and try to put it in the larger one, I think the bottom hole. I was able to fish it out of there after about 16 hours.
This has not been an easy gig. By the time I got the rtv around the inside edge of the plug it becomes kind of slippery and not easy to center by feel, and the small ones are worst. My arms aren't humongus but it is not easy to bend the wrist while keeping a grip on the edge of the plug...the tiny minuscule spots where the rtv didn't get, lol, and get it centered. I managed to get one pushed into the hole by using some gorilla tape bits on the outside for a better grip but it doesn't last, sweaty hands, gloves stick to the rtv, etc. So, I punted. I took super glue and glued the head of a zip tie to the outside of the plug and once it dried (if you use Gorilla super glue let it sit for an hour at least or it will come loose and you will find the wormhole) I was able to hold them from that and maneuver the plugs to the hole without smearing the rtv on gripping fingers so it went better after that. I mean the ones you can't see you will still get close but not there and smear it back and forth but finally feel it go into the opening and then you hope there was enough rtv to still seal, lol. It looks stupid but they went on. Sometime about then I realized there were seven more holes right behind that middle vertical piece, that pivoted with the big rear door, sigh. It was soulcrushing but I battled back with some chips and salsa and walking away until the next day, no need to be one of the working wounded at 1 am, you could find yourself asleep inside the 90 degree car.
After I got it all done the tape once again made its value known, I was able to mount the original piece kind of in the middle of the carved out area (had to take a bit more off to give my arms more room) and then built up the edges and it was pretty tight.
I am writing this so you will have full disclosure if you are on meds and are thinking of trying this method, lol. If you can just reach in and put these plugs in with the rtv sealant on them without any issue you are either double jointed or have girl arms/hands, J/K. On balance using the tape may have been easier overall with not having to deal with the rtv. I did use the spring grabbie to put in the top two holes on the heat blend door at back. I grabbed the zip tie bit and was able to bend the spring back up after it got past the opening and I was scrunched down and it just maneuvered right into the holes. I let it sit like that for a few minutes because one of the grabbie pieces was kind of wedged behind the zip tie but after it firmed up a bit I was able to expand the arms and it came loose. Good luck! My A/C is ICE COLD NOW even when ambient is in high 90s.


I got the opening cut out. I was able to put small led light down in the channel and it worked ok.
The front door was devoid of foam, the back door had foam on all the holes but the top left one, can't see in the pic, however it is deceiving, the foam over the holes is vapor-thin so will need to clean them all off. I was a bit concerned about the amount of force needed to clip the plugs into the holes, didn't want to knock that door off those itty bitty flanges holding it in place, plus it is further back than I expected almost an arms length. I can see why adhesive tape of some kind has its uses in this repair.
The front door went first. The rectangular plugs, at least, will insert with minimal difficulty, a bit more difficult to remove if you do it before adding the rtv. Using the black Right stuff sealant with 90 minute cure time. I did discover that the selector switch for it (dash/floor-dash/defrost) moves an unseen door up under the dash somewhere to send it all to the windshield when you select defrost. Now I wonder if it has foam on it, too, hmmm.
The red arrow points to the left side of the rear door (heat blend). I didn't see it at first but then discovered there are seven round holes in that narrow area. Also, keep that thing up against the little channel as much as possible because there is a stable wormhole underneath that door and it leads to the Delta quadrant.
I dropped one small round and one mid-size round plug. they bounced into that opening and never made a sound, they could still be falling. Anyway, you will have to risk dialing it back some when you go to plug the bottom hole and it is awkward because about a quarter of the hole is below the level of the channel. Since I was missing one round plug I had to use the high-temp aluminum tape. The adhesive on that stuff is crazy sticky and a bit difficult to maneuver but if you use small strips it is still difficult but after three or four tries you will still need two or three more tries until you get a couple on there that still leave a small gap at which point you mumble screw it and call it good. Maybe that won't happen to you. The place isn't exactly hermetically sealed anyway, you will see when you move the doors back and forth. If you go with the plugs on ebay you may want to negotiate an extra midsized round plug and maybe two extra small round plugs, they can disappear in a blink.
About the mid-sized round plug that also turned into dark matter and went on the rear door, I also used some tape for one of those holes, if you cut a couple of squares 1.5x1.5 inches you will then need to cut a smaller strip to compensate for your lack of eyesight since I had already used the other round plugs and it was one of the ones on the right side. If you are smart you will overnight some kevlar arm sleeves to wear when you do this job, at least a long-sleeved shirt. My forearms look like I played slapjack with Edward Scissorhands. I advise trying to fill the heat blend door holes from the right first, that way if you lose one you got the most difficult ones done first and the tape is easier to apply to the others.
Make sure you have one of those spring grabbies in case the plug squirts out of your fingers and goes through the opening behind the door
. It worked out the first time. There are also more than one size rectangular openings on mine. Don't do what I did and choose the smaller size and try to put it in the larger one, I think the bottom hole. I was able to fish it out of there after about 16 hours.This has not been an easy gig. By the time I got the rtv around the inside edge of the plug it becomes kind of slippery and not easy to center by feel, and the small ones are worst. My arms aren't humongus but it is not easy to bend the wrist while keeping a grip on the edge of the plug...the tiny minuscule spots where the rtv didn't get, lol, and get it centered. I managed to get one pushed into the hole by using some gorilla tape bits on the outside for a better grip but it doesn't last, sweaty hands, gloves stick to the rtv, etc. So, I punted. I took super glue and glued the head of a zip tie to the outside of the plug and once it dried (if you use Gorilla super glue let it sit for an hour at least or it will come loose and you will find the wormhole) I was able to hold them from that and maneuver the plugs to the hole without smearing the rtv on gripping fingers so it went better after that. I mean the ones you can't see you will still get close but not there and smear it back and forth but finally feel it go into the opening and then you hope there was enough rtv to still seal, lol. It looks stupid but they went on. Sometime about then I realized there were seven more holes right behind that middle vertical piece, that pivoted with the big rear door, sigh. It was soulcrushing but I battled back with some chips and salsa and walking away until the next day, no need to be one of the working wounded at 1 am, you could find yourself asleep inside the 90 degree car.
After I got it all done the tape once again made its value known, I was able to mount the original piece kind of in the middle of the carved out area (had to take a bit more off to give my arms more room) and then built up the edges and it was pretty tight.
I am writing this so you will have full disclosure if you are on meds and are thinking of trying this method, lol. If you can just reach in and put these plugs in with the rtv sealant on them without any issue you are either double jointed or have girl arms/hands
, J/K. On balance using the tape may have been easier overall with not having to deal with the rtv. I did use the spring grabbie to put in the top two holes on the heat blend door at back. I grabbed the zip tie bit and was able to bend the spring back up after it got past the opening and I was scrunched down and it just maneuvered right into the holes. I let it sit like that for a few minutes because one of the grabbie pieces was kind of wedged behind the zip tie but after it firmed up a bit I was able to expand the arms and it came loose. Good luck! My A/C is ICE COLD NOW even when ambient is in high 90s.