DIY: How to fix air blend door MK4 TDI no cabin heat problem

PaCrazyLady

New member
Joined
Sep 30, 2016
Location
Pennsylvania
TDI
1999.5 Jetta
The blend door is fixed but I still don't have heat. The project took 4.5 hours from start to finish and included an XL hot green tea. That project saved me some serious coins!!
Car is slated to go in shop on the 13th! It's either the t-stat or water pump and since i don't have the service history, I'm inclined to have both replaced, plus timing belt.
Not sure how to upload pics.
 

MVP

Veteran Member
Joined
Feb 15, 2015
Location
Litchfield Park, AZ
TDI
2003 Jetta Wagon, GLS 5-speed, Baltic Green Past: 2001 Golf 4-door, GLS 5-speed
Did the shortcut way today, it took about 3.25 hours so far (dash is still open). Probably will clock about about 4 hours total when put back together but I convinced myself to order a new Sony HU and toss the old Alpine since it doesn't support playing music files via USB.

One piece of advice I can give y'all is that if you have an aftermarket stereo/head unit installed, check to make sure the installer didn't zip tie any cords to the assembly/cover. Mine did and I must have fought it for 25 minutes before I pulled out the flashlight and eyeglasses to find it was zip tied majorly to some wrapped electrical runs.
 

mathanz

Well-known member
Joined
Oct 14, 2015
Location
Austin, TX
TDI
2003 Wagon, auto, 127k miles
Did this the shortcut Way a few months ago. Just wanted to post my experience of cutting my thumbs and fingers all to hell from pressing blindly on aluminum tape while contorting my body to reach it. Hope the blood doesn't prevent good adhesion. Definitely made a difference though. Also did the plastic piece that sticks in the bottom of the box and turns the door from cold to hot. $15 from VW. The previous owner was told this would be a $1500 fix, so his mechanic did a "shortcut" and crimped the cable to prevent him switching from cold to hot. Hope he didn't pay him for this "fix."

Need to do my wife's car next by the way...not really looking forward to it...
 

AdinaFloyd

Well-known member
Joined
Mar 23, 2017
Location
Clinton, La
TDI
2002 Jetta TDI
Did this today, thanks for all the info, tips and tricks. I can now drive to work without wearing my mittens....yay!
 

ItAintRodKnock

Veteran Member
Joined
Sep 29, 2008
Location
Fraggle Rock, CO
TDI
01GolfTDi
Just finished this up. Wow! HOT heat!
Cant wait to test it out in some much cooler weather. Definitely blowing hot now though.

Edit: in the teens and she blows hot!
Have to warm up the cab at fan speed 3 and then just put it on fan speed 1 to maintain. So awesomed
 
Last edited:

VincenzaV

Veteran Member
Joined
Apr 25, 2015
Location
New Hampshire
TDI
2004 Jetta Wagon
I have tons of black foam pieces shooting at me through the A/C and heater vents. My AC still works great (I'm in FL, don't need heat yet), is this project in my future too? There is a decent video here of the "shortcut" here, glad for that. But is it worth doing it vs taking the whole AC box out and doing it on a bench?
 

VincenzaV

Veteran Member
Joined
Apr 25, 2015
Location
New Hampshire
TDI
2004 Jetta Wagon
What seems to be the consensus of what lasts longer (or is better performing), foil tape? Foam tape? I'm unsure here and haven't started yet because of that.
 

tdijim

Veteran Member
Joined
Jun 4, 2001
Location
Eugene, Oregon
TDI
2000 Jetta TDI, 1996 Passat TDI
type of tape?

So, some people used solid tape, like for hvac...the aluminum type, and they shut out the outside smells, engine smells, and got very hot heater and very cold a/c results?

Why bother with the adhesive felt or foam, then?
 

BobnOH

not-a-mechanic
Joined
May 29, 2004
Location
central Ohio
TDI
New Beetle 2003 manual
Nothing gets shut out. The blend door comes with a foam seal which often didintegrates over tim. We're simply replacing that. The HVAC tape is more permanent, some type of foam tape might seal better. Your choice. Likely not enough data to determine which is better.
 

Stromaluski

Veteran Member
Joined
Oct 23, 2013
Location
Greenville, SC
TDI
'67 Deluxe Bus, '80 Rabbit Truck, '92 Corrado, '10 Cup Edition
So, some people used solid tape, like for hvac...the aluminum type, and they shut out the outside smells, engine smells, and got very hot heater and very cold a/c results?

Why bother with the adhesive felt or foam, then?
Having done both, I can say that the difference is purely for sound. Doing the door with the hvac tape, you will hear a tinny *thud* when any of the doors goes all the way open or closed from the door hitting the side of the box. But you do have to listen for it. If you use the felt/foam, you get a quieter operation from the doors. So far, both have held up fine, even after doing them 10+ years ago (in mk2s, anyway).
 

kirktdi

Member
Joined
May 2, 2016
Location
Upper Falls, MD
TDI
2001 Jetta TDI ALH, 2013 Passat TDI SEL(retired)2017 Passat SEL
Did this a couple of weeks ago. Used HVAC tape. Took my time (over 7 hours). Biggest obstacles were 1. putting the tape on the doors and 2. getting the cover off of the box. Smaller hands would have helped for the tape. Hooked a crow bar on the bottom of the cover and it finally came up and out. Total success and well worth the time. Now with good heat and A/C for $6
 

starjays

Well-known member
Joined
Mar 15, 2011
Location
Nebraska
TDI
2000 NB 5MT
Is this the same for the NB? 2000 has been blowing foam bits for a year now, A/C is meh, nearly no heat except on recirculate, so this needs doing. What I'm seeing are all Jetta or Golf models in the pictures and descriptions, and haven't looked at Bentley yet. The 2000 needs some love put into it, it's been the workhorse for a long time, but sits a lot more now that there are others newer around.

EDIT: Found a youtube video showing the procedure, looks similar enough to proceed cautiously.

Obviously this is a very old post, but did you happen to fix yours using the method described here?

I tore my entire dash apart, glove box, drivers side, the whole works, only to get everything removed and realize it looked nothing like the Golf/Jetta internals.

Ended up taking a dremel tool and cutting a rectangle in that first duct you see when you remove the radio/ac control cluster right up front. That gave me access to the blend door and after scraping up my hands and arms pretty bad putting tape on the doors, I used the same tape to patch-up the hole I cut and it's working like a charm so far. I would recommend taking some of the tape and putting it over the rough plastic where the hole was cut, as it makes it less painful on the arms/hands.

Anyway there's a couple "hack job" youtube videos I saw, and near as I can tell this is the best way to do it, short of removing literally the entire dash, steering wheel, etc.
 

VincenzaV

Veteran Member
Joined
Apr 25, 2015
Location
New Hampshire
TDI
2004 Jetta Wagon
Foam party over!

I finally did my foam elimination in the AC box. Luckily the front cover came off with gentle persuasion and no cutting. However, a few trim pieces are cracked around the screw holes. A thing that comes with age I guess. The part where you put the tape on really does take a while if you have man hands...
 

VincenzaV

Veteran Member
Joined
Apr 25, 2015
Location
New Hampshire
TDI
2004 Jetta Wagon
I did the AC tape. 3M brand I believe. Too hard to reach all the old foam from the front but 99% is done blowing in my face. So glad its done....
 

flash9

Veteran Member
Joined
Jul 1, 2003
Location
North Carolina
TDI
Jetta Wagon GLS 5-Speed, 2003, White
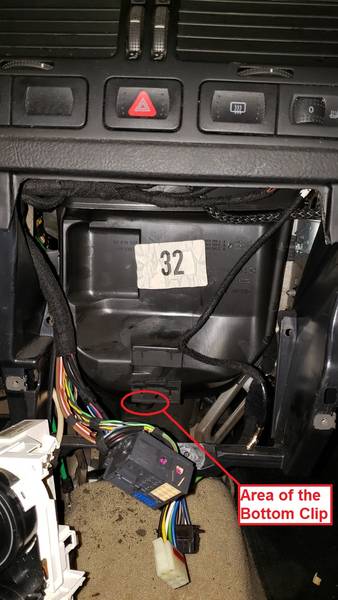
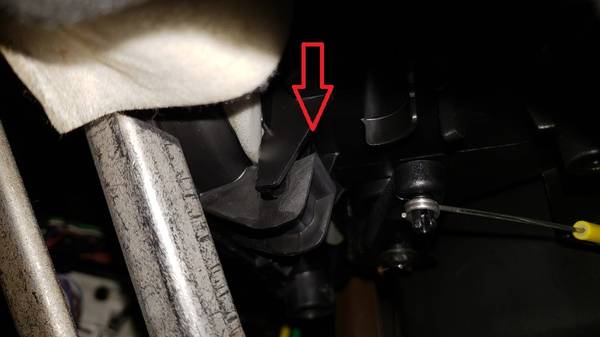
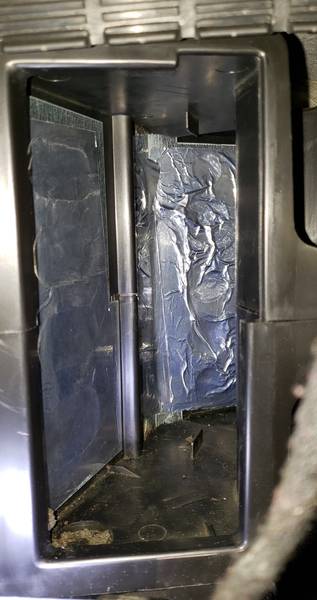
We were getting the dreaded foam out of the vents, so I decided the tackle this problem, but I really found very little details on getting into the center HVAC plenum. There are plenty of instructions on how to get far enough into the center dash area to see the center air plenum as shown below:


So, this will pick up from this point. There appeared to be two paths to take, just unsnapping the plenums front covers seven snaps, or finding the two 6mm screws and removing the front and back plenum together.
I decided to remove the two 6mm screws and try to remove the whole plenum.
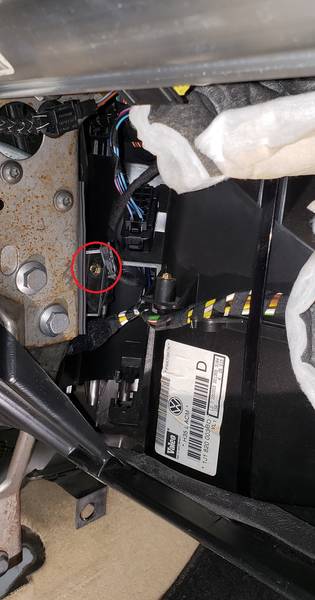
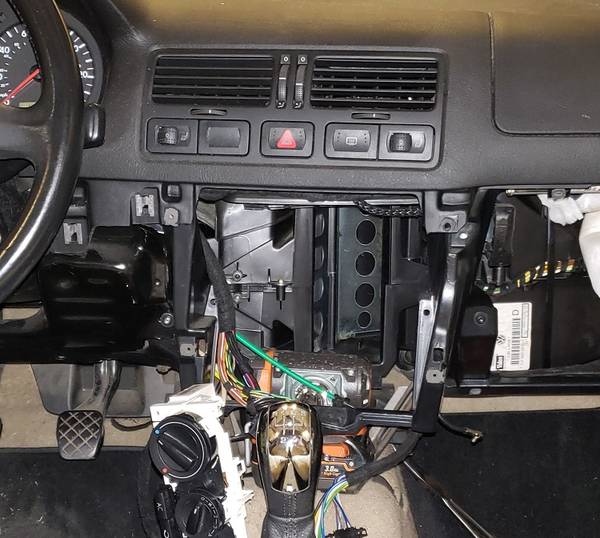
Here is the location of the right hand side screw.

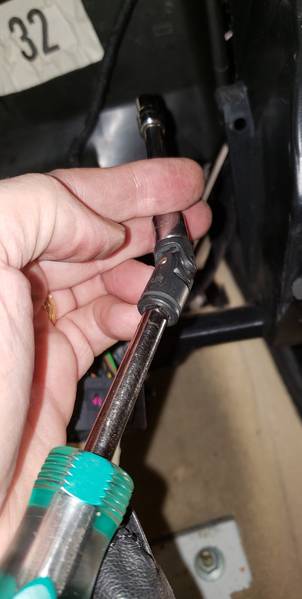
I was not able to get to it from this angle (basically the space where the glove box typically occupies) but I was able to get to it through the center opening.


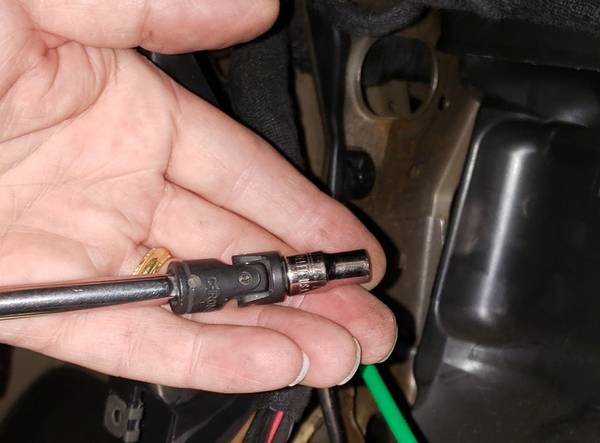
Here is a little more clear view of the tools setup that was able to reach the right hand side of the plenums screw.


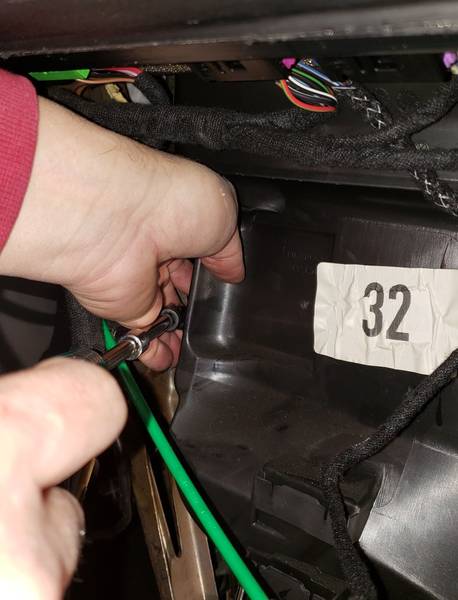
The left hand side screw is location directly across from the right hand side’s screw. Here is how I accessed it.


For the left hand side screw it took a slightly different tool configuration.


At this point I stared to pull on the plenum and realized I would not be able to get it out with the two half’s snapped together, so I started to work on separating the two pieces.
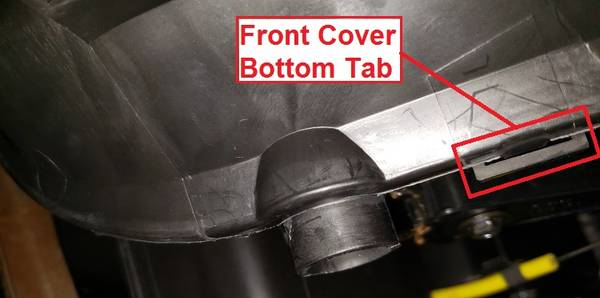
I found the bottom snap and a trick to help unsnap the cover was to stick a flat bladed screw driver in the slot to open it up a little and then I was able to unsnap it.


I did the snap opening trick on a few of the other six snaps and I was able to get the cover removed.
NOTE: I also found that by removing the two screws, it allowed the whole plenum to shift a little left and right to get better access to the three snaps on each side.
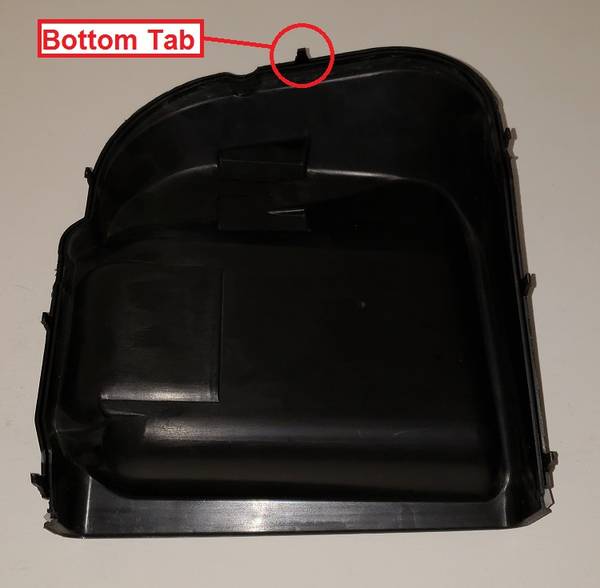
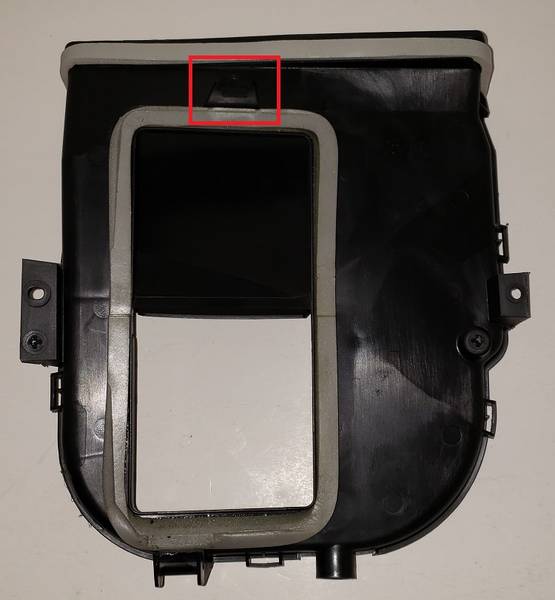
Here is a “back side” view of the front plenum cover once it was removed.


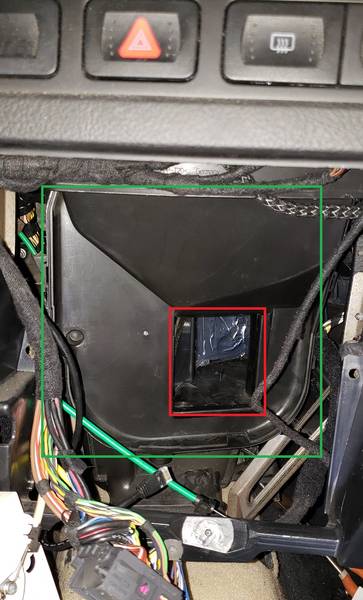
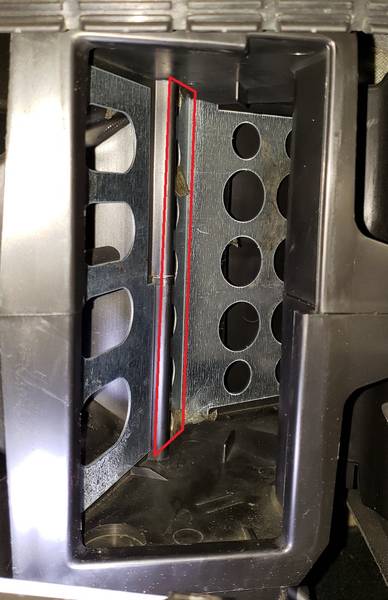
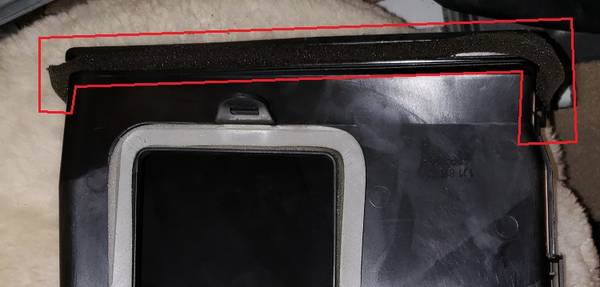
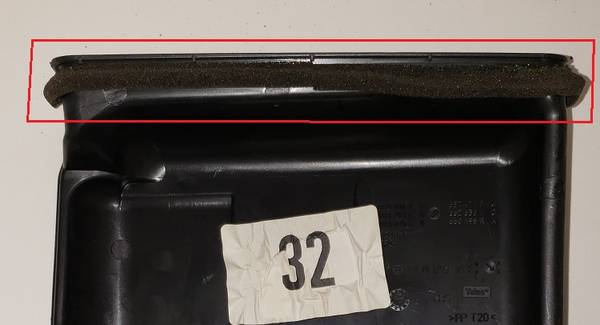
I forgot to get a picture of the plenum with just the front cover removed (and before the foam was removed), but for a point of reference here is the opening you would need to work through if you choose to not remove the back half of the plenum.


The Red Box is the opening you would need to work through if you do not remove the back piece of the plenum, and the Green Box is the approximate opening of you choose to remove the back piece.


Continued:
 
Last edited:

flash9

Veteran Member
Joined
Jul 1, 2003
Location
North Carolina
TDI
Jetta Wagon GLS 5-Speed, 2003, White
Continued

It is kind of a pain to get out, but if you have come this far it is well worth removing the back part of the plenum to get better access to be able to remove the foam and repair the dampers.
Since we have already removed the two screws we now just need to get a flat screw driver or something else to prey the clip down and off this bottom lip.


I figured at this point the back piece would just drop right down and out, but in my case it was not so simple. I had to really struggle to get it to drop down and out. One positive thing with this struggle was seeing exactly how this piece went up and into the upper portion of the plenum. There are three little tabs dropping down from the upper plenum that you should feel for to make sure that they are on the same location when putting everything back together. Sorry no picture. But here is an overall view with everything removed.


Here is a picture of the back side of the rear plenum housing. I have to think the tab that I have highlighted in the red box in the image below was what was keeping this part from coming out easily. Note, that the foam gasket on the back was in good condition, but the upper gray gasket shown in the photo, I installed after removing the rotted foam one that was there originally. I also installed new foam gasket material on the front plenum cover as well.


There are plenty of good discussions on foam vs aluminum duct tape, so I will not go into that, but I did want to highlight one part of the rear damper door that I nearly missed. See the boxed area in the photo below.


Here is my completed dampers after cleaning them off and installing the aluminum duct tape. Make sure you reach your finger through the holes and remove as much or the foam from the back side as you can. I was unable to apply the tape on the back side but getting foam off is important step.


I am still in the process of putting it all back together. I am taking the time to scrub and clean all of the parts before putting it all back together.
I hope this help others in tackling this job. I would rate this an 8 out of 10 in pain in the back side, but I am glad I am doing it. I am also glad I have a garage and plenty of time to do the project. ie we have extra cars.
 
Last edited:

wonneber

Top Post Dawg
Joined
Oct 12, 2011
Location
Monroe, NY, USA
TDI
2014 Jetta Sportwagon,2003 Jetta 261K Sold but not forgotten
There are plenty of good discussions on foam vs aluminum duct tape, so I will not go into that, but I did want to highlight one part of the rear damper door that I nearly missed. See the boxed area in the photo below.
For the foam piece you replaced, where did you get it?
If VW do you have the part# handy.
I may be doing this in the future.

It looks like you are not removing the back of the case so you did not drain the coolant or evacuate the AC?

About how many hours do you have into it so far?
 

flash9

Veteran Member
Joined
Jul 1, 2003
Location
North Carolina
TDI
Jetta Wagon GLS 5-Speed, 2003, White
For the foam piece you replaced, where did you get it?
If VW do you have the part# handy.
I may be doing this in the future.

It looks like you are not removing the back of the case so you did not drain the coolant or evacuate the AC?

About how many hours do you have into it so far?

I used some Frost King Weatherseal that I already had, but I am sure you can find it right near were you find the Aluminum Duct Tape.


Here are a couple pictures of both plenum half's from before I removed the old foam and installed the new foam.


I am taking my time, and pretty much finished up this morning, but I would estimate it has taken 5-6 hours.
Having the proper tools makes all the difference.
 
Last edited:

TLH_TDI

Veteran Member
Joined
Dec 25, 2003
Location
Florida
TDI
2002 Jetta Wagon
With the age of these Mk4's you might as well pull the entire dash and HVAC system so you can repair both of the doors and replace the AC and heater cores, the heater core may start leaking soon. My 2000 Jetta heater core is starting to leak. :(
 

NurseGuy1987

Well-known member
Joined
Nov 18, 2018
Location
Sylvania, GA`
TDI
2003 Beetle TDI
would this also cause poor cooling while AC is on? I'm almost 100% positive that my blend doors are now bare metal (with those stupid holes). No temp control, blowing from ventss at all times (even when on dash or floor is selected). I have warm heat (not "HOT") and zero AC (also, my AC may not be properly charged as the fans don't come on when I turn the AC on. I know it's paid for but, dang, I'm sick of these little grimlins that seem to plague the VW brand. Don't get me wrong....I love the little bugger but the engineering or certain systems is rather questionable. I know the original bugs were manufactured in Germany, but, the new bettles are coming out of Mexico correct?
 

hskrdu

Top Post Dawg
Joined
Oct 17, 2003
Location
Maryland and New England
TDI
2003 Golf GLS 4D 5M, 2015 GSW SE 6M
I know it's paid for but, dang, I'm sick of these little grimlins that seem to plague the VW brand. Don't get me wrong....I love the little bugger but the engineering or certain systems is rather questionable. I know the original bugs were manufactured in Germany, but, the new bettles are coming out of Mexico correct?
Most of the MKIVs came off the assembly line in Mexico- I'd suggest there are no quality differences between those and the cars from Germany (some have argued the Puebla vehicles are better). I'd also say that most cars have their gremlins, they just vary by make. I certainly don't drive VWs based on claims of reliability (although the MKIV ALH is incredibly reliable). As for your blend doors, how long did they go without problems? 15 years? That's not bad. I'd replace the foam and use it as an opportunity to combo some other projects.
 

rmidgett

Well-known member
Joined
Feb 10, 2012
Location
Nashville
TDI
2001 Jetta GLS
Blend Air Door Bushing

I recently went through the pain of repairing my blend air door using aluminum HVAC tape & replacing the bushing that rotates the blend air door in my 2001 Jetta TDi (the LAST VW I'll ever own).


The original bushing that is rotated by the temperature control push arm had worn to the point it wouldn't stay up in the housing & therefore it wouldn't rotate the blend air door. There's a tab on the bottom of the blend air door that protrudes downward into the housing; that tab is supposed to be captured in a slot in the top of the blend air bushing when the bushing is inserted upward into the housing. After years of use, the bushing tends to wear & fall out of the housing, rendering the blend air door immobilized & useless.


I acquired an aftermarket bushing from KansasCityTDi.com. Initially I had problems getting the new busing to fit onto the blend air door tab. To solve this, I folded a small piece of 400 grit sandpaper in half with the grit sides out & used that folded edge of the sandpaper to open up/smooth the insides of the gap which the blend air door inserts into. The fit of the new bushing into the housing was very snug & I was happy about that, but getting the blend air door tab inserted into the slot of the new bushing was a real pain. It took a combination of wiggling the blend air door with a magnet in my left hand while reaching under the dash & rotating the new bushing up into the housing. Finally I was able to feel the door tab insert into the bushing slot and push the bushing up to it's home position. This was done with the lever arm that attaches to the bushing disconnected; once I had the door tab & bushing coupled, I reattached the lever arm & put the 7mm screw back in place with a 7mm box end (ignition) wrench.
To insure that the bushing stays in the housing, I wedged a wooden block below the bushing & above the floor vent on the passenger side. I drilled a shallow hole in the top of the block for the 7mm screw head to ride in, and captured the block to the floor vent with a strip of perforated plumbers strap & a couple of wood screws. Cold & hot air at the twist of a knob....again!! My thanks to all who've contributed to this DIY/Sticky & helped me solve ANOTHER needless problem with this MY LAST VW.


I've included some photos to help with the text explanation. If the link doesn't work, email me directly.

https://photos.app.goo.gl/TaKRbrSfdyaQNbTZ6


Last edited:

Valiosport

Member
Joined
Dec 28, 2019
Location
Bulgaria
TDI
Golf 4 TDI ARL+++
Hello,
I've been with the R32 Dsg intake for about a year, and now I've found an Audi TT 3.2 1J0 129 607 AK filter box, I only need the flowmeter, but I don't know if it will be able to fit the TDI PD150 hose into the P32 flowmeter?
 
Top