ALH TDI engine transplant into '84 Vanagon

AndyBees

Top Post Dawg
Joined
May 27, 2003
Location
Southeast Kentucky
TDI
Silver 2003 Jetta TDI, Silver 2000 Jetta TDI (sold), '84 Vanagon with '02 ALH engine
Mark, I've seen your pedal photos and seems you explained about making the change and the improvement. I like the set up!

I suppose I'll be doing the same thing. I've not done much on that end of the vehicle lately. I have removed the Vanagon Cluster, copied the Vanagon electrical schematics (made lots of notes), and looked into positioning a bracket to hold the brake and clutch switches.

Right now, I'm almost 100% focused on the rear end components! I went by the welder's place this afternoon. He has not started to work on the mounts yet (mud bog event this coming weekend and he is one of the coordinators....go figure). So, I'm still addressing minor but important things.

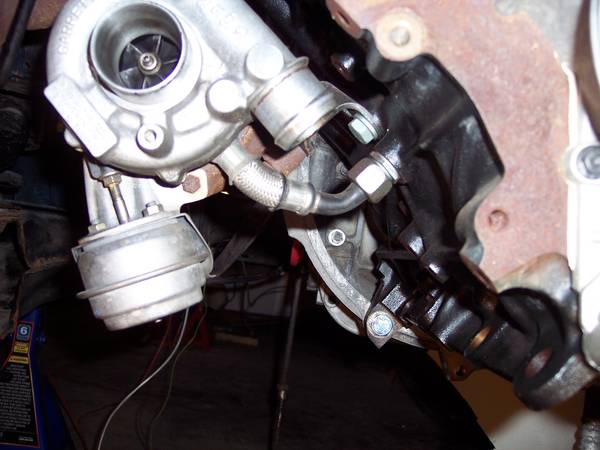
Here are a few photos of the Turbo and a simple "jig" to use in fabricating the down-pipe/exhaust/muffler/etc. (remember, my comments are at the top of the photo!)

In this photo, you can see the CIRCLE on the 4"X10" board which will serve as a JIG to modify/fabricate the down-pipe for the exhaust and on to the muffler.
EDIT: Although I did use these bits and pieces to fabricate an exhaust down-pipe and related exhaust components, I later custom made a SS system using the quick connections and rubber mounts. It works great. Skip over to Page 44, Post #1302 to see the custom SS down pipe!


This photo is of another angle.


Here is a close-up of the same angle as the above photo. I drilled the board to fit on the three bolts coming off the turbo outlet. This will be the reference point for cutting the down-pipe and welding in back together to be centered on the CIRCLE.


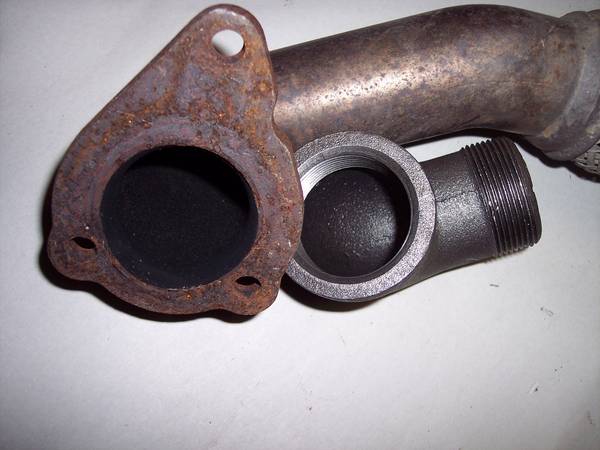
Remember this photo? Well, I've concluded that I need to abandon the 1.5 inch Street Elbow (threads on the outside) and go with a regular 1.5 inch Elbow. It will not be restrictive and welding will be no diffferent. Just imagine the down-pipe cut off, repositioned and the cast Elbow welded on to align with the CIRCLE in the JIG. Then comes the Exhaust with a regular pipe sweep elbow to go to the right side of the vehicle with a muffler! I think the angle coming off the Cast Plumbing Elbow is important so that the Exhaust/Muffler will not be too low at the back of the engine/vehicle.
 
Last edited:

jimbote

Certified Volkswagen Nut
Joined
Jul 10, 2006
Location
spiral arm, milky way (aka central NC)
TDI
Tacoma 4x4 converted to TDI
I'm rootin' for ya' andy....wanna have mine done by the winsboro GTG end of July....there was a guy in NC that did an ALH vanagon conversion and mounted the TDI pedal assembly in the engine bay using the van cable VIA a hole in the TDI foot pedal
 

markward

Veteran Member
Joined
Jul 5, 2007
Location
Loxahatchee, Florida
TDI
82 Vanagon and 2011 JSW
Andy, It seems you might be overthinking the exhaust or I am not following. I traced the gasket out on a peice of 1/4" steel plate. I then used a holesaw to cut out the center, a plasma cutter to cut the outside dimensions and a 5/16 drill for the 3 holes. A bandsaw would work in place of the plasma cutter. I then had my flange

We use mandrel bends all the time when fabbing up custom headers and exhaust systems. You can buy individual bends in mild steel or stainless. You cut and weld the bends as you need them. I would think a 180 degree bend would give you more than enough angle sections with some straight to make your exhaust up. You can then peice a complete exhaust system together and have your weld shop finish it up. I have the stock down pipe with the mesh section, but opted to leave that intact because it also included the cat. I bought an aftermarket mesh/vibration coupler and welded it in between my muffler and the turbo. So far no cracks or leaks.

Originally it was just a straight pipe out the right side. It would have been nice to try and get the muffler into the stock location, but I ended up using that area for the trailer hitch and front mount. I added a muffler first after getting it running because it was too loud. I added the flex joint because I was chasing vibrations and wanted to eliminate the exhaust as the culpret. I don't have a picture of the outlet, but here is the other part. mark


AndyBees

Top Post Dawg
Joined
May 27, 2003
Location
Southeast Kentucky
TDI
Silver 2003 Jetta TDI, Silver 2000 Jetta TDI (sold), '84 Vanagon with '02 ALH engine
Mark, the idea is to reverse the exhaust pipe straight out the back beside the engine block. Then, using a mandrel bend 2" exhaust pipe it will go to the right as with OE and exit just below the body (with a muffler). I do plan to use the flex pipe in the application. Go back and look at the post showing the "board" that will be used as a jig. The purpose of the jig is to orient the down pipe for welding to create the new down angle. The head of the down pipe will be cut off, re-welded to establish a new down angle and then the black pipe elbow will be welded on the bottom facing toward the rear. The board is only there in the photo to provide an idea of what I will be doing with the exhaust.

Hopefully, this view will give a better understanding.


Here is a photo of the Coolant Flange that's located on the back of the TDI engine. As you may recall, in previous posts, with photos, I discussed the topic. Here you can see the low heat glow plug flange and the replacement flange from a 1.6 VW Diesel.


This is a bummer here. I got the AC line adaptors today. Well, I'm not sure what I was thinking. The adpators are #10 & #8, however, the OE lines on the Vanagon are #12............will not work! EDIT: Summer of 2017, I replaced the entire OE AC set of hoses using Cold Hose dot Com sources. That old system was just, well, too old.


So, here is my plan to address this issue. I disassembled the Vanagon AC Compressor to look at those threaded ends. It looks like there will be ample material to do some welding. I'll cut them out and shape them for welding to the OE lines that come on the TDI AC Compressor. Since AP Air, Inc., offers aluminum and steel weld-in parts, this should not be a major task!
 
Last edited:

JoaoT4

Veteran Member
Joined
Feb 20, 2010
Location
Portugal
TDI
Eurovan Conversion
Great job you are doing over there.
Why don't you simply remove the glow plug from the coolant flange and put a screw on the threads holes?

João
 

rackaracka

Veteran Member
Joined
Nov 15, 2001
Location
Monroe, NJ
Great job you are doing over there.
Why don't you simply remove the glow plug from the coolant flange and put a screw on the threads holes?

João
Or use the plastic, non glow plug equipped version from an automatic trans ALH.

Although they do tend to fail... The rabbit one looks like it will work well.
 

AndyBees

Top Post Dawg
Joined
May 27, 2003
Location
Southeast Kentucky
TDI
Silver 2003 Jetta TDI, Silver 2000 Jetta TDI (sold), '84 Vanagon with '02 ALH engine
JoaT4 and rackaracka, actually I found on Ebay, for cheap, a plastic flange without the port for the GP. However, since that port is for the heater out flow of coolant from the head, I'm considering "plumbing" it in up stream high in the tranny bay area. I'll see what the ECU does as far as monitoring and sending a CEL. Also, winter driving would be a little more comfy if the coolant warmed up quicker. For now, those low-heat GPs will be side-tracked!
 

AndyBees

Top Post Dawg
Joined
May 27, 2003
Location
Southeast Kentucky
TDI
Silver 2003 Jetta TDI, Silver 2000 Jetta TDI (sold), '84 Vanagon with '02 ALH engine

AndyBees

Top Post Dawg
Joined
May 27, 2003
Location
Southeast Kentucky
TDI
Silver 2003 Jetta TDI, Silver 2000 Jetta TDI (sold), '84 Vanagon with '02 ALH engine
Well, I just finished cutting off the CAT, Flex Section, and Down-Pipe. All measurements seem to indicate there is plenty of room to "re-position" (cut and re-weld) the short solid piece of Down-pipe, add the 90 degree plumbing 2.25" (1.75" inside diameter) with welded flange for bolting, then the Flex Section (bolted on one end and weld to the mandrel on the other end), then a 90 degree mandrel bend section of pipe, then the CAT and that leaves 22 inches for muffler and tail pipe!

Measurements indicate that the CAT will have ample clearance to avoid heat issues with the Harmonic balancer end of the engine and the back cowl of the vehicle. I may add a heat shield on the engine side. Also, the OE WBXer engine come with a heat sheild bolt to the rear inside the engine bay!....may have to add that back with modifications........we'll see!

In summary:
Down-pipe with 90 degree black pipe (re-positioned to go straight back toward rear of vehicle)
Flex Section (to be secured to the 90 degree black pipe with bolted flanges/gasket)
Mandrel 90 degree bend
CAT
Muffler
Tail pipe out of muffler!

When completed, photos will be posted!

Back to the garage!
 
Last edited:

AndyBees

Top Post Dawg
Joined
May 27, 2003
Location
Southeast Kentucky
TDI
Silver 2003 Jetta TDI, Silver 2000 Jetta TDI (sold), '84 Vanagon with '02 ALH engine
Update

Okay, hopefully the following photos will make the Down Pipe, Exhaust, etc., a little more understandable.

This an excellent view of the "cut-off" Down-pipe. You are looking toward the back of the Vanagon! Look closely, it is pointing basically straight down (about 5:30). What I am going to do is cut and rotate it to about the 7:00 O'clock position!

EDIT: Although I did use these bits and pieces to fabricate an exhaust down-pipe and related exhaust components, I later custom made a SS system using the quick connections and rubber mounts. It works great. Skip over to Page 44, Post #1302 to see the custom SS down pipe!


Another view


Another view


Another view .......notice the black line to the right of the stud without a nut. That line is about the new angle for the Down-pipe.


This is a side view


This photo shows the TDI engine down-pipe in a JIG with a 1.5" (inside diameter) cast iron non-galvanized 90 degree elbow. The real inside diameter is slightly over 1.75 inches which is almost the same size of the Down-pipe inside diameter. The Down-pipe will be cut, rotated to align with the 90 degree cast elbow and then welded in that position as well as to the Elbow. End result, the exhaust will be pointing toward the back of the vehicle. The Flex Section of the TDI exhaust will be "bolted" to the cast elbow. It (Flex Section) will be welded to a 90 degree mandrel bend on the other end. The Mandrel Bend will have the CAT welded to it......then a muffler!


Lastly, here is a pic of the Turbo from the other end...........notice the discharge end of the Compressor has been indexed from about 5:00 to 10:00 O'clock! This is not the "exact" position that it will be left, but close. The Intercooler will be located behind the left rear wheel well (photos on that coming soon!)


For comparison below........... This is the OEM position of the Compressor outlet!


EDIT: ... see the dip (trap) in the oil drain from the Turbo? Well, it has worked just fine for 85k miles. It has a total of 208k miles on it as of 12/28/2017. The Turbo is fine and works great. So, get over the bunk that the drain must be straight down with no trapped oil. Edit update: I have concluded, the trap will cause a oil leak internal of the Turbo while the engine is idling.... nothing major though.
 
Last edited:

markward

Veteran Member
Joined
Jul 5, 2007
Location
Loxahatchee, Florida
TDI
82 Vanagon and 2011 JSW
Andy, just came in from troubleshooting my AC. The vent temps were just not where they should be. The tech at vintage air believes their system is not compatible with the TDI compressor. It has something to do with the TDI compressor being variable displacement and the expansion valve is for the old fashion fixed compressor. The valve that Looks like a mushroom. I don't know what expansion valve your vanagon has, but it is possible the system will also not work with the TDI compressor. The tech had no experience with this particular compressor, but says my pressure readings indicate it is a varialble displacement compressor and they do run into it with Hot Rodders and Custom Car builders that are using the LS1 engine. It also has a variable displacement compressor. It can be solved, but takes away from the plug and play. If this is accurate, I am going to have to try and adapt the factory bracket to hold the old style Sanden 508 compressor. I have cross posted this problem here in hopes that someone has more experience with this setup than me. Looks like the Beetle had an H type expansion valve. mark
 

AndyBees

Top Post Dawg
Joined
May 27, 2003
Location
Southeast Kentucky
TDI
Silver 2003 Jetta TDI, Silver 2000 Jetta TDI (sold), '84 Vanagon with '02 ALH engine
You know, back several years ago, when I converted my ol' 83 to R-134A, I was going to change the expansion valve for one compatible with the new freon. Well, upon inspection, I could not see any difference in the two valves. The old one had debris packed in the screen strainer which explained why it did not work with R-12. Anyway, I put the old one back and the thing worked just fine with R-134A.....lots of cold air. Seems I still have that valve in some of my stash!

I'm not sure what variable pressure means in an auto AC. The old Sanden 508-Ds have five pistons pushing the freon. I've never been inside a TDI compressor.

I've always liked the 508.............does anyone make a pulley/clutch assembly that will bolt on to a 508? It appears to me that it should bolt right up to the TDI bracket!.........just need a Serp pulley and clutch!

This whole thing with the AC has frustrated me more than the oil pan (which I've worked on today).

Now, I'm just wondering about my circumstances at this point. I'd planned to let the aluminum welder modify the OE adapters using parts from the 508. I guess I'll hold up on that for now.

This variable pressure thing just doesn't seem to make sense to me. Regardless, you would think at road speeds, the pressure would be adequate to provide cooling. I'm just wondering if the ECU needs to be communicating with the AC Compressor? But, the clutch is either engaged or not? So, what goes on inside that Compressor wouldn't seem to be controlled by anything.....the Varible pressure thing must have something to do with how the Expansion Valve(s) operate..........for efficiency, both in cooling effects and fuel consumption. Gees!
 
Last edited:

markward

Veteran Member
Joined
Jul 5, 2007
Location
Loxahatchee, Florida
TDI
82 Vanagon and 2011 JSW
Andy, been reading on the internet since posting. As best I can tell, there is an internal valve in the compressor that allows it to somehow adjust pressures. I think VW wanted the compressor to cycle as little as possible. This variable systems allows the compressor to run continuously. In fact my Bentley covers a lot of years and they describe a compressor without a clutch. Vintage Air says, their system will not work with a variable displacement compressor. The expansion valve that comes with the system is like the one you see on an old factory air rabbit, dasher, quantum etc. Through 84. In 85, vw started using the H type expansion valve with 4 lines. 2 and from the evaportator and 2 on the inlet side. I had good success converting both styles to 134, but for sure the compressors of that era were based on the fixed Sanden/Sankyo 508 compressor.

This has me concerned. I agree, you should hold off, until I get a definitive answer. It is unlikely the ears and clutch are in the same location as the TDI compressor, but there is a Sanden 508 version for a 7 rib serpintine belt. I think I probably will not get a definitive answer from the internet other than reading as much as I can. If you have the old vanagon compressor and could hold it up into the TDI compressor bracket and let me know how close a fit it is and what type of adaption might be required that would be helpful. Unfortunately, I don't have an old style compressor around, but might just go ahead and order one. Then I will know for sure. I might be breaking new ground. I wonder what Jon did? If you could do a little mockup and take a few pictures that would help. Email them if you chose not to get your thread off topic. This may actually save you something if you can adapat the 508 compressor from the WBX. I keep you posted. mark

Andy, another member posted this link in an earlier post from a thread I posted in. I skipped it because I thought it was GM only. The second half covers the VW variable compressor. http://www.aircondition.com/tech/get...9WYWx2ZXMucGRm I am going to give it a shot tomorrow. Looks too simple. mark
 
Last edited:

AndyBees

Top Post Dawg
Joined
May 27, 2003
Location
Southeast Kentucky
TDI
Silver 2003 Jetta TDI, Silver 2000 Jetta TDI (sold), '84 Vanagon with '02 ALH engine
Unfortunately, my Vanagon Compressor is almost impossible to identify the model due to the label being defaced. The name brand is Sanden, but model number is not identifiable.

The Suction and Discharge pipe fittings are the same size (#12). The unit will fit in the TDI mounting bracket. The bolt holes will need boring out to accomodate the OE TDI bolts and the steel insert would have to be added.

Tomorrow, I will double check that to make sure.

Oddly, my 2000 Jetta AC has been without a Temp sensor since I've owned it. The AC is either on or off. It never cycles. My brother had the same issue with his 2001 Jetta and the dealer installed a new sensor (under warranty). His has not given any problems since. On mine, I just hit the AC button as I need to! And, it works just fine otherwise!
 

AndyBees

Top Post Dawg
Joined
May 27, 2003
Location
Southeast Kentucky
TDI
Silver 2003 Jetta TDI, Silver 2000 Jetta TDI (sold), '84 Vanagon with '02 ALH engine
Here are some photos of the Oil Pan! This is the monkey that's been on my back for a long time. It is ready for the welder! I have cut all the pieces and temporarily glued them together with blots of JB Weld.

I bolted it up to the engine and everything looks okay. It is "right-on" from side-to-side but high in the rear by about a half bubble on the level. I did initially cut it too low in the rear. Some correction can be seen in this end photo. Also, the level will vary anyway due to load, hills, etc. The cut was probably okay, but due to changing the angle of my Tranny, the engine does not hang as low as the OE diesels did in the Vanagons.

This is a "rear" view (timing belt end of engine). You can see the extra piece of metal on the left side (bottom). That will be bent around, trimmed, welded, etc., by the welder. Notice the JB Weld for securing the plates in place.

EDIT: Although I did not use these bits & pieces to make the modified oil pan, it was used as a proto type. The first one was a total loss due to the welder not following instructions. The second one looked pretty much like this one but the aluminum cracked near some of the welds. I finally had a SS pan made. I suspect I have over $500.00 invested in oil pan R&D..LOL.


Another view: Notice I did not make a sharp V slope on the right side of the pan. In fact, I will have the welder add another piece of metal on the side to provide for a brace to secure the muffler as with the OE set-up in the VW Vanagon diesels!


Another view: In this view, you can see the JIG I made to secure the TDI oil pan stub so that I could measure, cut, fab, etc., all the pieces! This JIG is on a 50 degree angle as the OE for the VW Vanagon diesels.


Another view:This photo is looking straight down from the top. Sorry about the pieces of aluminum laying on the right side. But, this view also gives you an idea of what/how the JIG looks.


Another view: This is view is from the Bellhousing end of the oil pan. You can see the bottom piece needs to be trimmed off. I will let the welder handle that task. I moved the end piece back toward the rear of the pan to make sure there is plenty of clearance to access the bolts on that end of the pan.


This photo reveals that the oil pick-up tube will need to be rotated down!


I will need to do at least two bungs for oil drain and oil adding tube as with the OE set-up in the VW Vanagon diesels.
 
Last edited:

markward

Veteran Member
Joined
Jul 5, 2007
Location
Loxahatchee, Florida
TDI
82 Vanagon and 2011 JSW
Andy, the pan should work out fine. In the end it just needs to hold oil. Did you see these posted over on the Samba? It is exactly what we had discussed for using the stock diesel pan. Not so easy to purchase, but certainly copyable. mark


AndyBees

Top Post Dawg
Joined
May 27, 2003
Location
Southeast Kentucky
TDI
Silver 2003 Jetta TDI, Silver 2000 Jetta TDI (sold), '84 Vanagon with '02 ALH engine
In the Samba, oil pan mod photos!

Andy, the pan should work out fine. In the end it just needs to hold oil. Did you see these posted over on the Samba? It is exactly what we had discussed for using the stock diesel pan. Not so easy to purchase, but certainly copyable. mark


No, I did not see the photo in the Samba. Yes, that is what we discussed previously.

Last night, my welder (the dude working on the carrier bars) come by to look over the exhaust system. I showed him the oil pans (TDI and EO for the Vanagon diesels). He said that would be an easy adapter to make! In fact, he looked at the first mod I did and the 1.6 pan took a few measurements and said he could do it. But, at this point, I'm going to move on with the TDI pan mod.

I have he carrier bars and hope to install this afternoon to see what's up as far as fit, space, fabrication of brackets, etc.

He has my exhaust system almost finished. At the rear, the CAT will be slightly to the right side of the harmonic balancer pointing out in the same direction as the OE Vanagon exhaust system. There will be a three bolt flange on the end of the flex-pipe and mandrel bend. That will allow removing the CAT to access the rear of the engine for TB service.

I found a Donaldson "type" air filter/housing. The measurements all appear to be okay for location. It come off a Thermo King with an Isuzu 4-cylinder diesel engine.

Intercooler mod for the spot is my next challenge!:D
 
Last edited:

markward

Veteran Member
Joined
Jul 5, 2007
Location
Loxahatchee, Florida
TDI
82 Vanagon and 2011 JSW
I think I have mentioned this before, The only part of my conversion that looks "home made" is my oil pan. It works ok, but has a pin hole that weeps a drop of oil every now and then. If the adapter was readily available, I would plop down the money to purchase one and get the stock pan back on there. There were some interested in if I had one made they would want one. The problem I see, it is made from a good peice of billet aluminum that would need to be mostly machined away. So the aluminum alone would be expensive. Once it was programed into a CNC they could be replicated pretty quickly.

Owning the vanagon, I am having to learn how to live without everthing being "perfect" The pan is just one example. It is the curse of being a perfectionist. Great thread.

I pulled my fridge last Monday to replace the cooling fan. Lots of rust behind the kitchen. Oh My. More imperfection to live with. mark
 

AndyBees

Top Post Dawg
Joined
May 27, 2003
Location
Southeast Kentucky
TDI
Silver 2003 Jetta TDI, Silver 2000 Jetta TDI (sold), '84 Vanagon with '02 ALH engine
Update (EDIT: Although I used the "hydraulic" mounts shown here, I have since gone to the OE style rubber mounts. They are far less harsh than the hydraulic mounts. I'd never go back to any style of hydraulic mount.) edited on 12/28/2017.

First off, carrier bars with the Saab Mounts in place. Although in the rough, they are functional. Of course, the backets from the engine block over to the mounts are next to be fabricated.........hopefully within a week!

Remember, my comments about a photo are always on top of the image.

This is a view of the left mount. Although the Exhaust Gas recirculate outlet off the manifold looks close, I think it will not be a problem (I am considering cutting it off and welding shut). The oil line is not in its proper place on the Turbo, thus it will not be an issue either.


Another left side view!


One more left side view!


This is the right mount looking down from the top!


Another right side view from the back of the vehicle!


Lastly, the Intercooler ............ Although, I've only made a few comments about the Intercooler, it has had me scratching my head over the past few months! Tonight, I think I finally come to a conclusion on how it will be set in place, modified, etc.

The following photos are of the "un-cut" Intercooler to show what I will be working with. It is totally aluminum and a good junk yard find....price was right too!

Both the IN and OUT pipes will be cut-off and re-located. Also, the support tabs will need some modification!


Last edited:

markward

Veteran Member
Joined
Jul 5, 2007
Location
Loxahatchee, Florida
TDI
82 Vanagon and 2011 JSW
Andy, looking good. When I upgraded to the Saab mounts, my engine mount brackets were already made to fit the stock diesel vanagon mounts. As much as I tried to adapt the saab mounts into the carriers as you did nothing would line up. Since you are making the engine attachment brackets, you won't encounter that problem. I spent a day trying to figure out a way before I finally decided to cut the factory brackets completely off the carriers and start from scratch.

I deleted the entire EGR system and installed the intake "test" pipe. The engine shuts off fine without the flapper. Using the VCDS software I changed the adaption on the EGR to basically disable that feature. Once in a blue moon the missing EGR throws a code, but with the scan gauge permanently mounted it takes a second to clear the code.

mark
 

AndyBees

Top Post Dawg
Joined
May 27, 2003
Location
Southeast Kentucky
TDI
Silver 2003 Jetta TDI, Silver 2000 Jetta TDI (sold), '84 Vanagon with '02 ALH engine
Early on I was concerned about the left side mount and bracket. But, my welder come by the other night and he seems to think it will not be a major undertaking to fabricate the brackets.

I am hoping he got the exhaust finished yesterday. Also, I'm getting a little excited about the Intake piping. The filter housing should be here by Monday or Tuesday.

So, engine mounts, Intercooler, Exhaust and Intake piping all about to wrap-up at about the same time makes me feel like I am beginning to turn the corner!

One thing I reversed my decision on is the coolant pipes. Those plastic pipes from the 1990 Westy just didn't fit well (diameter issues) going thru the OE support holes in the cross member, which was also going to require making additional holes for the heater pipes. So, I cleaned and "brushed" all the flaking paint and rust from the OE pipes. They look good, especially inside. In fact, the inside looks like it is new. I will be coating the pitted areas of the pipes with JB Weld and then apply couple of coats of high heat paint! That should take care of those dudes for a few more years!
 

AndyBees

Top Post Dawg
Joined
May 27, 2003
Location
Southeast Kentucky
TDI
Silver 2003 Jetta TDI, Silver 2000 Jetta TDI (sold), '84 Vanagon with '02 ALH engine
Mark, I intended to comment on the EGR system! I'm using a modified EGR unit. The gas re-circulation valve, diaphram, etc., has been removed. The exhaust pipe inlet on the bottom of the EGR will be capped. The hole in the top where the rod from the diaphram extended down to the valve will be plugged with weld!

I will leave the flapper in the system!

One thing I thought about several months ago, is the use of an extractor in the exhaust system to handle the crankcase blow-by. Back in the days when I use to build and ride rail buggies, several vendors offered extractors that were welded into the exhaust system to "pull off" the blow-by fumes rather than running them thru the Intake system.

Last weekend, while attending a mud bog event sponsored by the local police departments (to raise funds for shop with a cop at Christmas), I looked over several of the "bad machines." One of them had one extractor welded to the headers on each bank of the big 454 Chevy engine! The dude said they worked just fine.

So, wouldn't the use of an extractor be better than using the Elephant Trunk method of dealing with the oily blow-by?

Comments, anyone?
 

AndyBees

Top Post Dawg
Joined
May 27, 2003
Location
Southeast Kentucky
TDI
Silver 2003 Jetta TDI, Silver 2000 Jetta TDI (sold), '84 Vanagon with '02 ALH engine
Exhaust System

These pics will clear up any confusion based on previous Threads and photos of the Exhaust System.

This photo shows the CAT. Notice the Exhaust is angled up to the right. Well, that will require the pipe to be cut and indexed to correct the angle toward the right!

EDIT: Although I did use these bits and pieces to fabricate an exhaust down-pipe and related exhaust components, I later custom made a SS system using the quick connections and rubber mounts. It works great. This entire system proved to be problematic in many ways. Skip over to Page 44, Post #1302 to see the custom SS down pipe!


You can see in this view that the exhaust is angling up as opposed to straight across. Although it may look a little too close to the rear, the CAT is centered between the hamonic balancer and the rear cowl. I suppose a nice heat shield will be in order!


This angle also provides a view of the incorrect angle.


In this view, you can see the bottom clearance is just barely in contact with the cross piece that goes from the bottom of the two carrier bars.


This is a similar view.


This is a little closer view!


This view shows the modified Down Pipe. Notice it was cut near the Turbo outlet, indexed and then re-welded. Also, notice the Cast non-galvanized 1.5 inch plumbing elbow. The inside diameter is actually very close to the same as the down pipe.


Another view of the Down Pipe modification


And, another view of the Down Pipe modification


It is pretty obvious that heat shields will be necessary to protect the Turbo Actuator and the oil drain back pipe!
 
Last edited:

markward

Veteran Member
Joined
Jul 5, 2007
Location
Loxahatchee, Florida
TDI
82 Vanagon and 2011 JSW
Andy, I have seen the weld in crank case breathers you talk about. I considered adding one, but was concerned about oil collecting in the muffler. The I don't think the diesel exhaust is hot enough to vaporize the oil residue. I will let you "test" that theory. Currently I have a long hose out the bottom of the van. I have the Mann seperator unit, but because of space and fitting sizes, it has not been installed yet. Impulse purchase at the time.

I was not aware you could reclock the turbo inlet shell. Mine is in the stock position and I had to get innovative with the discharge pipe. A summer project is to redo the discharge to the intercooler plumbing. It is too visable from the back of the Van. I think I can better hide it with a few more bends welded in. Good to know that I can reposition the turbo shell. That might help. Mark
 

AndyBees

Top Post Dawg
Joined
May 27, 2003
Location
Southeast Kentucky
TDI
Silver 2003 Jetta TDI, Silver 2000 Jetta TDI (sold), '84 Vanagon with '02 ALH engine
I've disassembled a good number of VNT 15 Turbos for various reasons. In doing so, I've learned a lot about them.

Yes, the air Inlet side can be rotated by loosening the six bolts.....other than removing the Actuator, there's no disassembly involved. It has a large O-ring for sealing. And, the Exhaust side can be Indexed but that involves the Vane system and could become complicated. In our application, it is not necessary to Index the Exhaust side anyway.

Well, if everything works based on my plans, the piping from the Turbo to the InterCooler and back to the Intake will be minimal. Also, I plan to route the piping from the Turbo Inlet across the back of the engine (TB end of engine) to the air filter in the right panel area in front of the right tail light assembly!

I've seen a lot of Intercooler/Turbo piping that seems too large, too long, etc., that seems to take up a lot of space! I'm sticking with the OE diameter sizes which I believe will provide adequate "breathing" and good performance!

If everything works as planned, it will be very easy to remove the exhaust and air intake piping to gain access to the Timing Belt area of the engine when the TB job rolls around!

Gees! The heat and humidity is horrible here today!
 
Last edited:

markward

Veteran Member
Joined
Jul 5, 2007
Location
Loxahatchee, Florida
TDI
82 Vanagon and 2011 JSW
Yes it has been hot and humid. I thought you had AC in the shop. I am not sure about the boost side plumbing size. The outlet of the turbo is 1 3/8ths I believe. VW must have at somepoint gone up in size. I used a transition peice to go up to 2 inch all the way through to the intake. The intake is 2 inch. That is why I think there must have been a factory transition somewhere either before or after the stock intercooler. I considered just plugging the egr when I found the crud, but you have to admit this part is hard to resist. mark


AndyBees

Top Post Dawg
Joined
May 27, 2003
Location
Southeast Kentucky
TDI
Silver 2003 Jetta TDI, Silver 2000 Jetta TDI (sold), '84 Vanagon with '02 ALH engine
Yep, my Garage does have AC which is very nice! However, the wife and I were out and about running errands this morning and into the after noon. The stopping and going (in and out of the car), etc., was unbelievably hot and humid. We did hike 3 miles yesterday in the D. Boone Forest but that not make things easier today! Yuk!

Yes, I'm thinking greengeeker is correct. The exit hole out of the VNT 15 is about 1.65 inches. The piping slightly increases in size all the way to the IC. The inlet and outlet to the IC are approximately 2"

Well, as it is beginning to unfold with my IC installation, the pressure pipe from the Turbo to the Intercooler will only be about 10 or 11 inches in length. The inlet pipe on the IC has a 1.95 inch inside diameter. The outlet pipe is the same size. The distance from the outlet pipe of the IC to the Throat of the EGR/Intake will be approximately 12 to 13 inches. So, I believe in my case, a full two inches from point A to point B will not be necessary.

I got the hole cut today for locating the IC, cut the pipes off for repositioning and have worked on a piece to insert the Turbo Pressure Sensor into the exit area of the IC. (Dang, I need the Turbo Pressure Sensor!)

Here is a photo of my modified EGR. This is from some older photos that are not in focus.

In this photo the EGR Diaphram has been removed. The hole for the rod to the valve will be welded shut!


This is a photo of the modified EGR on the Intake
 
Last edited:

markward

Veteran Member
Joined
Jul 5, 2007
Location
Loxahatchee, Florida
TDI
82 Vanagon and 2011 JSW
Andy, I only mentioned the sizing because of the connections. I needed a way to go from the turbo to the intercooler and then on to the intake. Since everything was 2 inch with the exception of the turbo outlet I opted to use a stainless transistion coming out of the turbo. I used standard 2" silicone hose and stainless tube to make all my connections to the intercooler and intake. I also made a short section that has my IAT sensor between the cooler and the intake. Originally I considered mounting it in the intake, but was concerned about heat soak. So I have an aluminum 2 inch diameter short pipe with a welded bung for the temp sensor. It has inline between the cooler and the intake and is also connected with the 2 inch silicone hose. I also incorporated a couple of 2 inch silicone bellow connectors to allow some movement. I used step ups for the MAF sensor between the air filter housing and the intake of the turbo. I think the MAF is more like 3 inches diameter and the air filter and turbo intake were also the same 2 inch.
 
Top