
PDJetta
Top Post Dawg
- Joined
- Nov 6, 2003
- Location
- Northern Virginia
- TDI
- '04 Jetta GLS TDI Pumpe Duce Platinum Grey w/ Leather
TimeSert makes a wonderful product that can repair the threads in VW aluminum engine and transaxle mounts. These mounts are good for about two, possibly three, bolt torquings before the threads fail.TimeSerts are better than Heli Coils, which can work out. The TimeSert kit is a little pricey, about the cost of a new mount, but with it you can fix additional mounts and the mount you have re-threaded should never have thread failure again.
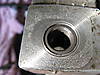
Last week I removed the engine and transaxle from my son's A5 Jetta to swap motors. The aluminum transmission mount lost some threads and looked unsafe to use. It looked like this:

I decided to give TimeSerts a try after reading about them on this list. They sell a 30 MM by 12 mm with a 1.5 MM thread pitch steel insert that is an exact fit. (This insert was originally engineered for Honda head bolt hole thread repair, so it has to be good).
Today I repaired the threads in the transmission mount on my son's Jetta in preparation of installing a new engine. This is the kit you want to buy, #1215:

Open it up, it looks like this:

Top in the box is the insert driver, next is the tap to cut the insert threads in the aluminum mount, next appears the countersink tool and at the bottom in the case is the drill bit to bore out the stripped threads.
And the 30 mm X 12 mm X 1.5 mm inserts #12159 (they do not come with the kit and must be bought seperately):

How to install: First you have to secure the mount level in a vice, or have it installed on the engine or transaxle so it wont move. Next, using a half inch chuck drill, drill the threads out with the supplied drill bit. Oil the bit first and hold the drill perpendicular to the mount and go easy. When done it looks like this:

Blow off the drillings.
Next, countersink the hole using the supplied countersink bit. The countersink holds the TimeSert (notice in the picture of the insert (above), how the insert top end is fluted to match the countersink) at the top of the hole when installing it, preventing it from screwing through the mount. Oil the bit and countersink as far as the tool will drill. It is really quick and is only a couple of mm deep. Blow off the metal bits. When done, it looks like this:

Next, take a tap handle and install the supplied tap, oil the tap, and carefully cut the threads by rotating the tap handle clockwise, holding the tap perpendicular to the hole. Soon the tap starts cutting threads and in a minute or so you have tapped the hole. Make sure you run the tap all the way through the hole. Unscrew the tap. Blow off the metal shavings. It should look like this:

By hand, screw in the steel thread insert a few turns so it looks like this:

Install the instert driver into the tap handle and oil the insert driver threads and screw the driver into the insert in the mount like so:

Begin screwing in the insert by turning the tap handle clockwise. Continue turning the tap handle until it tightens up, keep turning some more and after the driver spins easly, unscrew it. By this time its through the insert and out the bottom of the hole a half inch or so. You should see this:
The insert driver cold rolls the insert threads, firmly locking the insert in the aluminum mount and also perfectly forms the inner threads to accept the bolt you will install later.
--Nate
Last week I removed the engine and transaxle from my son's A5 Jetta to swap motors. The aluminum transmission mount lost some threads and looked unsafe to use. It looked like this:
I decided to give TimeSerts a try after reading about them on this list. They sell a 30 MM by 12 mm with a 1.5 MM thread pitch steel insert that is an exact fit. (This insert was originally engineered for Honda head bolt hole thread repair, so it has to be good).
Today I repaired the threads in the transmission mount on my son's Jetta in preparation of installing a new engine. This is the kit you want to buy, #1215:
Open it up, it looks like this:
Top in the box is the insert driver, next is the tap to cut the insert threads in the aluminum mount, next appears the countersink tool and at the bottom in the case is the drill bit to bore out the stripped threads.
And the 30 mm X 12 mm X 1.5 mm inserts #12159 (they do not come with the kit and must be bought seperately):
How to install: First you have to secure the mount level in a vice, or have it installed on the engine or transaxle so it wont move. Next, using a half inch chuck drill, drill the threads out with the supplied drill bit. Oil the bit first and hold the drill perpendicular to the mount and go easy. When done it looks like this:
Blow off the drillings.
Next, countersink the hole using the supplied countersink bit. The countersink holds the TimeSert (notice in the picture of the insert (above), how the insert top end is fluted to match the countersink) at the top of the hole when installing it, preventing it from screwing through the mount. Oil the bit and countersink as far as the tool will drill. It is really quick and is only a couple of mm deep. Blow off the metal bits. When done, it looks like this:
Next, take a tap handle and install the supplied tap, oil the tap, and carefully cut the threads by rotating the tap handle clockwise, holding the tap perpendicular to the hole. Soon the tap starts cutting threads and in a minute or so you have tapped the hole. Make sure you run the tap all the way through the hole. Unscrew the tap. Blow off the metal shavings. It should look like this:
By hand, screw in the steel thread insert a few turns so it looks like this:
Install the instert driver into the tap handle and oil the insert driver threads and screw the driver into the insert in the mount like so:
Begin screwing in the insert by turning the tap handle clockwise. Continue turning the tap handle until it tightens up, keep turning some more and after the driver spins easly, unscrew it. By this time its through the insert and out the bottom of the hole a half inch or so. You should see this:
The insert driver cold rolls the insert threads, firmly locking the insert in the aluminum mount and also perfectly forms the inner threads to accept the bolt you will install later.
--Nate
Last edited:

