What did you do to your MKIV today?

PakProtector

Veteran Member
Joined
Jan 5, 2014
Location
AnnArbor, MI
TDI
Mk.4's and the Cummins
Went off to the Fall GTG at Kirk's, and got some guidance and a few tools to change the rear axle beam bushings to Cupra R's. It went w/o a hitch, and I learned a bit by taking it on.
cheers,
Douglas
 

sriracha

Veteran Member
Joined
Oct 8, 2014
Location
805
TDI
2005 Jetta Wagon 5mt, 1982 Rabbit truck (gas)
Went off to the Fall GTG at Kirk's, and got some guidance and a few tools to change the rear axle beam bushings to Cupra R's. It went w/o a hitch, and I learned a bit by taking it on.
cheers,
Douglas
Do you notice any improvement in handling, with the Cupra R rear beam bushings?

What information did you learn, that might be helpful to those of us about to perform a similar upgrade?
 

RexNICO

Veteran Member
Joined
Sep 17, 2013
Location
South West OH
TDI
2011 Tiguan, 2011 Q7
Sorted parts for it in the garage, found a grey bodied, black lid armrest. Ratcheting function & lid both work.

Who wants it? Let me know. Thanks

Claimed
 
Last edited:

PakProtector

Veteran Member
Joined
Jan 5, 2014
Location
AnnArbor, MI
TDI
Mk.4's and the Cummins
Do you notice any improvement in handling, with the Cupra R rear beam bushings?
What information did you learn, that might be helpful to those of us about to perform a similar upgrade?

First, the originals were not in the worst shape I have ever seen or heard of. With the Cupra R in place the rear follows the front without winding itself up as cornering force is built. Bumps seem no harsher( all the rest of the suspension rubber save the subframe stuff is new, as are the Koni shocks and struts ).

What I learned is that with careful application of an air chisel it is a straightforward removal process. Just have to avoid digging into the beam...which is not so hard. Also, get a drill and open the OE bushing and drain it before attacking it.

Unclip the driver's side, body side of the brake line( grab the fitting with some pliers and pull/wiggle it until it is free). On the pass side, remove the clip held in with a 13mm bolt. Unclip the anti-lock wires from the body so the beam can fall a bit as you lower it. Car should be raised enough to get the tires at least 6" off the deck. Then support the cross piece of the beam with a floor jack, pull the bolts and lower the front until the bushings are well clear of the ears. Do this slowly and make sure neither brake lines or anti-lock wires are getting stressed.

Be careful about the clocking( as noted in the instructions ), before drawing the new bushings into the beam. If it is not right, there is little chance you will ever rotate it...
cheers,
Douglas
 

flashmayo

Veteran Member
Joined
Apr 1, 2007
Location
Santa Cruz CA
TDI
'03 Jetta - Gator Tuned
Replaced my grenading DMF with another, a LUK. Clutch disk still had lots of meat on it, just the Flywheel was shifted over like they do. I know everyone here wants to replace the over-engineered DMF system with a SMF, but this setup lasted 260K. Works for me.

Next will be to rebuild the shifter mechanisms with new bushings and connectors.
 

RexNICO

Veteran Member
Joined
Sep 17, 2013
Location
South West OH
TDI
2011 Tiguan, 2011 Q7
Added a rear view camera/mirror. This is actually research for another car, but since most of the interior is out of my MK4 wagon, it was much easier to install in the MK4 :).


First impressions is - pretty nice. The unit I bought includes a front camera as well, but I don't plan on recording, just testing out the rear view function. I didn't hard wire it or even tap into the reverse signal. I'm plugging in the cig lighter power supply each time I get in the car. If I decide to keep it in this car, I'll go back and do a proper install, add the GPS antenna and swap over to a larger micro-SD card.


This is the $100 unit I'm using
 

KrashDH

Top Post Dawg
Joined
Dec 22, 2013
Location
Washington
TDI
2002 Golf
First, the originals were not in the worst shape I have ever seen or heard of. With the Cupra R in place the rear follows the front without winding itself up as cornering force is built. Bumps seem no harsher( all the rest of the suspension rubber save the subframe stuff is new, as are the Koni shocks and struts ).
What I learned is that with careful application of an air chisel it is a straightforward removal process. Just have to avoid digging into the beam...which is not so hard. Also, get a drill and open the OE bushing and drain it before attacking it.
Unclip the driver's side, body side of the brake line( grab the fitting with some pliers and pull/wiggle it until it is free). On the pass side, remove the clip held in with a 13mm bolt. Unclip the anti-lock wires from the body so the beam can fall a bit as you lower it. Car should be raised enough to get the tires at least 6" off the deck. Then support the cross piece of the beam with a floor jack, pull the bolts and lower the front until the bushings are well clear of the ears. Do this slowly and make sure neither brake lines or anti-lock wires are getting stressed.
Be careful about the clocking( as noted in the instructions ), before drawing the new bushings into the beam. If it is not right, there is little chance you will ever rotate it...
cheers,
Douglas
I did the Cupra R bushings as well. I found for me I didn't want to tackle removing the old bushings laying on the ground so I removed the beam from the car completely. You can plug the brake lines and not lose much fluid.

I was under the impression that the clocking is critical with the OEM bushings since they have material removed from the rubber (voids), whereas the Cupra bushings don't have a clocking requirement since they are solid. That being said, I kept them to as close to the OEM position as I could (marked the OEM clocking coming out and aligned the new ones going in)
 

romad

Top Post Dawg
Joined
May 27, 2011
Location
Prescott, AZ
TDI
2005 Jetta GLS Wagon "Cranberry"
Drove up to Sir Tools in Paradise, CA and picked up a damaged radio removal tool (BMW tool damaged) and similar 12 piece electric contact extractor tool before they were thrown away.
 

Blacktree

Veteran Member
Joined
Sep 9, 2015
Location
Central FL
TDI
'02 Jetta 5-spd
Added a rear view camera/mirror. This is actually research for another car, but since most of the interior is out of my MK4 wagon, it was much easier to install in the MK4 :).

This is the $100 unit I'm using
I've been considering one of those units, or at least something like it. My biggest concern is how they attach to the mirror. They're just held on by rubber straps? Does the unit shift around when you hit bumps in the road?
 

mr.loops

Veteran Member
Joined
Nov 24, 2010
Location
Kelowna
TDI
2002 jetta, 2003 Bora 1.8T
Drove up to Sir Tools in Paradise, CA and picked up a damaged radio removal tool (BMW tool damaged) and similar 12 piece electric contact extractor tool before they were thrown away.


I just bought a SIR bearing puller kit from these guys. Nice piece of equipment!!


Sent from my iPhone using Tapatalk
 

romad

Top Post Dawg
Joined
May 27, 2011
Location
Prescott, AZ
TDI
2005 Jetta GLS Wagon "Cranberry"
Yep, but I don't know how long they'll be around since the Camp Fire last year. Here is a Google satellite view of their location showing their buildings that survived. Google hasn't updated their database showing the name change of Derrough Ln. to Sir Ct.


https://tinyurl.com/y32dga6j
 

RexNICO

Veteran Member
Joined
Sep 17, 2013
Location
South West OH
TDI
2011 Tiguan, 2011 Q7
I've been considering one of those units, or at least something like it. My biggest concern is how they attach to the mirror. They're just held on by rubber straps? Does the unit shift around when you hit bumps in the road?
Is there a shakiness when driving? Yes
Does it flop around? nope

Longer explanation
Yes, it uses rubber straps and it does seem fairly secure. Of course I know how rubber bands age in the sun, so I have my concern of how they will hold up over a long time in the heat of the South.
But I think the more important piece would be the ability/stability of the original mirror to stay in place when adjusted. Some of the reviews/feedback I read talked about the mirror leaning forward (towards driver/cabin) due to a loose swivel/ball mount.

I originally had it over-top of my fatter Audi auto-dim mirror and wasn't happy with the fitment, so I swapped over to a normal flatter/squarer VW. I actually tried 3 different mirrors and had assembled/disassembled 2 or 3 more to get the smallest physical mirror with the tightest ball/swivel in the back of the mirror body.


When I get ready to install this in the other car, I will probably deconstruct a normal flat/square VW mirror by removing the glass and trim ring around it to decrease the total amount of weight on the ball/swivel. But by that time, I hope to have complete confidence in the performance of the device both as a screen and as a normal mirror.
As it is installed now (the screen and the camera) it needs to be adjusted differently for the proper screen use, or using passively as a mirror. I probably won't spend the time to adjust on this car, unless I decide to buy a second and leave this 1 in the MK4.
 
Last edited:

Rob Mayercik

Veteran Member
Joined
Dec 19, 2001
Location
NJ, U.S.A.
TDI
2002 Jetta GLS, Baltic Green/Beige
Saturday evening I replaced the malfunctioning master window switch on my driver's door with a new replacement from switchdoctor.net.

While I had the thing out of the car, I removed the remaining soft-touch paint from the door handle (was starting to peel). Found that a credit card (or, more accurately, an old hotel door keycard) makes a dandy scraper for that stuff while being soft enough to not scratch the base plastic.

Planning on an oil change, air filter (with new airbox lid screws), and a vacuum pump reseal next weekend....
Didn't get the oil/air filter change done over the weekend, but did do the vacuum pump reseal with the RKXTech kit. Once again, used an old hotel key card as a scraper/pick so as to not have metal-metal contact near the seals or sealing surfaces. Took longer to wipe off/out all the oil in the pump than it did to get it off the engine, disassemble and replace the seals, and reinstall, but the operation was a complete success - no more leak, far as I can tell after about 200 miles logged since the job was completed.

This morning, went out before heading to work to check tire pressure (thinking I'd drop from 38 to 35 on my WRG3s due to a lot of spin starting out in wet), but found they were all actually at about 32 (with the LF at 30). Pumped them back up to 38 all around since that's been my "success point" with this car, will see how that turns out. Startout grip might feel better, but need more data yet.

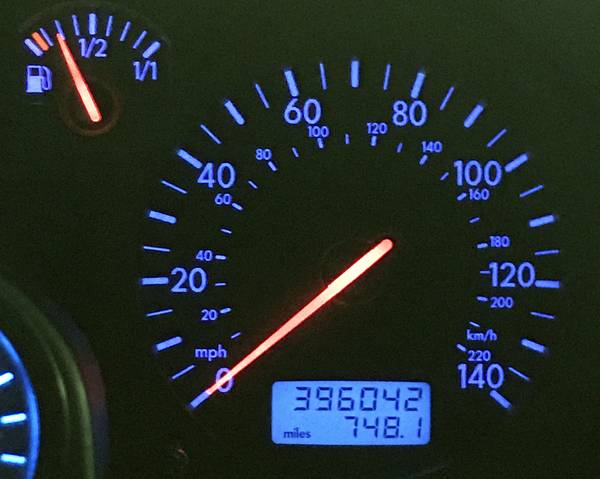
Oh, and rolled over 396,000 miles on the way to work. Hoping for 400K by Christmas!
 

Richy_T

Veteran Member
Joined
Apr 18, 2007
Location
Dickson, TN
TDI
2000 Jetta
Fixed the broken hinge on the glovebox and replaced all the dash parts I took off to do the blend door fix. Had a look at replacing the radiator fans but by the time I found my 1/4" torx, I got fed up and packed it in for the day.

Also tested my antenna and concluded it's probably dead.
 

IndigoBlueWagon

TDIClub Enthusiast, Principal IDParts, Vendor , w/
Joined
Aug 16, 2004
Location
South of Boston
TDI
'97 Passat, '99.5 Golf, '02 Jetta Wagon, '15 GSW
Drove it home to Easterm MA from Cleveland. Stopped to visit a friend in Syracuse en route.

Made it from Gary Indiana to Albany on this tank. 52 MPG. Not bad for an old car.
 
Last edited:

red16vdub

Veteran Member
Joined
Aug 26, 2013
Location
(617) City of CHAMPIONS
TDI
03 JSW 5spd
Why is your cluster showing 29 degrees F.? I thought you were near Boston.


Hi Greg
Yes I’m on the south shore. The past 4 or 5 months the cluster started reading low for whatever reason, I swap the sensor out twice but no luck getting the thing behaved lol. I said to myself I gotta get in touch with you, now that fishing [emoji476] season is slowing down, Maybe sometime next week or whenever you’re free, you can look at it for me.


Sent from my iPhone using Tapatalk
 

ssaric1.9TDI

Veteran Member
Joined
Feb 29, 2016
Location
Atlanta
TDI
2013 VW Passat TDI, 2003 VW Jetta Wagon TDI
Hi Greg
Yes I’m on the south shore. The past 4 or 5 months the cluster started reading low for whatever reason, I swap the sensor out twice but no luck getting the thing behaved lol. I said to myself I gotta get in touch with you, now that fishing [emoji476] season is slowing down, Maybe sometime next week or whenever you’re free, you can look at it for me.


Sent from my iPhone using Tapatalk
Mine is acting the same, its showing between 24-30F depending on the temperature outside. When you get the fix can you share it so that I can try and fix mine? Would like it to show correct temp.
 

gmenounos

Vendor
Joined
Jun 26, 2003
Location
Watertown, MA, USA
TDI
'99.5 Golf GLS, '01 Jetta GLX Wagon (TDI conversion)
Hi Greg
Yes I’m on the south shore. The past 4 or 5 months the cluster started reading low for whatever reason, I swap the sensor out twice but no luck getting the thing behaved lol. I said to myself I gotta get in touch with you, now that fishing [emoji476] season is slowing down, Maybe sometime next week or whenever you’re free, you can look at it for me.


Sent from my iPhone using Tapatalk
Was your old cluster an MFA? If you still have it, try swapping it in and see if it reads correctly. That'll tell you whether it's wiring related or something in the cluster itself. I can take a look in the coming weeks but not sure exactly when yet. I've got to clean out the garage first and fix a couple things on the Golf.
 

Nero Morg

Top Post Dawg
Joined
Oct 19, 2017
Location
OR
TDI
2014 A6 TDI, 2001 Jetta TDI, 2014 Passat TDI
Installed my new engine side shields, skid plate, and vented fender liner. New drivers side liner comes in Friday.
 

red16vdub

Veteran Member
Joined
Aug 26, 2013
Location
(617) City of CHAMPIONS
TDI
03 JSW 5spd
Was your old cluster an MFA? If you still have it, try swapping it in and see if it reads correctly. That'll tell you whether it's wiring related or something in the cluster itself. I can take a look in the coming weeks but not sure exactly when yet. I've got to clean out the garage first and fix a couple things on the Golf.


No the old cluster was non MFA unit. When we first did the swap to MFA, it always read 3 degrees high, now it’s reading 10 - 11 degrees lower than actual temperatures. When I changed out sensors I originally thought it was wiring, but after checking that I figured it was cluster related. I will swap the sensor out from my Audi later this evening, I believe both are the same. I’ll post my findings then.


Sent from my iPhone using Tapatalk
 

Nero Morg

Top Post Dawg
Joined
Oct 19, 2017
Location
OR
TDI
2014 A6 TDI, 2001 Jetta TDI, 2014 Passat TDI
Question for ya, how’s the quality and where did you get the side shields from ?


Sent from my iPhone using Tapatalk
Purchased from IDparts, the side skirts looked OEM, they had the vw logo on them, and they were very rigid. The skid plate is aluminum, and had to drill one hole as it was off about 1/2 inch.
 

gmenounos

Vendor
Joined
Jun 26, 2003
Location
Watertown, MA, USA
TDI
'99.5 Golf GLS, '01 Jetta GLX Wagon (TDI conversion)
No the old cluster was non MFA unit. When we first did the swap to MFA, it always read 3 degrees high, now it’s reading 10 - 11 degrees lower than actual temperatures. When I changed out sensors I originally thought it was wiring, but after checking that I figured it was cluster related. I will swap the sensor out from my Audi later this evening, I believe both are the same. I’ll post my findings then.
I have plenty of spare clusters you can swap with for a quick test.

The wiring is very simple. One side of the sensor goes to pin 7 of the blue connector at the cluster. The other side of the sensor goes to pin 26 of the green connector at the cluster. If either of those wires has any extra resistance, it will make the temp read low. Here's a page that shows how the sensor's resistance changes based on the outside temp:

https://www.briskoda.net/forums/topic/377402-outside-temp-sensor-g17-supply-voltage/

I realize the info is for a Skoda but it's a TDI from the same approximate year so it's probably the same sensor.
 

red16vdub

Veteran Member
Joined
Aug 26, 2013
Location
(617) City of CHAMPIONS
TDI
03 JSW 5spd
I have plenty of spare clusters you can swap with for a quick test.


The wiring is very simple. One side of the sensor goes to pin 7 of the blue connector at the cluster. The other side of the sensor goes to pin 26 of the green connector at the cluster. If either of those wires has any extra resistance, it will make the temp read low. Here's a page that shows how the sensor's resistance changes based on the outside temp:


https://www.briskoda.net/forums/topic/377402-outside-temp-sensor-g17-supply-voltage/


I realize the info is for a Skoda but it's a TDI from the same approximate year so it's probably the same sensor.


I’ll get my fluke multimeter out tonight depending on weather or maybe tomorrow


Sent from my iPhone using Tapatalk
 
Top