I've posted most of the stuff below on this vwvortex thread for retrofiting projectors. Figured I should re-post everything here in a new thread for those interested.
The Chinese Audi and VW style replicas are slightly more expensive and easier alternatives. But judging by the output shots folks have posted, the projectors used in them frankly aren't very good. The manufacturers probably used the cheapest projectors they can find to save cost. So I decided to go the DIY route and use some good projectors instead.
Parts used:
Factory reject headlights from ebay.
FXR 3.0 Bi-xenon projector with 3 inch lens
Philips 85122+ D2S 4300k 35W bulb
Morimoto 3Five 35W ballast
Orbit Shrouds
Bought everything from The Retrofit Source
The idea is to pry open the stock headlights put the projectors in. I already had a set of the Mini H1 projectors. They are much smaller and fits through the existing bulb holes and screw onto the reflector. They are a big upgrade over stock halogens, but still sacrifice performance due to their small size. I decided to use the FXR 3.0 instead, which made a 5-10 hour project into a 30+ hour project. It was worth it in the end though as the output is amazing. Anyway here is what I did:
Pry open headlight:

+

+
lots of prying
=

Now if you want to retrofit the Mini H1, your hard work is done at this point. All you need to do is screw the projector through the reflector bowl, possibly with minor trimming of adapter plates, install headlights onto car to verify your projector rotation for flat cutoffs, reseal and re-install. However, the FXR is much larger than the Mini H1:

Larger projector means more light output:
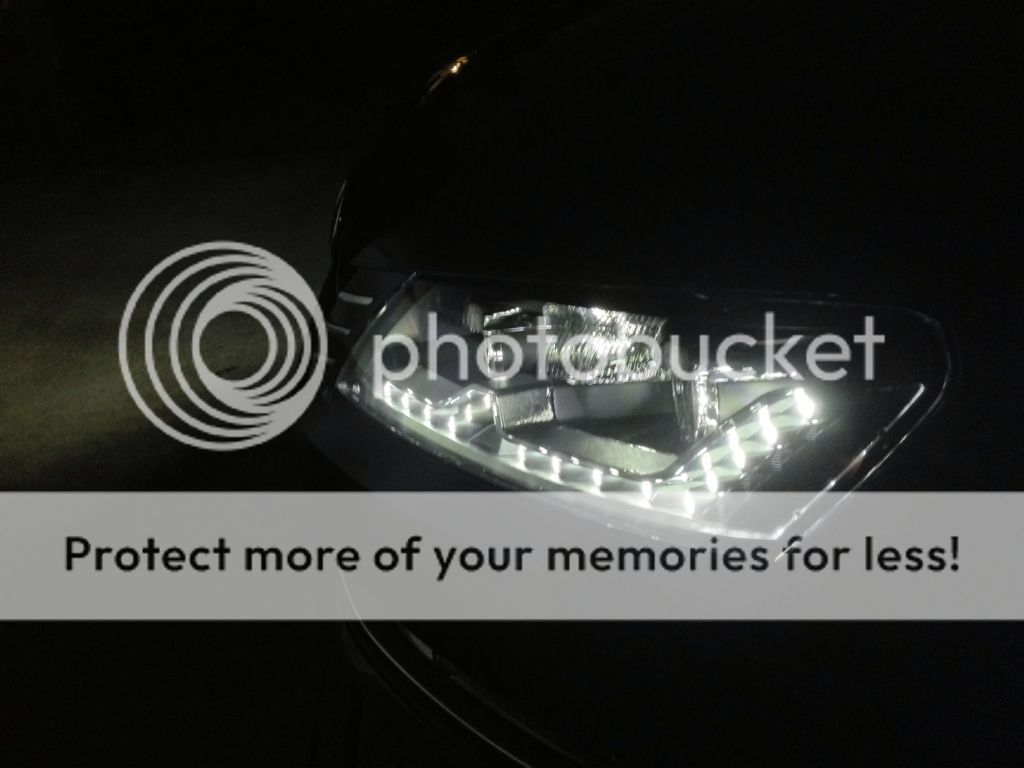
Mini H1 output against garage door:

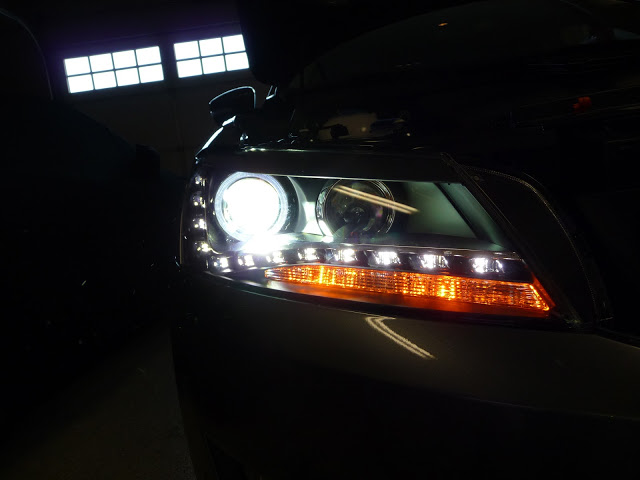
FXR output against garage door:

But as a result the stock reflector needs to be trimmed in order for the larger projector to fit.
So the next step is to remove the low beam reflector. This was a giant pain. The low beam reflector is held onto the housing via three points. One of the point is secured by a screw, while the other two are secured by plastic tab thingies. I had to obliterate one of the tabs using a flat blade screwdriver in order to free the reflector, but as long as you don't damage the ball joint you will be fine. The part can be reattached using epoxy just fine.

Now in order to make sure the projector's rotation is good, you have to mark the stock halogen's beam reference. The reflector is round so I had to turn it upside down on its only flat part in order to secure it with screws:

Install the halogen bulb and power it up. I used a standard computer ATX power supply for this.

Mark beam cutoff on the wall at least 10 feet away:

Now the stock beam cutoff is marked, it is important to keep your mounting places/hardware in place and not move them. Otherwise your marked cutoff will become invalid and you will be screwed.
The Chinese Audi and VW style replicas are slightly more expensive and easier alternatives. But judging by the output shots folks have posted, the projectors used in them frankly aren't very good. The manufacturers probably used the cheapest projectors they can find to save cost. So I decided to go the DIY route and use some good projectors instead.
Parts used:
Factory reject headlights from ebay.
FXR 3.0 Bi-xenon projector with 3 inch lens
Philips 85122+ D2S 4300k 35W bulb
Morimoto 3Five 35W ballast
Orbit Shrouds
Bought everything from The Retrofit Source
The idea is to pry open the stock headlights put the projectors in. I already had a set of the Mini H1 projectors. They are much smaller and fits through the existing bulb holes and screw onto the reflector. They are a big upgrade over stock halogens, but still sacrifice performance due to their small size. I decided to use the FXR 3.0 instead, which made a 5-10 hour project into a 30+ hour project. It was worth it in the end though as the output is amazing. Anyway here is what I did:
Pry open headlight:
+
+
lots of prying
=
Now if you want to retrofit the Mini H1, your hard work is done at this point. All you need to do is screw the projector through the reflector bowl, possibly with minor trimming of adapter plates, install headlights onto car to verify your projector rotation for flat cutoffs, reseal and re-install. However, the FXR is much larger than the Mini H1:
Larger projector means more light output:
Mini H1 output against garage door:
FXR output against garage door:
But as a result the stock reflector needs to be trimmed in order for the larger projector to fit.
So the next step is to remove the low beam reflector. This was a giant pain. The low beam reflector is held onto the housing via three points. One of the point is secured by a screw, while the other two are secured by plastic tab thingies. I had to obliterate one of the tabs using a flat blade screwdriver in order to free the reflector, but as long as you don't damage the ball joint you will be fine. The part can be reattached using epoxy just fine.
Now in order to make sure the projector's rotation is good, you have to mark the stock halogen's beam reference. The reflector is round so I had to turn it upside down on its only flat part in order to secure it with screws:
Install the halogen bulb and power it up. I used a standard computer ATX power supply for this.
Mark beam cutoff on the wall at least 10 feet away:
Now the stock beam cutoff is marked, it is important to keep your mounting places/hardware in place and not move them. Otherwise your marked cutoff will become invalid and you will be screwed.
Last edited:


")