Install was a piece of cake, with a few choice moments where my large hands were doing spaghetti fingers trying to fit the adapter with the HID bulb all aligned properly with the lug where it belongs in the adapter all fitting and locked down inside the headlight housing. Quite a few #@$! and "muthah f$#@!r were leaked from my lips while doing this project, but I got it.
The Kit. It does come with the adapters. Use some super glue to set up the bulbs on the adapters beforehand.
Watch the video that comes with the lights from the place you bought the lights, they don't come with instructions at all.
<iframe width="640" height="360" src="http://www.youtube.com/embed/beNlGogfz3E?feature=player_embedded" frameborder="0" allowfullscreen></iframe>
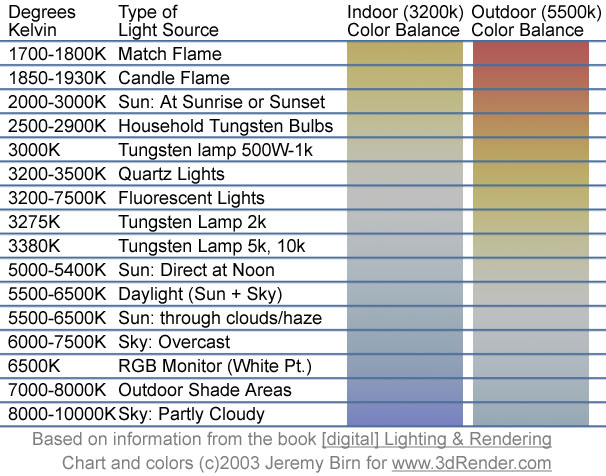
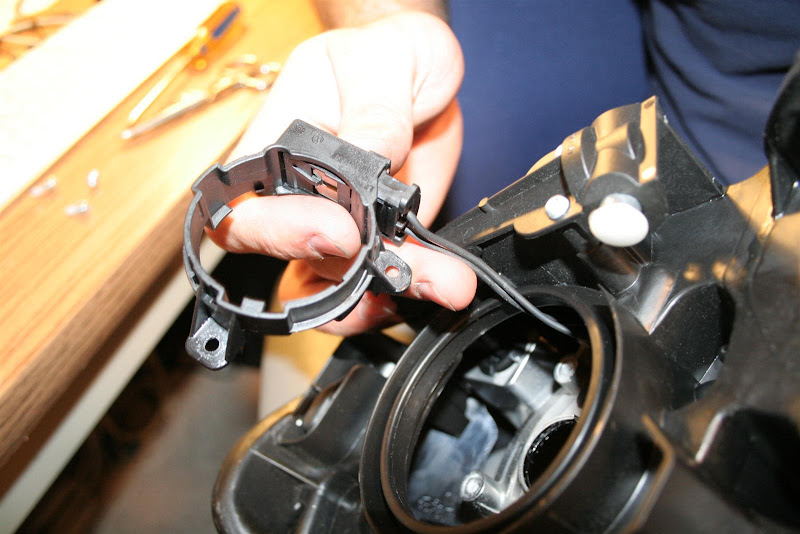
First order of business is pull the caps off then rotate the light backings about 20 degrees counter clockwise, towards fender for the left light, towards engine for the right light.
Next, pull the head light connector. I had to turn on the ignition and headlights switch and pin out which wire was hot, besides the brown ground wire. It was yellow with a blue stripe on the left headlight, and yellow with another color strip, adjacent to the brown wire, on the right headlight, numbers 5 and 6 on the fitting.
Crimp on the connectors provided, like this, for the right light. Hot is yellow with a black stripe on the right and yellow with a blue stripe on the left. Brown is universally Ground on German cars, for the most part.
Cut the black sealer donut, very carefully without nicking wires, off the HID. Do NOT TOUCH the HID bulb with your fingers, you'll destroy it, so handle wires only not the glass bulb.
Attach the ground wire provided with the screw bag to the ballast with the machine screw provided.
Install the HID's with adapters as shown in the video. It all has to be shoved in the back of the headlight very carefully keeping everything aligned with the spade lug of the HID light base staying in alignment with the adapter base.
Take the rubber covers and with dykes, cut a slit for the wires from the headlight bulb to pass through.
Pass the wires through the covers after the bulbs are installed in the housings. Press the covers back in place carefully, all the way around the edges, making sure they are seated fully.
Clean the side of your headlight housings, making sure they are dust free and spotless. Apply the double backed tape to the mini ballast, and attach to the side of the headlight housings with the wiring all facing the firewall.
Plug the male spades into the connectors you crimped on, red from ballast goes to the yellow wires with stripes, black from ballast goes to the brown (ground) wires. Plug the other connectors from the ballast to the wires from the head light.
Attach the black ground wire from the ballast housing via a self drilling /tapping tek screw into a section of the fender lip. On the right there is a ground lug already that exists, I do not know if the ground lug will fit over it.
When it's all plugged in, it should look like this.
Time to go on a Mountain Bike ride and wait for tonight to test them out on the neighbors garage door across the way for the cutoff lines. ;-)
Later on, I will go in with VCDS in the long coding section, and bump the headlight voltage up to 13.8 V to drop the start amperage required of the wiring at start up of the ballasts to arc the lights to get them going.