
How to replace your BEW or PD TDI serpentine belt:
Tools needed: 16mm open face wrench & tensioner locking pin.
Serpentine belt for BEW is different from ALH so be careful that you get the right part.
Done on my 04 Bora from the top only!
Steps
1) Open hood
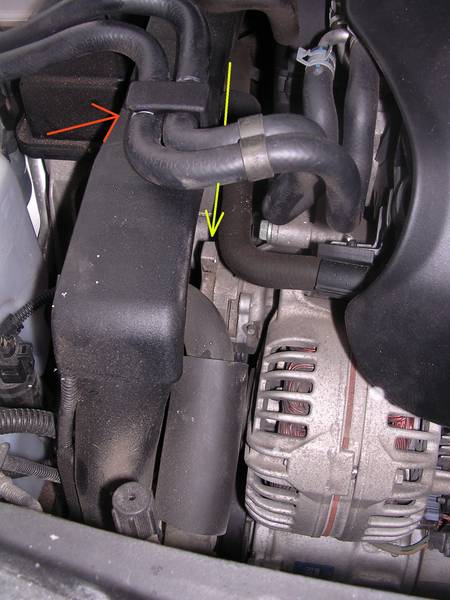
2) Where indicated by red arrows, unclip the fuel lines so they can freely move. The 16mm wrench will go where the yellow arrow is pointing to.

I took a few pictures before and afterwards. This is where the fuel lines need to be unclipped. You need to do this so to allow free movement of the wrench as you move the tensioner to where you can lock it.

Again, the red arrows point to the fuel lines that need to be unclipped. The yellow arrow is where the 16mm wrench goes. You will pull the wrench with your hand passing underneath the fuel lines.
3) Using the 16mm wrench mate it to the top notch on the tensioner (use the pathway already indicated by the yellow arrows)

4) Ready your tensioner lock pin

5) And pull on the wrench until you lock the tensioner (yes, I used an Allen key)
6) Found to be the easiest to remove the serpentine belt from around the alternator pulley first, by pulling it to the left, next do the AC pulley and then the power steering pump pulley.
7) Now reach down with one hand and separate the belt from the engine pulley (look first and then reach down with which ever hand is best for you, with the other use it to control tension on the loose part of the belt). Taking of your watch comes in handy.

8) With the new belt, unfold it from the packaging and find the largest loop. Guide this loop down around the engine pulley. ***Make sure you do not twist the belt***. Once it is around the engine pulley, guide the belt around the steering wheel pump pulley. You will need to use both hands at this point, left hand holding and guiding the belt around steering wheel pump pulley and the right hand coming in from the front (see next picture) holding the belt at the bottom most to the AC pulley. Guide the belt up around the topside of the AC pulley and then partially hook it around the Alternator pulley.
9) ***Now check your work***. Make sure that the belt is properly seated on all pulleys (except the alternator). Once satisfied that all is in order squeeze the belt completely over the alternator pulley.
10) Using the 16mm wrench again unlock the tensioner and slowly allow it to reapply tension to the belt.
11) Remove all tools from engine compartment and test your work (get in car)
12) Return the two fuel lines to under the plastic clip
13) Close hood
This took me 20 minutes to do. I’m not mechanically inclined but I did my R&D before trying.
This is the front side view of the steering pump, AC and top (blurry) alternator. You can see there is a lot of space.

Reference:
BEW belt (different from ALH) as I was not able to find a drawing/schematic here is a side view picture of what and how you will find.

Well I was finally able to find a real true side view of the alternator belt and how it is routed. Yes this is from a gas 1.8T and not a diesel sipping sibling but I do have the permission from the owner to post it here and it does explain nicely how the belt is laid out. Positions of the main pulley, alternator pulley, PS pulley, AC pulley and belt tensioner are clearly viewable. Even the locking pin holes used to lock the tensioner can be seen.

(more pictures = better understanding. ie nothing is lost in the translation)
-30-
Tools needed: 16mm open face wrench & tensioner locking pin.
Serpentine belt for BEW is different from ALH so be careful that you get the right part.
Done on my 04 Bora from the top only!
Steps
1) Open hood
2) Where indicated by red arrows, unclip the fuel lines so they can freely move. The 16mm wrench will go where the yellow arrow is pointing to.
I took a few pictures before and afterwards. This is where the fuel lines need to be unclipped. You need to do this so to allow free movement of the wrench as you move the tensioner to where you can lock it.
Again, the red arrows point to the fuel lines that need to be unclipped. The yellow arrow is where the 16mm wrench goes. You will pull the wrench with your hand passing underneath the fuel lines.
3) Using the 16mm wrench mate it to the top notch on the tensioner (use the pathway already indicated by the yellow arrows)
4) Ready your tensioner lock pin
5) And pull on the wrench until you lock the tensioner (yes, I used an Allen key)
6) Found to be the easiest to remove the serpentine belt from around the alternator pulley first, by pulling it to the left, next do the AC pulley and then the power steering pump pulley.
7) Now reach down with one hand and separate the belt from the engine pulley (look first and then reach down with which ever hand is best for you, with the other use it to control tension on the loose part of the belt). Taking of your watch comes in handy.
8) With the new belt, unfold it from the packaging and find the largest loop. Guide this loop down around the engine pulley. ***Make sure you do not twist the belt***. Once it is around the engine pulley, guide the belt around the steering wheel pump pulley. You will need to use both hands at this point, left hand holding and guiding the belt around steering wheel pump pulley and the right hand coming in from the front (see next picture) holding the belt at the bottom most to the AC pulley. Guide the belt up around the topside of the AC pulley and then partially hook it around the Alternator pulley.
9) ***Now check your work***. Make sure that the belt is properly seated on all pulleys (except the alternator). Once satisfied that all is in order squeeze the belt completely over the alternator pulley.
10) Using the 16mm wrench again unlock the tensioner and slowly allow it to reapply tension to the belt.
11) Remove all tools from engine compartment and test your work (get in car)
12) Return the two fuel lines to under the plastic clip
13) Close hood
This took me 20 minutes to do. I’m not mechanically inclined but I did my R&D before trying.
This is the front side view of the steering pump, AC and top (blurry) alternator. You can see there is a lot of space.
Reference:
BEW belt (different from ALH) as I was not able to find a drawing/schematic here is a side view picture of what and how you will find.
Well I was finally able to find a real true side view of the alternator belt and how it is routed. Yes this is from a gas 1.8T and not a diesel sipping sibling but I do have the permission from the owner to post it here and it does explain nicely how the belt is laid out. Positions of the main pulley, alternator pulley, PS pulley, AC pulley and belt tensioner are clearly viewable. Even the locking pin holes used to lock the tensioner can be seen.
(more pictures = better understanding. ie nothing is lost in the translation)
-30-
Last edited:
