
paramedick
TDIClub Enthusiast, Vendor
Since I haven't seen a writeup for this, I thought I would do one.
Note: While the New Beetle is an A4 vehicle, the clearances are very tight in the area. I was not able to remove the alternator by link below. Others have had more luck than I have.
First, put the car up on ramps or jackstands to give you room to work. Remove the bellypan, and the right sideskirt. BTW, you will probably find the missing pulley in the bellypan.
I found it easier to remove the lower intercooler tube just to give me working room, but not absolutely necessary. One 10 mm nut and two clamps.
I followed Wingnuts excellent How-to on removing the alternator. No use reinventing the wheel, so here is the link.
http://forums.tdiclub.com/showthread.php?p=932019
Not mentioned in the alternator removal thread is to remove the hoses near the cooling fans from their clamps. You may find that gives you more room.
When you have your alternator out, you will probably see something like this.

Stand the alternator on the rear portion on a sturdy work surface. You will need to remove the old portion threaded onto the alternator. Metalnerd makes an excellent set of tools to accomplish this, as seen below.

You will need a set of vice grips or a pipe wrench as shown below. Insert the triple square bit to hold the alternator from spinning. Using your pipe wrench to hold the failed portion, turn the ratchet clockwise to unscrew the failed part.

This is what you end up with.

This is the new part you need to replace the pulley. EDIT: 022 903 119 C is new part #.

Before you put the new pulley on the alternator, you have to remove a protective cap. A small screwdriver will do this nicely.

Put the new pulley onto the alternator, and spin down until it is snug.

Using the Metalnerd spline tool and triple square tool, tighten the pulley to the alternator. No torque value is in Bentley, so I used "good and snug". . Use a wrench to hold the spline tool when tightening. Torque to 59 ft/lb (80 nm). Thanks MOGolf for the torque value.

Snap the protective plastic cap back in place to protect the bearing and threads.
Now is the time to replace the alternator in the car. One suggestion to make it easier. Place the alternator ear that has the threaded insert into a vise. Put a socket over one side, and tighten the vise to move the threaded insert, as seen below. Suddenly, it's very easy to put the alternator in the car. Otherwise, very tight tolerances to replace in mount. Don't worry, the inserts will be back in the right place when you tighten the mounting bolts. A large pin punch is very helpful in aligning the ears for bolt insertion. You can do the same thing for the AC compressor with a C Clamp and socket for ease of installation. I've also had success with a socket and a large pair of channel lock pliers.

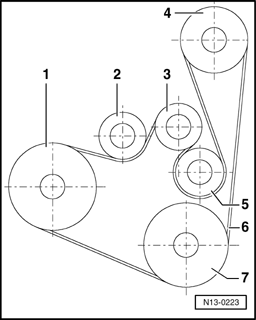
Follow the removal instructions in reverse order to put everything back in place. Put your new serpentine belt in place. (Image stolen from MoGolf) One thing I've encountered. I had a car that the serpentine belt actually SHRANK due to the heat generated during failure/slipping. I know this is true because I put the new belt on a few months ago. Plan on replacing the belt with a new one.
Torque specs you need:
Alternator mounting bolts 18 ft/lbs
AC compressor mounting bolts 33 ft/lbs
Serpentine belt tensioner 18 ft/lbs
Special thanks to Wingnut for the removal instruction, and Chuck (Metalnerd) for the great tools!
Note: While the New Beetle is an A4 vehicle, the clearances are very tight in the area. I was not able to remove the alternator by link below. Others have had more luck than I have.
First, put the car up on ramps or jackstands to give you room to work. Remove the bellypan, and the right sideskirt. BTW, you will probably find the missing pulley in the bellypan.
I found it easier to remove the lower intercooler tube just to give me working room, but not absolutely necessary. One 10 mm nut and two clamps.
I followed Wingnuts excellent How-to on removing the alternator. No use reinventing the wheel, so here is the link.
http://forums.tdiclub.com/showthread.php?p=932019
Not mentioned in the alternator removal thread is to remove the hoses near the cooling fans from their clamps. You may find that gives you more room.
When you have your alternator out, you will probably see something like this.
Stand the alternator on the rear portion on a sturdy work surface. You will need to remove the old portion threaded onto the alternator. Metalnerd makes an excellent set of tools to accomplish this, as seen below.
You will need a set of vice grips or a pipe wrench as shown below. Insert the triple square bit to hold the alternator from spinning. Using your pipe wrench to hold the failed portion, turn the ratchet clockwise to unscrew the failed part.
This is what you end up with.
This is the new part you need to replace the pulley. EDIT: 022 903 119 C is new part #.
Before you put the new pulley on the alternator, you have to remove a protective cap. A small screwdriver will do this nicely.
Put the new pulley onto the alternator, and spin down until it is snug.
Using the Metalnerd spline tool and triple square tool, tighten the pulley to the alternator. No torque value is in Bentley, so I used "good and snug". . Use a wrench to hold the spline tool when tightening. Torque to 59 ft/lb (80 nm). Thanks MOGolf for the torque value.
Snap the protective plastic cap back in place to protect the bearing and threads.
Now is the time to replace the alternator in the car. One suggestion to make it easier. Place the alternator ear that has the threaded insert into a vise. Put a socket over one side, and tighten the vise to move the threaded insert, as seen below. Suddenly, it's very easy to put the alternator in the car. Otherwise, very tight tolerances to replace in mount. Don't worry, the inserts will be back in the right place when you tighten the mounting bolts. A large pin punch is very helpful in aligning the ears for bolt insertion. You can do the same thing for the AC compressor with a C Clamp and socket for ease of installation. I've also had success with a socket and a large pair of channel lock pliers.
Follow the removal instructions in reverse order to put everything back in place. Put your new serpentine belt in place. (Image stolen from MoGolf) One thing I've encountered. I had a car that the serpentine belt actually SHRANK due to the heat generated during failure/slipping. I know this is true because I put the new belt on a few months ago. Plan on replacing the belt with a new one.
Torque specs you need:
Alternator mounting bolts 18 ft/lbs
AC compressor mounting bolts 33 ft/lbs
Serpentine belt tensioner 18 ft/lbs
Special thanks to Wingnut for the removal instruction, and Chuck (Metalnerd) for the great tools!
Last edited:
")