MCaesar
New member
I spent alot of time looking around the internet trying to find a way to change my 12v power outlet to always on. I start/stop my car quite frequently, and with the outlet being tied to the ignition, my phone's battery was not enjoying the constant power changes. I noticed others looking to accomplish the same thing but there didn't seem to be any How To for this specific modification, so I figured I'd put up a quick and easy guide on how to fix this yourself.
I did this on my 09 Jetta, so that's what the guide is based off of, but for those of you with other years/models, I would assume the general idea can be applied to you as well, the only difference would be the fuse locations, wire color coding, and the panels you'll need to remove to get access to the fuse box.
Tools required:
Torx driver (T20 was the size I needed for my Jetta)
Flathead screwdriver (or other device for prying)
Voltmeter
Needle-nose pliers
Fuse pin removal tool (not required, but makes things easier I would guess)
I didn't take pictures (didn't think about it till after everything was put together), but if anybody needs more specific/visual info, just let me know.
1. Remove fuse cover by driver door. Locate fuse 42 (verify for your car before proceeding using your car's user manual) and remove it.
2. Loosen fuse box by unscrewing top and bottom bolts.
3. Disconnect head-light switch (models may vary, however I believe most can be removed by setting the switch to the 'off' position, pushing in on the selector, rotating the selector clockwise, then pulling on the module. Use a flathead screwdriver to press the locking tab and remove the cable from the back)
4. Remove screw from inside of light switch module space. Should be located on the top side of the hole.
5. Pull off the trim above the steering wheel by the cleer plastic window for the tach/displays. This will give you access to a screw holding panel in front of fuse box. Remove this screw.
6. On the underside of the dash, by the pedals, remove the screws for the panel in front of the fuse box, remove the panel. (When removing this panel, there is a clip or 2 keeping it in place, use moderate force to get the panel off. Also there is a metal clip on the side by the fuse box, make sure that clears the plastic on the side, otherwise it will catch when you're trying to pull off the panel.)
7. Disconnect the dimmer switch from the panel and set the panel aside.
8. (This may be optional, not sure if this was absolutely necessary, I just did it because I wasn't completely sure how much access I'd have with it still in place) There is a black panel on the underside of the dash above the pedals (has the foot-illumination light, and the computer molex connector in it), remove the screws holding this up. You can just let the panel hang down, no need to disconnect the light or the computer connection.
9. Using a flathead, pry off the back cover of the fuse box. There 4 or 5 clips, so make sure they're all disconnected, don't force it.
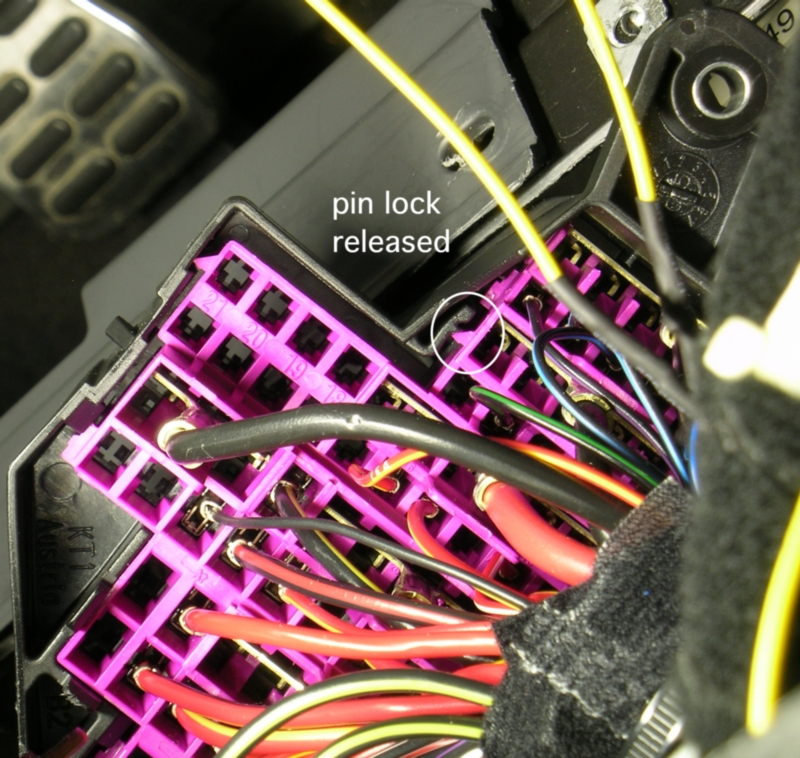
10. The fuse box will not have much play considering the large bundle of wires connected to it, but maneuver it as best you can to work with the back-inside of the fuse box. Near the top left, in between the fuse box housing and the pink grid-box, there will be a small clip. Use a flathead to pry this open and pull the pink box down. This clip was a PITA, but once it's open the pink box will slide down a bit. The pink grid-box acts as a locking mechanism for the fuse connections, by sliding it down, you're unlocking them.
11. Locate fuse 42 (again, check your diagram before proceeding, make sure you're working with the right fuse for the 12v power outlets). On the back of this fuse there should be a red/black wire coming out from it. This wire is the hot for the outlet. Using the fuse pin removal tool (if you have it), or a small flathead and the needle-nose pliers, remove the fuse from the fuse box. What you will have is a small metal 'box' at the end of the red/black wire.
12. If you have electronic lumbar support, fuse 36 should work for you. Otherwise, locate fuse 35. Using a voltmeter, verify you have 12v going through with the ignition off (remove the keys completely just to be absolutely sure). Once verified, place the fuse you removed from 42 into 35.
13. Test the connection by putting the 20amp fuse into slot 35, then plug something into your outlet. You should be getting power with the car off.
14. Making sure to slide the pink grid-box back up to lock your fuses into place, reverse the steps from step 9 to put your car back to it's former glory")
15. Enjoy
In the event your wire isn't red/black coming out of 42 (or appropriate fuse #), you will need to get access to the 12v power outlet's plug/wires. For my vehicle, I needed to pry loose the gear selector cover, which gave me access to 2 screws. Removing these screws allowed me to get to the underside of the plastic tray with the 12v P.O. My outlet is lit, so there were 3 connections/wires. The one closest to the lighting module is the hot for the light, the center is the hot for the outlet, and the 3rd is the ground. Your hot wire (most likely middle) should match the color scheme of the wire in the back of the fuse box for your 12v outlet.
This is my first post on the forums. Glad to be a TDI owner, and hopefully this helps others make this modification with less research time and guesswork than it took me.
I did this on my 09 Jetta, so that's what the guide is based off of, but for those of you with other years/models, I would assume the general idea can be applied to you as well, the only difference would be the fuse locations, wire color coding, and the panels you'll need to remove to get access to the fuse box.
Tools required:
Torx driver (T20 was the size I needed for my Jetta)
Flathead screwdriver (or other device for prying)
Voltmeter
Needle-nose pliers
Fuse pin removal tool (not required, but makes things easier I would guess)
I didn't take pictures (didn't think about it till after everything was put together), but if anybody needs more specific/visual info, just let me know.
1. Remove fuse cover by driver door. Locate fuse 42 (verify for your car before proceeding using your car's user manual) and remove it.
2. Loosen fuse box by unscrewing top and bottom bolts.
3. Disconnect head-light switch (models may vary, however I believe most can be removed by setting the switch to the 'off' position, pushing in on the selector, rotating the selector clockwise, then pulling on the module. Use a flathead screwdriver to press the locking tab and remove the cable from the back)
4. Remove screw from inside of light switch module space. Should be located on the top side of the hole.
5. Pull off the trim above the steering wheel by the cleer plastic window for the tach/displays. This will give you access to a screw holding panel in front of fuse box. Remove this screw.
6. On the underside of the dash, by the pedals, remove the screws for the panel in front of the fuse box, remove the panel. (When removing this panel, there is a clip or 2 keeping it in place, use moderate force to get the panel off. Also there is a metal clip on the side by the fuse box, make sure that clears the plastic on the side, otherwise it will catch when you're trying to pull off the panel.)
7. Disconnect the dimmer switch from the panel and set the panel aside.
8. (This may be optional, not sure if this was absolutely necessary, I just did it because I wasn't completely sure how much access I'd have with it still in place) There is a black panel on the underside of the dash above the pedals (has the foot-illumination light, and the computer molex connector in it), remove the screws holding this up. You can just let the panel hang down, no need to disconnect the light or the computer connection.
9. Using a flathead, pry off the back cover of the fuse box. There 4 or 5 clips, so make sure they're all disconnected, don't force it.
10. The fuse box will not have much play considering the large bundle of wires connected to it, but maneuver it as best you can to work with the back-inside of the fuse box. Near the top left, in between the fuse box housing and the pink grid-box, there will be a small clip. Use a flathead to pry this open and pull the pink box down. This clip was a PITA, but once it's open the pink box will slide down a bit. The pink grid-box acts as a locking mechanism for the fuse connections, by sliding it down, you're unlocking them.
11. Locate fuse 42 (again, check your diagram before proceeding, make sure you're working with the right fuse for the 12v power outlets). On the back of this fuse there should be a red/black wire coming out from it. This wire is the hot for the outlet. Using the fuse pin removal tool (if you have it), or a small flathead and the needle-nose pliers, remove the fuse from the fuse box. What you will have is a small metal 'box' at the end of the red/black wire.
12. If you have electronic lumbar support, fuse 36 should work for you. Otherwise, locate fuse 35. Using a voltmeter, verify you have 12v going through with the ignition off (remove the keys completely just to be absolutely sure). Once verified, place the fuse you removed from 42 into 35.
13. Test the connection by putting the 20amp fuse into slot 35, then plug something into your outlet. You should be getting power with the car off.
14. Making sure to slide the pink grid-box back up to lock your fuses into place, reverse the steps from step 9 to put your car back to it's former glory
15. Enjoy
In the event your wire isn't red/black coming out of 42 (or appropriate fuse #), you will need to get access to the 12v power outlet's plug/wires. For my vehicle, I needed to pry loose the gear selector cover, which gave me access to 2 screws. Removing these screws allowed me to get to the underside of the plastic tray with the 12v P.O. My outlet is lit, so there were 3 connections/wires. The one closest to the lighting module is the hot for the light, the center is the hot for the outlet, and the 3rd is the ground. Your hot wire (most likely middle) should match the color scheme of the wire in the back of the fuse box for your 12v outlet.
This is my first post on the forums. Glad to be a TDI owner, and hopefully this helps others make this modification with less research time and guesswork than it took me.
Last edited: